background image

15

Model 236B BEVELMASTER™

92-1306 : Rev. 090225

BEVEL/FACE TOOL BLOCK

The Bevel/Face Tool Block is designed with a 37.5° angle so that a Straight Tool Bit
may be used for beveling and so that when using the 37.5° Facing Tool Bit, the Tool
Bit height is adjustable.

Compound Bevel Tool Bits, or J-Bevel Tool Bits, if used, should also be in-
stalled in these Tool Block’s.

The Bevel/Face Tool Block with a Beveling Tool Bit Installed

The Bevel/Face Tool Block with a Facing Tool Bit Installed

Headstock

Tool Block

Beveling Tool Bit

Headstock

Tool Block

Pipe OD

Facing Tool Bit

Pipe OD

Summary of Contents for BEVELMASTER 236B

Page 1: ...ESCRIPTION 6 SPECIFICATIONS 7 MAINTENANCE 10 OPERATION 13 CUTTING SPEEDS 20 STANDARD JAW BLOCKS RAMPS AND SPACERS 21 EXTENSION KIT JAW BLOCKS RAMPS AND SPACERS 22 TOOL BITS 23 TROUBLE SHOOTING 24 ACCESSORIES 26 ILLUSTRATED PARTS BREAKDOWN 27 TOOL BIT RESHARPENING POLICY Inside Back Cover WARRANTY INFORMATION Inside Back Cover ...

Page 2: ...Copyright 2009 Proprietary property of TRI TOOL Inc No reproduction use or duplication of the information shown hereon is permitted without the express written consent of TRI TOOL Inc ...

Page 3: ...Do not operate cutting tools without eye protection Dress properly Do not wear loose clothing or jewelry They can be caught in rotat ing and moving parts Avoid slippery floors or wear nonskid footwear If you have long hair wear protective hair covering to contain it WORK AREA Keep the work area clean Cluttered work areas and benches invite injuries Consider the work area environment Keep the area ...

Page 4: ...ut of all cutting fluids and water Hydraulic drives Observe proper procedures for electrically driven power sources Avoid damage to hydraulic lines Keep quick disconnects clean Grit contamination causes malfunctions Air tools Check the exhaust muffler Broken or damaged mufflers can restrict air flow or cause excessive noise Use air motors only with a filtered lubricated and regulated air supply Di...

Page 5: ...ere designed Do not reach into rotating equipment Do not reach into the rotating head stock to clear chips to make adjustments or to check surface finish A machine designed to cut steel will not stop for a hand or an arm Handle chips with care Chips have very sharp edges and are hot Do not try to pull chips apart with are hands they are very tough Avoid unintentional starts Do not carry or handle ...

Page 6: ...ESCRIPTION The Model 236B BEVELMASTER is a portable I D mount machine tool for beveling facing and or counterboring 12 through 36 pipe The tool is configured with an in line feed knob and hydraulic drive motor at a right angle to the lathe head ...

Page 7: ...tubing having an inside diameter of 11 43 290 4 mm minimum with a maximum outside diameter of 36 00 914 4mm The expanding Mandrel provides fast accurate self centering and alignment to the pipe or tubing to be machined The Lathe accepts it s own torque through the Mandrel generated by machining operations No additional torque restraining devices are required The Model 236B is provided with a lathe...

Page 8: ...nintentional starts Do not carry or handle tools with your hand on the operating switches or levers Do not lay the tool down in a manner which will start the drive Do not allow the tool to flip around or move when adjusting or changing tool bits Store idle tools Disconnect tools from the power source and store the tools in a safe place Remove tool bits for safe handling of the tool 5 00 127 0 mm F...

Page 9: ...m in the range listed Tubing or pipe with a greater wall thickness may be handled provided the I D is greater than 11 43 290 4 mm and the O D is less than 36 00 914 4 mm Contact Tri Tool for heavier wall procedures Counterboring Operations The tool will counterbore pipe and tubing with an I D range of 11 43 290 4 mm to 35 00 889 0 mm ...

Page 10: ... as necessary Wipe the machine clean of cutting fluids dirt and grime and then coat it with a light film of oil Weekly maintenance should include checking the mandrel and wiping the oil and grime from the surface and then relubricating it with a light film of oil Re lubricate the Main Bearing via a grease fitting on the Headstock Re lubricate the Main Gear via a grease fitting on the Main Housing ...

Page 11: ...vice for a signifi cant period of time 30 days or more it should be thoroughly cleaned lubri cated and sprayed with a rust preventative prior to storage The twelve 12 cap screws that hold the main torque housing Item A to the main housing are to be torqued to 80 ft lbs 108 N m The four 4 cap screws that hold the 236B BEVELMASTER to the lathe stand Item B are to be torqued to 100 ft lbs 136 N m Bus...

Page 12: ...BRICATION The drive gears require a grease such as Chevron Ultra Duty grease EP NLGI 2 P N 68 0024 The slide rails and tool blocks require a light oil such as SAE 10 light machine oil A light film of all purpose grease may be used but it must be checked for grit contamination frequently The bearings in the hydraulic motor s are sealed and do not require any lubrication Shoulder Screw Item C Gear C...

Page 13: ...WARNING PINCH POINT Remove the Lathe Stand Feet Supports BEFORE operating ...

Page 14: ...nce and may constitute abuse of this machine and therefore voids the TRI TOOL Inc factory warranty The three 3 Tool Blocks have been optimized for the various operations and to reduce Tool Bit wear thus the Tool Bit s must be installed in the correct Tool Block s Be sure that the Tool Bit s sits flush against the Slot and then tighten the Locking Set Screws Be sure that the cutting edge of the Bev...

Page 15: ...at when using the 37 5 Facing Tool Bit the Tool Bit height is adjustable Compound Bevel Tool Bits or J Bevel Tool Bits if used should also be in stalled in these Tool Block s The Bevel Face Tool Block with a Beveling Tool Bit Installed The Bevel Face Tool Block with a Facing Tool Bit Installed Headstock Tool Block Beveling Tool Bit Headstock Tool Block Pipe OD Facing Tool Bit Pipe OD ...

Page 16: ...ly check for burrs and remove them with a file Install the machine into the pipe In order to avoid cutting the Jaw Blocks with the tool bits during the machining operation the Jaw Blocks on the Mandrel Head must be installed beyond the final end preparation location Tighten the Draw Rod clockwise to force the Jaw Blocks out against the inside diameter of the pipe Verify a minimum clearance of 1 8 ...

Page 17: ...e closer together The actual machining operation will begin when the first Tool Bit makes con tact with the pipe If the pipe end is not square with the pipe axis the Tool Bit will contact only a small segment of the pipe during each revolution To avoid Tool Bit damage the feed rate should be very slow until the Tool Bit has contacted the pipe continually for at least one full revolution Continue r...

Page 18: ...re dull or broken Damage or worn Tool Bits are evidenced by increased feed pressure visual obser vations poor surface finish etc MANDREL STOP With the Mandrel Stops installed the feed cannot be retracted to the point of disengaging from the threads When installing the Machine and the Mandrel as a unit the Mandrel Stops are installed in the Mandrel before the Mandrel has been secured in the pipe Do...

Page 19: ...19 Model 236B BEVELMASTER 92 1306 Rev 090225 Mandrel Stop Location Mandrel Stop 2 ...

Page 20: ...applied Use 300 surface inches per minute 7620 surface millimeters per minute for Aluminum and some thin wall mild steel and tube with coolants Pipe Size RPM for 200 in min 5080 mm min RPM for 250 in min 6350 mm min RPM for 300 in min 7620 mm min 36 36 00 914 4 mm 2 2 3 34 34 00 863 6 mm 2 2 3 32 32 00 812 8 mm 2 3 3 30 30 00 762 0 mm 2 3 3 28 28 00 711 2 mm 2 3 3 26 26 00 660 4 mm 2 3 4 24 24 00 ...

Page 21: ...mm thru 484 7 mm 19 070 thru 21 546 484 3 mm thru 547 3 mm 21 433 thru 23 913 544 4 mm thru 607 4 mm 23 800 thru 26 283 604 5 mm thru 667 6 mm 26 169 thru 28 654 664 7 mm thru 727 8 mm 28 540 thru 31 026 724 9 mm thru 788 1 mm 30 912 thru 33 400 785 2 mm thru 848 3 mm 33 286 thru 35 774 845 5 mm thru 908 6 mm 08 0388 48 0973 08 0389 48 0973 48 0973 48 0973 08 0390 08 0391 48 0973 08 0393 08 0390 4...

Page 22: ...hru 47 644 1146 9 mm thru 1210 2 mm 47 530 thru 50 021 1207 3 mm thru 1270 5 mm 49 907 thru 52 399 1267 6 mm thru 1330 9 mm 52 284 thru 54 776 1328 0 mm thru 1391 3 mm 54 662 thru 57 154 1388 4 mm thru 1451 7 mm 57 000 thru 59 532 1447 8 mm thru 1512 1 mm 08 0388 48 0973 08 0552 08 0389 48 0973 08 0552 08 0390 48 0973 08 0552 48 0973 08 0552 48 0973 08 0552 08 0392 08 0391 48 0973 08 0552 08 0854 ...

Page 23: ...terbore 4 1 P N 99 1939 8 50 to 24 00 216 0mm to 609 6mm DIA Range Tool Bit Counterbore 4 1 P N 99 2090 24 00 to 42 00 609 6mm to 1066 8mm DIA Range Tool Bit Beveling 37 5 P N 99 0009 Tool Bit Facing P N 99 0016 Tool Bits for special applications are quoted upon request ...

Page 24: ...quired A dull Tool Bit is causing surface hardening conditions Stainless pipe or tubing There is scale or other foreign matter on the pipe or tube which is dulling the tool bit at the start of the cut The tool bit is incorrect for the material being cut Problem The surface finish is rough The tool bit is dull chipped etc Metal build up on the cutting edge of the tool bit is creating a false cuttin...

Page 25: ...er The hydraulic supply pressure is too low The hydraulic filter is plugged The hydraulic line size is insufficient The hydraulic line is too long Problem The tool bit will not reach the work Incorrect tool blocks are installed for the size of the pipe or tube being worked on Incorrect tool bit is installed Problem The hydraulic motor will not start The hydraulic power supply is shut off The hydra...

Page 26: ...are recommended for use with the Model 236B BEVELMASTER and are available from TRI TOOL INC 1 Single Point Module Kit 2 I D Tracking Module Kit 3 Miter Mandrel Head Kit 4 Jaw Block Extension Kit 36 60 5 Miter Mandrel Extension Kit 36 60 6 Model 765RVC Hydraulic Power Supply ...

Page 27: ...27 Model 236B BEVELMASTER 92 1306 Rev 090225 MODEL 236B BEVELMASTER P N 01 1850 ILLUSTRATED PARTS BREAKDOWN 1 2 3 4 5 6 7 8 9 10 11 12 13 14 15 16 17 18 19 ...

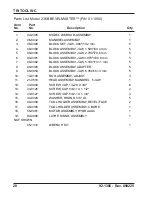
Page 28: ...0 8 mm 5 7 08 0392 BLOCK ASSEMBLY JAW 5 160 131 1 mm 5 8 08 0393 BLOCK ASSEMBLY ADAPTER 5 9 08 0854 BLOCK ASSEMBLY JAW 6 350 161 3 mm 5 10 14 0108 ROD ASSEMBLY ADJUST 3 11 21 0518 HEAD ASSEMBLY MANDREL 5 JAW 1 12 33 0040 SCREW CAP 1 4 20 X 3 4 6 13 33 0126 SCREW CAP 5 8 11 X 1 1 2 2 14 33 0127 SCREW CAP 5 8 11 X 1 3 4 3 15 34 0320 WASHER HRDND 5 8 I D 5 16 49 0394 TOOL HOLDER ASSEMBLY BEVEL FACE 2...

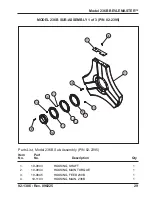
Page 29: ...EMBLY 1 of 3 P N 02 2395 Parts List Model 236B Sub Assembly P N 02 2395 Item Part No No Description Qty 1 19 0843 HOUSING SHAFT 1 2 19 0844 HOUSING MAIN TORQUE 1 3 19 0845 HOUSING FEED 230B 1 4 19 1193 HOUSING MAIN 236B 1 8 9 14 16 17 30 40 41 42 43 46 51 52 64 66 ...

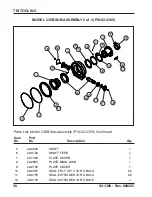
Page 30: ...Part No No Description Qty 5 20 0628 SHAFT 1 6 20 0720 SHAFT FEED 1 7 24 1468 PLATE COVER 1 8 24 2692 PLATE MAIN 236B 1 9 24 2702 PLATE COVER 1 10 28 0057 SEAL FELT 1 8 X 3 16 X BULK 62 11 28 0176 SEAL EXTRUDED 3 16 X BULK 62 12 28 0176 SEAL EXTRUDED 3 16 X BULK 7 1 2 4 10 11 13 18 19 21 20 23 29 31 33 35 36 38 39 44 49 53 54 61 62 63 65 22 ...

Page 31: ...rt No No Description Qty 13 28 0254 SEAL 2 750 ID X 3 500 OD X 375 2 14 28 0262 O RING 7 734 ID X 139 W 1 15 29 0020 BRG BALL 3 4 X 1 5 8 X 7 16 4 16 29 0337 BRG TAPERED CONE 7 75 ID X 906 1 17 29 0338 BRG TAPERED CUP 9 50 OD X 688 1 18 29 0339 BRG TAPER CONE 9 125 ID X 847 1 3 5 6 7 12 15 24 25 26 27 28 32 34 37 45 47 48 50 55 56 57 58 59 60 67 24 25 ...

Page 32: ... 30 32 0046 PIN ROLL 3 16 DIA X 2 8 31 33 0029 SCREW CAP 10 24 X 5 8 2 32 33 0044 SCREW CAP 1 4 20 X 1 1 2 4 33 33 0046 SCREW CAP 1 4 20 X 2 24 34 33 0047 SCREW CAP 1 4 20 X 2 1 4 8 35 33 0053 SCREW CAP 5 16 18 X 5 8 2 36 33 0071 SCREW CAP 3 8 16 X 1 16 37 33 0092 SCREW CAP 7 16 14 X 1 3 4 8 38 33 0095 SCREW CAP 7 16 14 X 2 1 2 12 39 33 0103 SCREW CAP 1 2 13 X 3 4 2 40 33 0109 SCREW CAP 1 2 13 X 2...

Page 33: ...WORM GEAR SET 230B 1 55 39 0796 GEAR FEED 60T 1 56 39 0798 GEAR IDLER 24T 1 57 39 0867 GEAR PINION 24T 1 58 41 0131 HANDLE FEED 5 59 42 0017 KNOB SPHERICAL 1 3 8 DIA 5 60 42 0185 KNOB FEED 1 61 43 0481 COVER WORM GEAR 2 62 43 0482 COVER DUST 1 63 43 0746 COVER MAIN TORQUE HOUSING 2 64 45 0257 BUSHING 1 65 45 0303 BUSHING REAR 1 66 54 0375 FITTING GREASE 2 67 54 0554 PLUG HOLD 1 3 4 DIA 2 ...

Page 34: ... MOTOR ASSEMBLY P N 56 0061 1 33 0106 SCREW CAP 1 2 13 X 1 1 4 2 2 54 0002 ADAPTER 2 3 54 0333 COUPLER QD HYD DRIPLESS FEMALE 1 4 54 0334 COUPLER QD HYD DRIPLESS MALE 1 5 55 0156 HOSE ASSEMBLY HYDRAULIC 2 6 56 0002 MOTOR HYDRAULIC 1 REF 31 0001 KEY WOODRUFF 1 4 X 1 DIA 1 NOT SHOWN 54 0335 DUST PLUG DRIPLESS 2 1 2 3 4 5 6 REF ...

Page 35: ...o No Description Qty 1 10 2 3 4 5 6 8 11 4 7 9 1 13 0443 MANDREL 1 2 20 0719 SHAFT WRENCH 1 3 35 0448 NUT FEED 1 4 33 0055 SCREW CAP 5 16 18 X 7 8 20 5 31 0160 KEY MANDREL 2 6 44 0502 SPACER 1 7 34 0148 WASHER 1 8 30 2935 INSERT THREADED 1 9 33 0531 SCREW SET 3 8 16 X 3 4 3 10 31 0219 KEY MANDREL STOP 2 11 33 2392 SCREW MOD 2 ...

Page 36: ...iption Qty 1 2 3 4 5 6 7 8 9 10 11 1 21 0520 HEAD MANDREL 1 2 24 1621 PLATE BUTT 1 3 24 1465 PLATE RETAINING 5 4 33 0287 SCREW BUTTON HEAD 1 4 20 X 3 4 15 5 23 0319 DRAW ROD 1 6 35 0538 NUT HEX 1 7 31 0144 KEY RAMP 5 8 33 0040 SCREW CAP 1 4 20 X 3 4 10 9 48 0973 BLOCK RAMP 5 10 33 0109 SCREW CAP 1 2 13 X 2 8 11 32 0533 PIN DOWEL PULL 4 ...

Page 37: ...7 SCREW CAP 5 16 18 X 1 1 4 4 2 33 0530 SCREW SET CUP POINT 3 8 16 X 5 8 10 3 35 0551 NUT T SLOT PLATE 2 4 49 0365 HOLDER TOOL BEVEL FACE 1 Parts List C Bore Tool Holder Assembly P N 49 0395 Item Part No No Description Qty 1 33 0057 SCREW CAP 5 16 18 X 1 1 4 4 2 33 0530 SCREW SET CUP POINT 3 8 16 X 5 8 10 3 35 0551 NUT T SLOT PLATE 2 4 49 0366 HOLDER TOOL C BORE 1 1 2 3 4 ...

Page 38: ...38 TRI TOOL INC 92 1306 Rev 090225 LATHE STAND ASSEMBLY P N 60 0099 1 2 3 4 5 6 7 8 9 10 11 ...

Page 39: ... HD CAP 1 2 13 X 3 2 3 34 0020 WASHER FLAT SAE 1 2 NOMINAL 14 4 35 0254 NUT LK 1 2 13 7 5 47 1222 BRACKET LIFTING 1 6 60 0100 LATHE STAND UPPER 236B 1 7 60 0098 LATHE STAND LOWER 236B 1 8 33 2132 SCREW HEX HD CAP 1 2 13 X 4 1 9 33 0114 SCREW CAP 1 2 13 X 3 1 4 4 10 63 0248 ARM SUPPORT LEFT 1 11 63 0249 ARM SUPPORT RIGHT 1 NOT SHOWN 30 3093 TAPE HAZARD YELLOW BLACK 3 36 ...

Reviews: