background image

XF 100

5

3.  Seguire le istruzioni del vostro dispositivo esterno per ricercare lo speaker.
4.  Ricercare lo speaker nominato “XF 100” o “MT3152”e inserire il PIN “0000” se richiesto.
5.  Ad accoppiamento avvenuto si avvertira un suono di notifica.

Note:

-  L’altoparlante Bluetooth

®

 funziona solamente con una connessione alla volta, la con-

nessione non può essere interrotta durante il normale funzionamento.

-  Quando l’accoppiamento Bluetooth

®

 con dispositivi esterni fallisce, eliminare un 

altro dispositivo Bluetooth

®

 nell’elenco delle connessioni, riavviare l’altoparlante 

Bluetooth

®

 e cercare nuovamente il segnale.

La vicinanza di apparecchi TV, lampade al neon o altri elettrodomestici può provocare 

disturbi nella ricezione, in questo caso allontanate l’apparecchio.

COMANDI DISPONIBILI IN MODALITÀ BLUETOOTH®

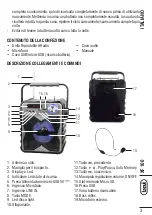
-  Premere una volta il tasto 

9

(11) per passare al brano precedente, premere una volta 

il tasto 

:

(13) per passare al brano successivo.

-  Premere il tasto



(12) per mettere in pausa, per riprendere la riproduzione musica-

le premere nuovamente



(12).

FUNZIONAMENTO MICRO SD CARD/USB

1.  Inserire una scheda Micro SD nella slot (15) o una schiavetta USB nella presa (16) e 

accendere l’apparecchio.

2.  La riproduzione partirà in automatico.
3.  Premere una volta il tasto 

9

(11) per passare al brano precedente, premere una volta il 

tasto 

:

(13) per passare al brano successivo.

4.  Premere il tasto



(12) per mettere in pausa, per riprendere la riproduzione premerlo 

nuovamente.

FUNZIONAMENTO LINE IN

1.  Premere il tasto MODE(8) più volte fino a quando sul display (3) comparirà la scritta 


“LINE”.

2.  Collegare una qualsiasi unità provvista di uscita audio tramite apposito cavo Jack da 

3,5mm all’ingresso LINE (7).

3.  Regolare il dispositivo esterno dai propri comandi.

CARATTERISTICHE TECNICHE 

Potenza Totale: ...................... 10W
Rapporto S/N: ....................... ≥95dB
Distorsione: .......................... ≤1%
Risposta in frequenza: ........... 100Hz - 20KHz
Gamma FM: .......................... 87.5 - 108MHz
Versione Bluetooth: ............... 2.1
Potenza di trasmissione Bluetooth:0,25mW

IT

ALIANO

Summary of Contents for XF 100

Page 1: ...er Guide RADIO FM BLUETOOTH LETTORE MP3 USB MICRO SD KARAOKE DISCO LIGHT FM RADIO BLUETOOTH MP3 USB MICRO SD PLAYER KARAOKE DISCO LIGHT RADIO FM BLUETOOTH LECTEUR MP3 USB MICRO SD KARAOKE LUMIÈRE DISCO FM RADIO BLUETOOTH MP3 USB MICRO SD PLAYER KARAOKE DISCO LICHT RADIO FM BLUETOOTH MP3 USB MICRO SD KARAOKE LUZ DISCO MICRO SD USB READER LINE IN BLUETOOTH CONNECTION FM RADIO DISCO LIGHT 10 W MAX ...

Page 2: ...un oggetto pieno di liquido quali vasi deve essere posto sull apparecchio Conservare il presente manuale per futuri riferimenti CURA E MANUTENZIONE Per la pulizia si consiglia l uso di un panno morbido leggermente inumidito Evitate solventi o sostanze abrasive IMPORTANTE La buona costruzione di questo apparecchio ne garantisce per lungo tempo il perfetto funzionamento Se tuttavia dovesse presentar...

Page 3: ...ria Micro SD 16 Presa USB 17 Vano batteria ricaricabile 18 Bass reflex 19 Microfono esterno ITALIANO completo scaricamento quindi ricaricarla completamente di nuovo prima di utilizzarla nuovamente Mettendo in carica una batteria non completamente esaurita la sua durata risulterà ridotta In questo caso ripetere il ciclo caricamento scaricamento completo più volte Evitare di tenere la batteria sotto...

Page 4: ...OMATICA DELLE STAZIONI 1 Posizionare l apparecchio in un luogo privo di interferenze e accenderlo 2 Sollevare ed estendere completamente l antenna stilo 1 3 Premere il tasto MODE 8 più volte fino a quando sul display 3 comparirà la frequenza radio 4 Premere il tasto 12 per effettuare una ricerca e memorizzazione automatica delle stazioniradio laricerca memorizzazionesifermeràalcompletamentodell in...

Page 5: ...e premere una volta il tasto 13 per passare al brano successivo Premere il tasto 12 per mettere in pausa per riprendere la riproduzione musica le premere nuovamente 12 FUNZIONAMENTO MICRO SD CARD USB 1 Inserire una scheda Micro SD nella slot 15 o una schiavetta USB nella presa 16 e accendere l apparecchio 2 La riproduzione partirà in automatico 3 Premere una volta il tasto 9 11 per passare al bran...

Page 6: ...nferire l apparecchiatura integra dei componenti essenziali giunta a fine vita agli idoneicentridiraccoltadifferenziatadeirifiutielettroniciedelettrotecnici oppurericonsegnarla alrivenditorealmomentodell acquistodinuovaapparecchiaturaditipoequivalente inragione di uno a uno oppure 1 a zero per le apparecchiature aventi lato maggiore inferiore a 25 cm L adeguata raccolta differenziata per l avvio s...

Page 7: ...NCE For cleaning it is recommended to use a soft slightly damp cloth Avoid solvents or abrasive substances IMPORTANT The construction of this device guarantees long flawless operation However if come some problem you should consult your nearest authorized service center TREVI pursues a policy of continuous research and development Therefore the products may show different characteristics from thos...

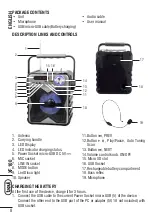
Page 8: ...me control knob ON OFF 15 Micro SD slot 16 USB Socket 17 Rechargeable battery compartment 18 Bass reflex 19 Microphone CHARGING THE BATTERY At the first use of the device charge it for 3 hours 1 Connect the USB cable to the current Power Socket micro USB 5 of the device Connect the other end to the USB port of the PC or adapter 5V 1A not included with USB socket PACKAGE CONTENTS Unit Microphone US...

Page 9: ... call the number of a preset station to use 13 to move to the next station and 9 11 to move to the previous station Note The quality of FM reception depends on the place where the device is placed TheproximityofTVsets fluorescentlamps orotherappliancesmaycauseinterference in the reception of radio programs in this case removed the radio player BLUETOOTH FUNCTION PAIR TO YOUR BLUETOOTH DEVICE 1 Pla...

Page 10: ...e Jack 3 5mm to the LINE 7 3 Adjust the external device from their commands TECHNICAL CHARACTERISTICS Music power 10W S N Ratio 95dB Distortion 1 Frequency response 100Hz 20KHz FM Range 87 5 108MHz Bluetooth version 2 1 Bluetooth transmission power 0 25mW Bluetooth transmission 2 4GHz Power Supply Rechargeable battery 1200mA by micro USB 5V Dimensions 173 x 89 x 178mm INFORMATION ON REMOVAL AND DI...

Page 11: ...ection for the decommissioned equipment for recycling processing and environmentally compatible disposal helps pre vent negative impact on the environment and human health and promotes recycling of the materials making up the product Illegal dumping of the product by the user entails the application of administrative sanctions stated in Legislative Decree n Legislative Decree No 49 of March 14 201...

Page 12: ...aboussures d eau et aucun objet rempli d eau tels que des vases doit être placé sur l appareil Conservez ce manuel pour référence future MANIEMENT ET ENTRETIEN Pour le nettoyage il est conseillé d utiliser un chiffon doux légèrement humide Évitez l emploi de solvants ou de substances abrasives IMPORTANT La bonne fabrication de cet appareil garantit un fonctionnement parfait pour une longue période...

Page 13: ...Lumière disco Led 10 Haut parleur 11 Bouton 9 précédent 12 Bouton Lecture Pause Mémoire de balayage automatique 13 Bouton suivant 14 Contrôle du volume Rotary ON OFF 15 Micro SD slot mémoire 16 Prise USB 17 Compartiment de la batterie rechargea ble 18 Bass Reflex 19 Microphone externe Pour prolonger la durée de vie de la batterie utilisez la lorsqu elle est complètement rechargéejusqu àundéchargem...

Page 14: ...re en marche 2 Soulever et étendre complètement l antenne fouet 1 3 Appuyez sur le bouton MODE 8 plusieurs fois jusqu à l affichage 3 apparaîtra dans la fréquence radio 4 Appuyezsurlebouton 12 derechercheretdestockageautomatiquedesfréquences radio recherche stockage sera arrêter à analyses complètes de la bande radio A la fin il va jouer la première station de radio préréglée RAPPEL DE STATION STO...

Page 15: ... FONCTIONNEMENT MICRO CARTE SD USB 1 Insérez une carte Micro SD dans la fente 15 ou une prise USB esclave 16 et allumer l appareil 2 La lecture commence automatiquement 3 Appuyez une fois sur le bouton 9 11 pour passer à la piste précédente appuyez sur le bouton une fois 13 pour passer à la piste suivante 4 Appuyezsurlatouche 12 pourmettreenpause appuyezànouveaupourreprendre la lecture CARACTÉRIST...

Page 16: ... type équivalent en termes de un à un ou un à zéro pour les équipements ayant plus côté de moins de 25 cm collecte séparée appropriée pour l équipement mis hors service pour le recyclage le traitement et l élimination respectueuse de l environnement contribue à éviter les effets négatifs sur l environnement et la santé humaine et favorise le recyclage des matériaux qui composent le produit le dump...

Page 17: ...asser und kein Objekt mit Wasser wie Vasen auf dem Gerät platziert werden Bewahren Sie diese Anleitung zum späteren Nachschlagen PFLEGE UND WARTUNG Für die Reinigung wird die VeSKIP endung eines leicht angefeuchteten weichen Tuchs empfohlen Der Einsatz von Lösungsmitteln oder scheuernden Substanzen sollte vermieden werden WICHTIG Der fachgerechte Bau dieses Geräts gewährleistet langfristig einen e...

Page 18: ...Auto Tuning Scan 13 Taste folgende 14 Lautstärke Drehregler EIN AUS 15 Micro SD Karte 16 USB Buchse 17 Wiederaufladbare Batteriefach 18 Bassreflex 19 Externes Mikrofon und vollständig entleert werden Vor der erneuten Benutzung sollte sie wieder komplett aufgeladen werden Wird eine nicht vollständig entleerte Batterie aufgeladen so wird deren La deautonomie reduziert In diesem Falle sollte der Vorg...

Page 19: ... das Gerät in einem Gebiet frei von Störungen und einschalten 2 Heben und vollständig die Stabantenne 1 erstrecken 3 Drücken Sie die MODE Taste 8 so oft bis die Anzeige 3 die Radiofrequenz angezeigt 4 Drücken Sie die tasto 12 eine automatische Suche und Speichern von Radio sendern durchzuführen Forschung Lagerung wird an der Fertigstellung des gesamten Scan Funkband zu stoppen Am Ende wird es die ...

Page 20: ...m vorherigen Titel zu springen drücken Sie einmal die Taste 13 um zum nächsten Titel zu wechseln Drücken Sie 12 zu unterbrechen um die Wiedergabe fortzusetzen Musikpresse 12 BETRIEBS Micro SD Karte USB 1 Legen Sie eine Micro SD Karte in den Schlitz 15 oder einen Slave USB Buchse 16 und schalten Sie das Gerät ein 2 Die Wiedergabe startet automatisch 3 Drücken Sie einmal auf die 9 11 Taste um zum vo...

Page 21: ...rechenden differenzierten Sammelstellen zu seinem Leben bekam oderesandenHändlerzurückgeben wenneinneuesGerätgleichwertigerArtKaufin Bezug auf 12 59 oder eine für Geräte mit längeren Seite von weniger als 25 cm auf Null Die angemessene getrennte Sammlung für die stillgelegte Anlagen für Recycling Aufbereitung und umweltgerechte Entsorgung trägt dazu bei die Umwelt und die menschliche Gesundheit ne...

Page 22: ...en la unidad Conserve este manual para futuras referencias CUIDADO Y MANTENIMIENTO Para efectuar la limpieza se aconseja utilizar un paño suave y ligeramente humedecido Evite el uso de disolventes o sustancias abrasivas IMPORTANTE La buena construcción del aparato garantiza su perfecto funcionamiento durante mucho tiempo Si se presentase algún inconveniente es oportuno consultar al Centro de Asist...

Page 23: ...ada IN 8 Botón MODE 9 Llevó la luz de discoteca 10 Altavoz 11 Botón 9 el anterior 12 Botón de reproducción pausa memoria automática 13 Botón la siguiente 14 Control de volumen rotativo ON OFF 15 Ranura de memoria Micro SD 16 Toma USB 17 Compartimento de la batería recargable 18 Bass reflex 19 Micrófono externo Si se carga una batería no completamente agotada se reduce su duración En ese caso repit...

Page 24: ...idad en una zona libre de interferencias y enciéndalo 2 Levantar y extender por completo la antena de varilla 1 3 PresioneelbotónMODE 8 variasveceshastaquelapantalla 3 aparecerálafrecuencia de radio 4 Pulse el tasto 12 para llevar a cabo una automática de emisoras de radio de búsqueda y almacén investigación almacenamiento se detendrá en la realización de la totalidad de la banda de radio de barri...

Page 25: ... botón una vez 13 para pasar a la siguiente pista Pulse 3 para hacer una pausa reanudar la reproducción de música pulse el botón 3 FUNCIONAMIENTO TARJETA MICRO SD USB 1 Inserte una tarjeta micro SD en la ranura 15 o una toma de esclavos USB 16 y encienda la unidad 2 La reproducción se iniciará automáticamente 3 Pulse una vez el botón 9 11 para pasar a la pista anterior pulse el botón una vez 13 pa...

Page 26: ...vida útil a los centros adecuados de recogida de residuos electrónicos y electrotécnicos o devolverlo al distribuidor al comprar un nuevo aparato de tipo equivalente en términos de uno a uno o uno a cero para el equipo que tiene lado más largo de menos de 25 cm la recogida selec tiva apropiado para el equipo fuera de servicio para su reciclaje tratamiento y eliminación ambientalmente compatible ay...

Page 27: ...XF 100 27 NOTE ...
Page 28: ...ndirizzo Internet www trevi it SIMPLIFIED EU DECLARATION OF CONFORMITY Hereby TREVI Spa declares that the radio equipment type XF 100 is in compliance with directive 2014 53 EU The full text of the EU declaration of conformity is available at the following internet address www trevi it Trevi S p A Strada Consolare Rimini San Marino 62 47924 Rimini RN Italy Tel 0541 756420 Fax 0541 756430 www trevi...

Reviews: