background image

Trevi Spa User Guide 


19


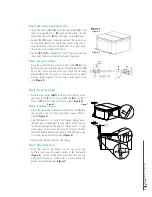
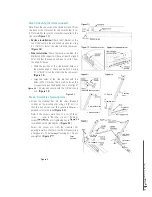
Step 1: Attaching the removal support.

Note: Place the spa cover in the closed position. Offset 
the back of the U-bracket for the cover border 5 cm  
(2") forward. Make sure the U-bracket is parallel to the 
spa cover. 

(Figure 1.1)


Surface installation: 

Attach the U-bracket on the 

top of the frame in the pre-drilled wood holes using 
4 1 1/4" bolts. Install the other side the same way. 

(Figure 1.2)


Side installation: 

Check that once assembled, the 

bracket and the support will have at least 4 aligned 
holes and that the support will be at 5 cm (2") from 
the edge of the spa.


Mark the position of the side bracket holes on 
the wooden edge of the spa and attach it using 
4 1 ¼" bolts. Install the other side the same way. 

(Figure 1.3)


Align the holes of the side bracket with the 
holes in the U-bracket. There are 5 holes on the 
U-support and 6 on the bracket. You must align at 
least 4 holes and secure with the 3/4" bolts and 
nuts. 

(Figure 1.3)

Step 2: Assembly of pivoting arms.


Screw the stabilizer bar into the small threaded 
cylinder on the pivoting arm using a 5/8" bolt so 
that the bar passes over the square tube and is 
perpendicular to the tube 

(Figure 2.1).


Note: If the cover is more than 12.5 cm (5") thick, 
screw it parallel to the tube or omit it. Partially 
screw the extension arm tightening key in the hole 
located above the stabilizer bar. 

(Figure 2.1)

Select the swivel arm with the stabilizer bar 
pointing inwards and attach it to the U-bracket using 
a hexagonal 1 ¾" bolt and self-locking nut. Do not 
overtighten. 

(Figure 2.2)


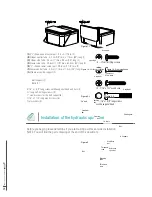
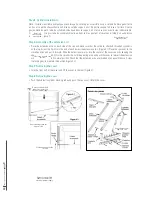
Figure 4.2

Figure 4.1

Figure 4.3

Figure 5

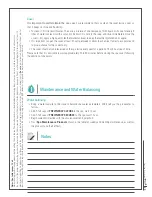
Cover stitching

Drawing of parts

2 pins

4 pins with casing

2 locking 

keys

2 hydraulic 

cylinders

10 ¾" bolts 

and nuts

1¾"

 bolts  

and nuts

5/8"

 bolts

Locking 

key

Cover
stitching

2 extension arms

2 U-supports

2 brackets
4 nuts

"  

lag nuts

2 stabilizer bars

2 pivoting 

arms

Summary of Contents for Spa

Page 1: ...Trevi Spa User Guide ...

Page 2: ... procedure 7 Winterizing procedure 9 Opening procedures for spas 12 Precautions when using your spa during winter 13 Draining procedures 13 Winter emergency procedures 14 15 Instruction spa cover 16 Maintenance of spa components and water balancing instructions 21 22 Trevi spa maintenance products 23 Spa Pack error codes 24 Compulsory and optional training 30 Customer access 31 Contact 32 ...

Page 3: ...Trevi Spa User Guide 3 Reminder list Model Year Height Quantity liters Customer number TC Purchase date Important notes ...

Page 4: ...of children CAUTION When using chlorine always add the product to water Do not pour water over chlorine or an explosive reaction may result A few drops of water are enough to trigger an explosion Safety precautions To avoid health hazards never heat the spa water above 104 F 40 C Limit the use of the spa to 15 minute intervals to avoid nausea Never enter the spa when under the influence of alcohol...

Page 5: ...nment of the spa all year round to establish the best privacy solutions Also think of the view you ll have when you use your spa Is your yard equipped with a special landscaped area that you especially enjoy Perhaps there s a special place that boasts a soothing breeze during the day or a beautiful sunset in the evening Prévoyez un accès pour l entretien Many people choose to build a decorative st...

Page 6: ... COMPULSORY Following delivery of the spa you have 3 days to make sure the jets are working well Installation options for your spa Option 1 Installation on stone dust Remove sod and excavate site to a depth of four inches The perimeter of the site should allow for an additional six inches on all sides of the spa be sure to base calculations on the exact dimensions of your spa Fill site with six in...

Page 7: ...d 5 to 10 feet from the spa for easy maintenance Initial start up procedures Step 1 Start up and emptying the spa Fill the spa by inserting the hose into the skimmer where the holes are under the cartridges up to one inch below the neck jets at the level of the trapezoids or one centimeter below the lowest pad All cushions must be outside the water Fill the spa with the skimmer by removing the fil...

Page 8: ... seconds will allow you to enter the programming menu In the programming menu the following items can be set the clock the filtering cycles or the purging cycles economy mode and temperature units In the programming menu use the buttons to adjust the settings and use the Filter key to move to the next setting The changes will be saved only after confirmation of the last setting If you do not press...

Page 9: ...efully read this entire document before proceeding with the closure of your spa In order to avoid unpleasant surprises please check with your insurance company to make sure that your spa is insured If you choose not to make optimum use of your spa and prefer closing it for the winter we suggest that you continue to maintain it until the time of closure and have a complete test of your water done i...

Page 10: ...ck jets Reinstall the o rings taking care to lubricate with Jack s formula and reinstall the swivel properly Close the valve Vacuum the remaining water from the footwell Step 3 Vacuum the spa s drain for about 1 or 2 minutes with the vacuum cleaner Vacuum each body jet at least twice using vacuum Vacuum the ozone generator nozzle using the vacuum cleaner as well as the holes in the skimmer and bot...

Page 11: ...ut winter Position cover on top of spa Cover your spa cover with a sheet of plywood so that the cover is entirely protected only the cover not the skirt Cover your spa with a sheet of polyethylene and ensure that it is well attached to make it through the winter Leave a space between the polyethylene sheet and the spa skirt to avoid moisture build up Step 4 Cleaning your In Clear Disconnect the In...

Page 12: ...kimmer Connect motor blower and ozonator if applicable and light Open ball valves on the pipe ends Clean the acrylic using slightly soapy water Replace jets in their housings Fill the spa with a garden hose up to 1 cm below the lowest cushion Place the garden hose towards the hole s of the cartridge s Put the GFCI to ON Close air controls and jets Operate the 2 pumps and add 250 ml of Trevinergy w...

Page 13: ...e operation as safely as possible Clean all of your spa s components thoroughly this way you will start the winter with clean water which will make maintenance easier as water cannot be changed in winter due to the risk of frost Have a specialist perform a full analysis of your water quality in order to start the winter season with ideal conditions and check your spa daily Should you require any a...

Page 14: ...s on a downward grade to properly drain spa Winter emergency procedure If you need to temporarily install heaters near your spa to prevent the water from freezing in the piping and avoid damaging it here s how Step 1 Open the panels on the front of your spa Step 2 Arrange the panels at an angle to form a wall on each side Step 3 Place the heaters ...

Page 15: ...ere below the spa thus avoiding frozen piping You must raise the heaters onto blocks or pieces of wood so that the hot air circulates inside the spa and not on the black membrane Step 4 Protect and insulate the spa Place a canvas of about 15 x 10 on the spa then replace the cover Use the center panel of your spa skirt as a wall to create a shelter with canvas Step 5 Insulate the spa Next place sno...

Page 16: ...er B in A using a tape measure and the center mark Make a pencil mark at the junction of A and B Figure 2 Place the upper section on the ground and align the pencil marks made at the ends of B and A Be sure that the short sides of A are level to the other Connect the different parts of the upper section of the frame using 3 4 long self drilling screws 3 at each end The screw heads should be inside...

Page 17: ...tion assembly Place the top section ABC on the central stitching of the spa cover Insert C in D Connect C and D using the 2 holes of D with 3 4 long self drilling screws Figure 4 Step 6 Installation of belts Attach the belt which is already inserted into section D into the top hole using 3 4 long self drilling screws of the flat washer Figure 5 Hold the frame so it is 13 cm 5 from the spa Tighten ...

Page 18: ...d screws 6 Flat washers 4 Figure 7 2 Figure 7 1 18 self drilling screws Figure 7 2 Figure 7 1 6 1 wood screws Figure 7 2 Figure 7 1 10 3 16 x 1 wood screws Figure 7 2 Figure 7 1 8 5 16 x 1 5 8 long screws with hexagonal head Installation of the hydraulic spa cover Before you begin please determine if you are making a surface or side installation NOTE You will find the parts drawing at the end of t...

Page 19: ...es on the U support and 6 on the bracket You must align at least 4 holes and secure with the 3 4 bolts and nuts Figure 1 3 Step 2 Assembly of pivoting arms Screw the stabilizer bar into the small threaded cylinder on the pivoting arm using a 5 8 bolt so that the bar passes over the square tube and is perpendicular to the tube Figure 2 1 Note If the cover is more than 12 5 cm 5 thick screw it paral...
Page 20: ...lace the spa cover to the closed position and pull it forward Slide the extension arm pins into the center of the cover seam by keeping the upper pin visible Figure 4 2 Do the second side Fold the pivoting arms and push the cover to reinsert the extension arms until the cover is in its normal position Check that the extension arms are inserted at an equal distance Screw the locking key to maintain...
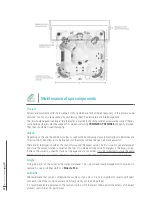
Page 21: ...Trevi Spa User Guide 21 Rear sink clearance for 82 spa Rear sink clearance for 92 spa ...

Page 22: ...are 2 other types of valves the shut off valve and the bypass valve The first is used to completely open and close the cervical stations as well as the falls It s a medium sized valve The largest is the bypass valve It directs the water to a specific station at the expense of any another It is very important to close the pump before adjusting by pass valves otherwise strong pressure in the piping ...

Page 23: ...lance the water parameters We ll tell you the procedures to follow Add 5 full caps of Trevinergy Clear3 to the spa wait 1 hour Add 5 full caps of Trevinergy Secure4 to the spa wait 1 hour Begin water disinfection with the chosen conditioning method Trust Spa Maintenance Products shown in the table for weekly and monthly maintenance as well as the products and their effects Notes Notes One tablespo...

Page 24: ...g the spa in the spring once per year In the spring following the use of Whirl When needed When needed When needed When needed Quantity 1 tbsp by bather or 1 tbsp if not bathing max 4 tbsp per day 1 to 2 tablets Maximum of 3 tablets 1 tablet 3 tbsp or 1 40 g bag 3 full caps 4 full caps 250 ml per 10 L of water Let soak 12 hours 1 cap full Repeat as needed 250 ml and operate the pumps for 60 minute...

Page 25: ...s the spa cover and headrests Increases alkalinity Increases the pH Decreases the pH Increases calcium hardness Product Lithium Brome Spa Tab Shock treatment Oxy Clarifying agent Clear 3 Descaler Secure 4 Cartridge cleaner Anti foam Whirl Acrylic cleaner Cover cleaner Alca pH pH Calcium Error codes on Spa Pack in xm SP HR An internal error of the in xm equipment has been detected Restart the Spa P...

Page 26: ...ct all the elements one by one until the fuse blows Replace the element that blew the fuse SP F3 The in xm F3 fuse is blown Pump 1 Replace the F3 fuse which has blown with a fuse of the same calibre SC 20 SC 25 etc If the new fuse blows replace pump 1 SP OT The temperature inside the spa skirt is too high The temperature inside the spa skirt is too high causing an increase in the internal temperat...

Page 27: ... the filters Make sure that there are no air pockets or that no object obstructs the passage of water into the in therm channel The pumps can create strange sounds and error messages such as P1 ER that may appear on the display Follow the air lock procedure to delete these messages Make sure that pump coupled to the water heater pump 1 turns by pressing the P1 button If the message P1 ER appears o...

Page 28: ...ated or stopped Make sure that pump 3 is plugged in correctly you should hear a click when properly done Change the output status on off of pump 3 and try all possible conditions i e low high and stop Reset the Spa Pack by pressing the Select button twice If the error is not cleared the problem is surely pump 3 It must be replaced If pump 3 is replaced the learning mode must be performed again CP ...

Page 29: ...re that Aux 2 is connected correctly Change the output status on off of the Aux 2 device If the error is not cleared the problem is surely the Aux 2 device It must be replaced If Aux 2 is replaced the learning mode must be performed again FN ER Fan error The system has detected no change in current when the fan is activated or stopped Make sure that the fan is connected correctly Change the output...

Page 30: ...r is reset Do not forget to trip and then reset the circuit breaker if you change the keyboard model the in k400 for the in k600 If a keyboard does not work Check the connections of the keyboard and try a replacement keyboard Replace the keyboard if the problem is solved Replace in xm if the problem persists Notes Spa Pack in xe error codes HR An internal in xe equipment error was detected Restart...

Page 31: ...e system cool down until the error disappears Replace the Spa Pack if the problem persists OH The temperature of the water in the spa has reached 42 C 108 F Do not enter the water Using a digital thermometer measure the temperature of the water and compare the value with the one displayed on the keyboard If the readings are different replace the water heater Remove your spa protection and let the ...

Page 32: ...ce guides and a host of important documents for the proper operation of your new purchase at TREVI CA Customer Access section Now a single number to reach us 514 22 TREVI 87384 Repair departement Phone 514 22 TREVI 87384 Ext 2 Email repairdepartment trevi ca Delivery departement Phone 514 22 TREVI 87384 Ext 3 Email spa trevi ca Installation departement Phone 514 22 TREVI 87384 Ext 4 Email spa trev...

Reviews: