background image

Address Entry 

NOTE: There is no need to enter a starting point. CoPilot Live uses GPS 
positioning to determine your location automatically.

Using Your Pocket PC for Guidance

In CoPilot Live's Guidance Mode you will receive turn-by-turn route guidance
information as you travel. For your safety the Driver Safety screen will hide maps
when they are not necessary to avoid distractions. Using the Passenger screen the
map will be visible in half of the screen at all times.
REMINDER: CoPilot Live won’t open on your Pocket PC unless map data has
been previously downloaded from the CoPilot desktop application.

- 27 -

- 28 -

1. To launch the CoPilot Live program,
tap Start and choose “CoPilot Live”
from the drop-down menu. Because  you
have the GPS receiver attached and 
powered, CoPilot assumes that you are 
on the road ready to drive, and opens in
Guidance Mode to get you on your way
quickly and easily.

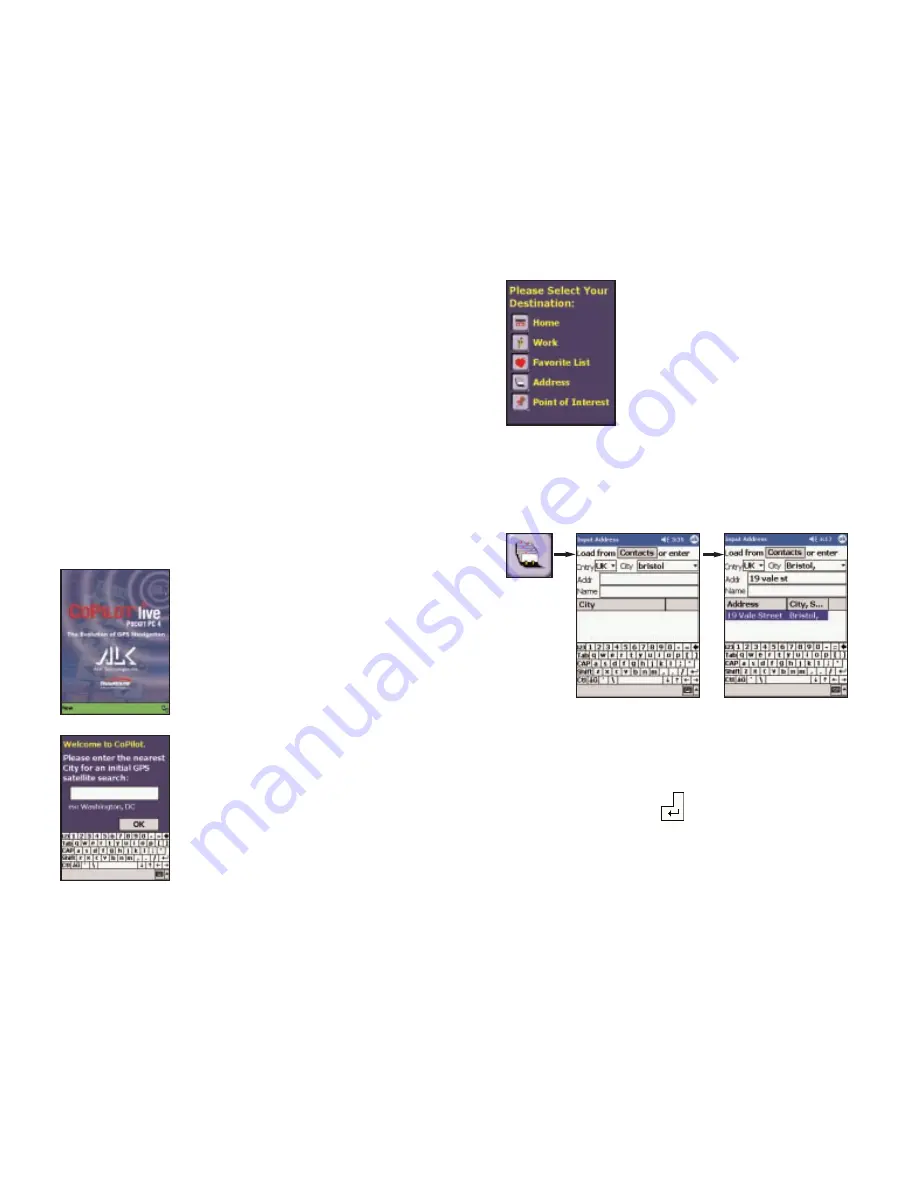
2. The first time you use CoPilot Live,
you will be asked to enter your current 
location to help speed up the initial GPS 
acquisition. Enter your city, country 
(e.g. bristol, uk) and tap OK.

PLEASE NOTE:

You will only

need to enter your initial city the
first time you use CoPilot Live.
For subsequent uses, CoPilot will
remember your last location 
automatically.

3. CoPilot will then provide you with a
number of different ways to enter an
address. You can:

a) Program your Home address.
b) Program your Work address.
c) Enter a new Address.
d) Select a destination from your

Favorite List, or

e) Search for a Point of Interest

Tap the appropriate button to choose the 
option you would like to use.

Select a country from the
drop-down menu. 
Using
the keyboard, type in the
name of a city or a postal
code. Tap the <Enter> key
to view possible matches or
to select your city.

If this is not your first use of
CoPilot Live, a pick list of
cities previously entered may
appear.

Tap the 
Address 
button.

In the Addr box, type in the
street address (optional). Then
tap the <Enter> key
. If there
is an exact match in CoPilot’s
database, your address will
appear on the Address list 
highlighted in blue. Tap
<Enter> again to enter it
. If
no exact match was found, a list
of possible matches appears.
Highlight one and tap <Enter>.
Tap the Name box to enter a
name (optional), type in a name,
then tap OK.

In-vehicle Hardware Setup:

First turn on your Pocket PC, then make sure that the GPS receiver is attached
and powered and your engine is running before using CoPilot Live.

If you have a vent mount and in-vehicle power adapter:

1. Attach the cable to the Pocket PC and insert it into your vehicle’s cigarette

lighter socket. Make sure it is firmly seated (the red light should be on).

2. Attach the vent mount clips to the vent in your vehicle, in a position that will

allow you to be comfortable as you view and operate CoPilot.

3. Slide the Pocket PC into the vent mount, and make sure it is turned on.

Launch CoPilot Live:

Summary of Contents for CoPilot GPS Receiver

Page 1: ......

Page 2: ...hese steps 1 On your Pocket PC 1 Tap the Start menu and select Settings System Remove Programs 2 Select Pocket CoPilot and tap Remove 3 Select Pocket Speech and tap Remove 4a If you stored map data on a storage card i Delete the Pocket CoPilot folder on the storage card Tap Start then Programs File Explorer My Device SD Card then tap and hold on Pocket CoPilot and select Delete from the menu 4b If...

Page 3: ...4 The installation will start with the text to speech software Choose a Male or Female Voice both are standard TTS file or Pre recorded Sound Files WAV files male voice when prompted The pre recorded option saves space on your Pocket PC but provides less detailed driving instructions Click Next iii iv 5 Choose an installation location on the Pocket PC The default is the device memory Yes Recommend...

Page 4: ...uded in This Download list on the right To take an area off the list highlight it and click the left arrow button v vi 5 Activate the software NOTE CoPilot won t open unless map data has previously been down loaded from the CoPilot desktop application see Step 4 To launch CoPilot Live first turn on your Pocket PC attach the GPS receiver and insert your QuickStart card if provided Tap Start on your...

Page 5: ...ll allow you to be comfortable as you view and operate CoPilot 3 Slide the Pocket PC into the vent mount and make sure it is turned on Third Party GPS Receiver setup On your Pocket PC select Options from CoPilot s Tools menu Then select the GPS tab bottom and tap on Auto Scan CoPilot will scan all COM Port and Baud Rate settings until it finds your GPS receiver If you purchased CoPilot with a sing...

Page 6: ...tains complete European maps which can now be downloaded to your Pocket PC for in vehicle use If you purchased CoPilot with a single region license and later want to use street maps from other regions you will need to purchase an update license from your dealer 6 In the Edit Trip screen tap the View Route button to begin receiving guidance instructions to the destination you entered Or enter addit...

Page 7: ...nna Also make sure to properly set the time and date on your Pocket PC The first acquisition can take from 5 to 15 minutes and you can minimize this time by positioning the GPS receiver with a clear view of the sky Once initialized the unit should acquire satellite signals in 40 seconds or less If your Pocket PC hangs does not respond to screen taps or button pressing reset it by inserting the sty...

Page 8: ...ss 31 Finding Points of Interest 31 Favorites 32 Closing CoPilot 32 Map Itinerary Guidance Toggle 33 Customizing the Guidance Screens 34 Trip Editing and Waypoints 35 Getting ETA s and Distances 35 Picking Stops From the Map 36 Detour Feature 37 Selective Routing 38 Contact Integration 39 Tool Menu Options 40 POI Alert Options 41 Modes 42 The GPS Menu 43 Open and Play GPS Tracks 44 Save Current Lo...

Page 9: ...roduct to be used for automated navigation or in any situation in which the failure of the product could lead directly to death personal injury or physical or environmental damage The driver must remain alert at all times to actual road conditions and obey all posted signs and traffic regulations TravRoute assumes no responsibility for any damage or injury resulting from the use of this product Wh...

Page 10: ...necessary to connect the two machines and is provided by your Pocket PC manufacturer If you did not receive this software with your mobile device contact the distributor immediately 1 When connecting your Pocket PC if you have not set up a partnership between your Pocket PC and your desktop you will be prompted to do so This is not required If you choose not to set up a partnership select Guest pa...

Page 11: ...ll select No To All 6 Select Start Search Files or Folders and search for the Pocket CoPilot folder 7 Right click the Pocket CoPilot folder and select Delete Installing CoPilot Live NOTE You must uninstall any previous version of Pocket CoPilot from your desktop laptop and Pocket PC before proceeding see above To install CoPilot Live first turn on your computer and set up your Pocket PC Do NOT att...

Page 12: ...he appropriate location 6 Tap OK on your Pocket PC to reinstall 7 Tap Yes to All if prompted 8 Click OK on your Desktop then click Finish to complete the process 9 When the installation is complete a CoPilot Live icon will appear on your desktop or laptop You are now ready to start using CoPilot 8 As the desktop installation proceeds you will be given the choice to install the CoPilot Data to your...

Page 13: ...o a Storage Card in the device In this example CoPilot Live has detected that all options are available Select a storage card name from the drop down pick list then click Next to go to the Data Selection window See CoPilot QuickStart p 10 for a description of software included in down loads See p 20 for Options 9 CoPilot QuickStart Storage Card Application Download If you are downloading map data ...

Page 14: ...ou to choose an area of data by drawing a box on the Data Download Wizard s map screen In the Wizard you enter a city name near which you would like to select data then click Next The map will zoom to that location Then you create a box around the desired area by clicking and dragging your mouse across the map The street level data within that box will be selected At this point you can zoom the ma...

Page 15: ...e the selection Click Next 5 You will return to the Data Selection Menu where you can select another data area if you like using any method When you finish selecting data areas click the Download icon and you will be taken to the final screen where you can build your download 2 Enter a City Country or Postal Code and a radius around the area that you would like to download Click Next to verify tha...

Page 16: ... area that you would like to download Click Next 5 You will return to the Data Selection Menu where you can select another data area if you like using any method When you are finished selecting data areas click the Download icon to go to the final screen where you can build your download 3 Click and hold the left mouse button and drag the cursor to draw a box around a desired area The size of the ...

Page 17: ...ccount for support files 5 To customize these distances for any trip click Options and type a distance in the appropriate box 6 You will return to the Data Selection Menu where you can select another data area if you like using any method When you are finished selecting data areas click Download Trip itineraries that were created using theTrip download method will be transferred along with map dat...

Page 18: ...e as Favorites for trip entry on the Pocket PC Uncheck Create QuickStart if you do not want the CoPilot QuickStart software copied to your Storage Card see p 10 for a description of this feature POI Download Options When you download a data region you ll get all roads within that region but not roads outside the region Also included with each download are regional points of interest POI such as ga...

Page 19: ... desktop then follow the step by step instructions given by the Wizard Use the Data Import Status window to edit any addresses that were not accepted during the importing process then click Add to import the final list of addresses For more detailed instructions refer to the CoPilot Live Help Files on your desktop Help Contents and Search in the Help menu 21 E Ed diit tiin ng g C Cu us st to om m ...

Page 20: ...ails 5 To configure your GPS receiver see Step 6 on p 24 If you are unable to synchronize your Pocket PC with your desktop laptop but have internet access you can Activate Manually as follows 1 On your Pocket PC check Activate Manually and tap Next 2 Type in your Product Key Code where indicated and tap Next The following screen displays your License Number 3 On your desktop laptop connect to the ...

Page 21: ...is running before using CoPilot Live If you have a CoPilot vent mount and in vehicle power adapter 1 Attach the cable to the Pocket PC and insert it into your vehicle s cigarette lighter socket Make sure it is firmly seated red light on 2 Attach the vent mount clips to the vent in your vehicle in a position that will allow you to be comfortable as you view and operate CoPilot 3 Slide the Pocket PC...

Page 22: ...s You can a Program your Home address b Program your Work address c Enter a new Address d Select a destination from your Favorite List or e Search for a Point of Interest Tap the appropriate button to choose the option you would like to use Select a country from the drop down menu Using the keyboard type in the name of a city or a postal code Tap the Enter key to view possible matches or to select...

Page 23: ...Then tap the Edit Trip button Start Driving Entering a Home Address Tap the Home button in the Edit Trip screen The first time you use this button you will be prompted to enter your Home Address Enter the City or Postal Code and address Tap OK and it will be saved Now you can tap the Home button to enter your home as a stop To change your home address see Favorites p 32 30 Tap the View Route butto...

Page 24: ...r Current Location As a Favorite You must be receiving GPS data to save your current location as a favorite Tap the GPS menu and then select Save Current Location Closing CoPilot To exit the CoPilot Live application select Exit from the pop up Tools menu at the bottom of the screen If the menu isn t visible tap the screen anywhere except on the map 32 A prompt will ask you to assign a location nam...

Page 25: ...the same display options Note that only one line will be shown when the Passenger screen is displayed The map display can also be customized Choose Options in the pop up Tools menu then select miles or kilometers for distances a North Up map view that always considers north to be at the top or Heading Up view that always tracks your route upward and Box Zoom draw a box around the area to zoom to w...

Page 26: ...Route button to display the Guidance screens and see the ETA distance If your trip has multiple stops and you want to know the ETA for a destination that is not the next stop designate the stops between your current location and the target stop as waypoints as described in Trip Editing and Waypoints above Edit Trip button Picking Stops From the Map CoPilot Live enables you to pick a stop off the m...

Page 27: ...he Trip Itinerary TailoringYour Route Using Waypoints CoPilot Live lets you customize a route by designating some stops as waypoints Waypoints appear on the Itinerary but they re not treated like stops in Guidance Mode and or in routing instructions You can enter a waypoint along a road you want CoPilot to use and CoPilot will guide you through the waypoint along that road toward your destination ...

Page 28: ...Menu Options Tap the Routing Tab to change your Vehicle Type Routing Type and Routing Options RV routes favor major roads and avoid sharp turns and U turns wherever possible Quickest routing is based on the most practical route in terms of road quality terrain and urban rural classifications Tap the Guidance Tab to adjust the turn warning time and speech volume and to display or hide GPS tracking ...

Page 29: ...t Guidance Navigating Walking or Planning Mode Guidance Mode In Guidance Mode you enter one or more destinations tap the View Route button on the toolbar and start driving This mode provides you with on screen spoken driving directions and other information relevant to your trip such as estimated time of arrival and distance to the next stop To receive driving directions and other data you must ha...

Page 30: ... four satellites in the green for several seconds Select Receiving from the pop up GPS menu to activate or deactivate GPS satellite reception Receiving is active if you see a check mark Tap once to change the status If Receiving is inactive CoPilot will be unable to provide driving instructions 43 Open and Play GPS Tracks 1 To open a GPS track receiving must be turned off Select Open Tracks to ope...

Page 31: ...playing To turn receiving on tap Receiving Reference CoPilot Live Screens What s What on Your Pocket PC The following is a guide to the various features and shortcuts available from the screens you will see on your Pocket PC as you operate CoPilot Live Edit Trip Screen Guidance Passenger Screen Map will always be shown Shortcuts to Home Work Favorites Address Input Points of Interest and the View ...

Page 32: ...ure 2 Make sure your receiver is plugged into your vehicle s power source 3 In the drop down GPS menu on your Pocket PC be sure Receiving is checked 4 Occasionally when using the GPS expansion pack without a power adapter this message may be displayed because the expansion pack is powering down temporarily to save power Reception will resume within a few seconds 47 Map Screen Itinerary Window Tool...

Page 33: ...he Enter key Enter key 49 Trip Planning on Your Pocket PC You can use Pocket CoPilot on your Pocket PC for trip planning whether or not the GPS receiver is connected and receiving data Planning mode allows you to run a trip on your Pocket PC even when you re not in your car You ll get driving directions and maps that you can use for reference before your trip begins 1 First turn on your Pocket PC ...

Page 34: ...ktop application Help Contents and Search in the Help menu or click the Help button on the toolbar Go to Desktop Trip Planning in the Contents tab Menus and Toolbar Buttons Using the drop down menus you can select from a number of functions Many of these functions also have corresponding toolbar buttons 1 Open Trip 51 52 5 Tap the Itinerary button to see the itinerary for your planned trip 6 Tap t...

Page 35: ...r Run Trip from the Trip menu Generates the route Will show a detailed Trip Summary and display a map and driving directions for the route that was run Takes you into a standard Windows folder where you can name trips to be saved after running them in the Trip Planner Edit Trip button or Edit Trip from the Trip menu Takes you to the Trip Planner window where you can edit stops on your existing tri...

Page 36: ... these buttons your view will be zoomed in or out by one increment The zoom level is shown in the title bar of the map window Takes you to the standard Windows Print menu to print the active window that contains your map or driving directions Activate one or the other window by selecting from the drop down Window menu Select Print TravPak from the File menu to print driving directions an overview ...

Page 37: ...hat location You can then choose to enter it as a start place a waypoint or a destination Select Preferences from the drop down Edit menu In this window you can change the way you view your desktop maps and various application settings 13 Zoom to Region The Zoom to Europe button or Zoom Region from the Map menu This function allows you to zoom your map view to a specific region 14 Refresh Map Refr...

Page 38: ...pful travel links a link to the ALK Web site and a link to the ALK data corrections e mail address With street level data changing every day you may discover some errors Please drop us an email With your help we will be able to improve our map data with every update Menus and toolbar buttons to access all of CoPilot s desktop features Click on a tab to frame any stop on your route Map of area arou...

Page 39: ... list using the buttons to the right Click the Add Stop button to add a favorite to your Itinerary Trip Planner Window Contacts Driving Directions and Map Split Screen Enter a person s first or last name and hit Enter CoPilot will search your Contacts database for matches Select the Contacts address type as defined in Outlook to get the appropriate address then click the Add Stop button to add it ...

Page 40: ... possible Click Advanced to set general road preferences Drag the sliding bars to the left or right to avoid or favor each road type Set the road speeds CoPilot uses in its route calculations for each type of road by either typing or clicking the up and down arrows under Rural and Urban for each road type Select Run from the Trip Planner window to run the trip you enter Your trip will be calculate...

Page 41: ...ges will appear here NOTE All of CoPilot Live s communications are done in real time This means information is only transferred when the driver in the vehicle and a user on a home office PC are using CoPilot Live at the same time In this sense CoPilot Live communication is similar to using a telephone communication only occurs when both parties are on at the same time ALK does not actively log a d...

Page 42: ...tton the driver will see whatever text you enter and when the driver responds the text of the button will be sent back to you Once you have typed your message and specified your Customizable Response Buttons click the Send button to send your message to the driver When the driver responds to your message the response is displayed in the Message Center Advanced Clicking on the Advanced tab of the S...

Page 43: ...ion Delete Message Deletes the message notice of the delete is sent back You can also tap one of the Customizable Response Buttons at the bottom of the screen that the message sender has included The text on the button is sent back To send a Trip Itinerary Update to the driver click the New Trip button on the toolbar and create a trip itinerary in the Trip Planner window just as you would in Plann...

Page 44: ...e is sent to you CoPilot Live displays it on top of all other windows If you have CoPilot Live s text to speech engine installed you will hear the itinerary updates spoken out loud The four Standard Response Buttons appear see p 68 for more details on these buttons You can Accept or Decline the change to your trip itinerary If you accept the change CoPilot Live will automatically start giving rout...

Page 45: ...ur satellites Using the data from these How CoPilot Live Uses GPS CoPilot Live uses the GPS positional data that it receives from the hardware unit you place on your dashboard to display your current position on a map as you drive This is called tracking CoPilot also uses the GPS data it receives to guide you along your planned route provided you enter a destination on your Pocket PC CoPilot Live ...

Page 46: ...Te ec ch hn no ollo og giie es s Yes you can use a third party receiver with CoPilot Live See p 1 of this User s Guide for a list of compatible types of receivers GPS PROBLEMS If you do not get a GPS signal please check the following 1 Under GPS make sure there is a check mark next to Receiving 2 If not tap on Receiving to check it on If you are unable to place a check mark next to Receiving by ta...

Reviews: