background image

23

CPSMC08xx-100  PointSystem

Chassis

net
work mgmt.

24 hour Technical Support:

1-800-260-1312

-- International:

00-1-952-941-7600

DB-9 Serial Port

The DB-9 serial port allows the network administrator to configure and manage the
CPSMC08xx-100 chassis using the SNMP Command-Line Interface (CLI) at an
attached terminal or terminal emulator.

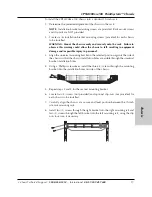
Use a null modem cable to attach a terminal to the DB-9 serial port on the
management module as shown.

RJ-45 Ethernet Port 

The RJ-45 Ethernet port allows the network administrator to manage the
CPSMC08xx-100 chassis via a remote Network Management Station (NMS) in one
of two ways:

1. Using the Transition Networks 

FocalPoint™

graphical user interface.

2. Using a remote Telnet connection.

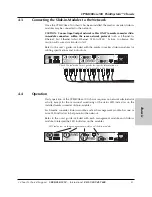
Use an RJ-45 network cable to attach a terminal (via a network hub or switch) to the
RJ-45 Ethernet port on the management module as shown.

NOTE:  

To manage the 

PointSystem™ 

chassis via a remote NMS, both the RJ-45

Ethernet port and the NMS must be connected to a network with Internet access.  

RX

TX

LNK

PWR

RESET

DB-9

CFETF1

10

SPD

PWR

FRX

CRX

FLNK

CLNK

10/100TX

RX

TX

10/100SX

LKS

PWR

LKM

Multimode

Singlemode

TX

RX

TX

RX

CFETF1

10

SPD

PWR

FRX

CRX

FLNK

CLNK

10/100TX

RX

TX

10/100SX

LKS

PWR

LKM

Multimode

Singlemode

TX

RX

TX

RX

CPSMC-0800

8-Slot Chassis

Mpls, MN 55344

Mpls, MN 55344

Input Power:

Input Power:
110-240 VAC

110-240 VAC
1.6A max. (60W max)

1.6A max. (60W max)
50/60 Hz

50/60 Hz

Network hub or switch connected 
to the RJ-45 Ethernet port.

Remote Telnet connection OR

Remote NMS with an SNMP application

RX

TX

LNK

PWR

RESET

DB-9

CFETF1

10

SPD

PWR

FRX

CRX

FLNK

CLNK

10/100TX

RX

TX

10/100SX

LKS

PWR

LKM

Multimode

Singlemode

TX

RX

TX

RX

CFETF1

10

SPD

PWR

FRX

CRX

FLNK

CLNK

10/100TX

RX

TX

10/100SX

LKS

PWR

LKM

Multimode

Singlemode

TX

RX

TX

RX

CPSMC-0800

8-Slot Chassis

Mpls, MN 55344

Mpls, MN 55344

Input Power:

Input Power:
110-240 VAC

110-240 VAC
1.6A max. (60W max)

1.6A max. (60W max)
50/60 Hz

50/60 Hz

Attached terminal or terminal emulator
connected to the DB-9 serial port
via null modem cable.

Summary of Contents for CPSMC0800-100

Page 1: ...Transition Networks CPSMC08xx 100 8 Slot PointSystem Chassis User s Guide revision B CPSMC0800 100 AC powered CPSMC0810 100 DC powered...

Page 2: ...arning This is a Class A product In a domestic environment this product may cause radio interference in which case the user may be required to take adequate measures Achtung Dieses ist ein Ger t der F...

Page 3: ...les 11 3 Powering the CPSMC08xx 100 12 3 1 Primary Power Supply 12 3 1 1 AC Power Supply 12 3 1 2 DC Power Supply 13 3 2 Auxiliary Power Supply 14 3 2 1 AC Auxiliary Power Supply 14 3 2 2 DC Auxiliary...

Page 4: ...e fans help remove heat from the chassis With installed PointSystem management module s P N CPSMM 120 200 or 210 the CPSMC08xx 100 can be managed and monitored via An SNMP application such as Transiti...

Page 5: ...ser s Guide 33270 The following items are optional accessories for the CPSMC08xx 100 8 slot PointSystem chassis Item Part Number External AC Power Supply CPSMP 180 optional External DC Power Supply CP...

Page 6: ...the face place with the enclosed bolt 2 1 2 Calculating the Power Consumption CAUTION Before installing the media converter slide in modules refer to the power consumption data for each individual me...

Page 7: ...slots 2 Align the slide in module with the chassis installation slot so that the panel fastener screw is at the left of the slide in module 3 Carefully slide the slide in module into the installation...

Page 8: ...from the chassis 2 Align the replacement slide in module with the chassis installation slot so that the panel fastener screw is to the left 3 Carefully slide the replacement slide in module into the...

Page 9: ...Slot Master Management Module CPSMM 200 Dual Slot Master Management Module The optional CPSMM 200 Dual Slot Master Management Module can also be installed in the CPSMC08xx 100 chassis to enable netwo...

Page 10: ...PSMM 120 Single Slot Master Management Module OR CPSMM 210 Single Slot Expansion Management Module If chassis face plates are covering the installation slots remove one 1 management module protective...

Page 11: ...e management module to be replaced by loosening the panel fastener screw that secures the module to the chassis front Slide the module from the chassis 2 Align the replacement module with the installa...

Page 12: ...internal AC power supply which is accessed through a power inlet on the front panel The power cord is included To power the CPSMM0800 100 chassis through the primary AC power supply 1 Connect the fem...

Page 13: ...e manual CAUTION All installation and service must be performed by qualified service personnel The CPSMC0810 100 includes an internal DC power supply which is accessed through the power terminal block...

Page 14: ...CPSMP 190 as the Auxiliary power supply Likewise the CPSMC0810 100 with the internal DC power supply can have either the AC powered CPSMP 180 or the DC powered CPSMP 190 as the Auxiliary power supply...

Page 15: ...ed on the product or included in the manual CAUTION All installation and service must be performed by qualified service personnel To power the CPSMC08xx 100 chassis through the DC auxiliary power supp...

Page 16: ...40 C If the chassis is installed in a closed or multi unit rack assembly the operating ambient temperature of the the rack environment may be greater than room ambient NOTE Rack mounted equipment mus...

Page 17: ...ews through the mounting bracket into the installation holes on side of the chassis 5 Repeat steps 3 and 4 for the second mounting bracket 6 Locate four 4 screws not provided and optional clip nuts no...

Page 18: ...red torque to the fasteners is specified by the connector s manufacturer To properly ground the CPSMC08xx 100 chassis 1 Obtain one 1 properly terminated grounding conductor 12 AWG copper wire gauge or...

Page 19: ...is Mpls MN 55344 Mpls MN 55344 Input Power Input Power 110 240 VAC 110 240 VAC 1 6A max 60W max 1 6A max 60W max 50 60 Hz 50 60 Hz CPSMC 0800 8 Slot Chassis Mpls MN 55344 Mpls MN 55344 Input Power Inp...

Page 20: ...or at one end of the cascade cable into the management module s RJ 45 port labeled OUT 3 At the next chassis in the series Plug the RJ 45 connector at the other end of the cascade cable into the manag...

Page 21: ...dicators to help monitor the network Refer to the user s guide included with each management module and slide in module to interpret the LED indicators on the modules 10BASE T INPORT MCCM10 MGMT MASTE...

Page 22: ...o configure and manage the CPSMC08xx 100 chassis from an attached terminal or from a remote networked computer The firmware includes the Transition Networks Command Line Interface CLI a telnet server...

Page 23: ...remote NMS both the RJ 45 Ethernet port and the NMS must be connected to a network with Internet access RX TX LNK PWR RESET DB 9 CFETF110 SPD PWR FRX CRX FLNK CLNK 10 100TX RX TX 10 100SX LKS PWR LKM...

Page 24: ...D is NOT illuminated Ensure the management module is firmly seated in the slot Press the RESET button on the management module Contact Tech Support 1 800 260 1312 Int l 00 1 952 941 7600 4 For the rem...

Page 25: ...certified by the manufacturer to comply with DHHS Rule 21 CFR Subchapter J applicable at the date of manufacture The fiber optic transmitters on this device meets Class I Laser safety requirements per...

Page 26: ...ect CD 1 Receive Data RXD 2 Transmit Data TXD 3 Data Terminal Ready DTR 4 Signal Ground GND 5 Data Set Ready DSR 6 Request To Send RTS 7 Clear To Send CTS 8 RJ 45 Cable Category 5 Gauge 24 to 22 AWG A...

Page 27: ...equirements of the media and port type For example Shielded RJ 45 cable used for 100Base Tx Ethernet MUST be grounded at both cable endpoints via shielded RJ 45 jacks Shielded RS 232 cable MUST have t...

Page 28: ...www transition com and click the Transition Now link Web Based Seminars Transition Networks provides 12 16 seminars per month via live web based training Log onto www transition com and click the Lea...

Page 29: ...uct To return a defective product for warranty coverage contact Transition Networks technical support department for a return authorization number Transition s technical support department can be reac...

Page 30: ...by Transition Networks for a fee will carry a 180 day limited warranty All warranty claims are subject to the restrictions and conventions set forth by this document Transition Networks reserves the...

Reviews: