background image

9

USER GUIDE

524 Control Installation and User Guide

The model TZEMT524AA21MA Comfort Control provides typical operation of a forced air heating and cooling HVAC system. The control 
also features a Z-Wave™ module for remote control when connected to Nexia™ Home Intelligence.

PM

Fan

Cooli

n

g

Menu

Sched

Mode

Hold

Cool

Auto

F

:

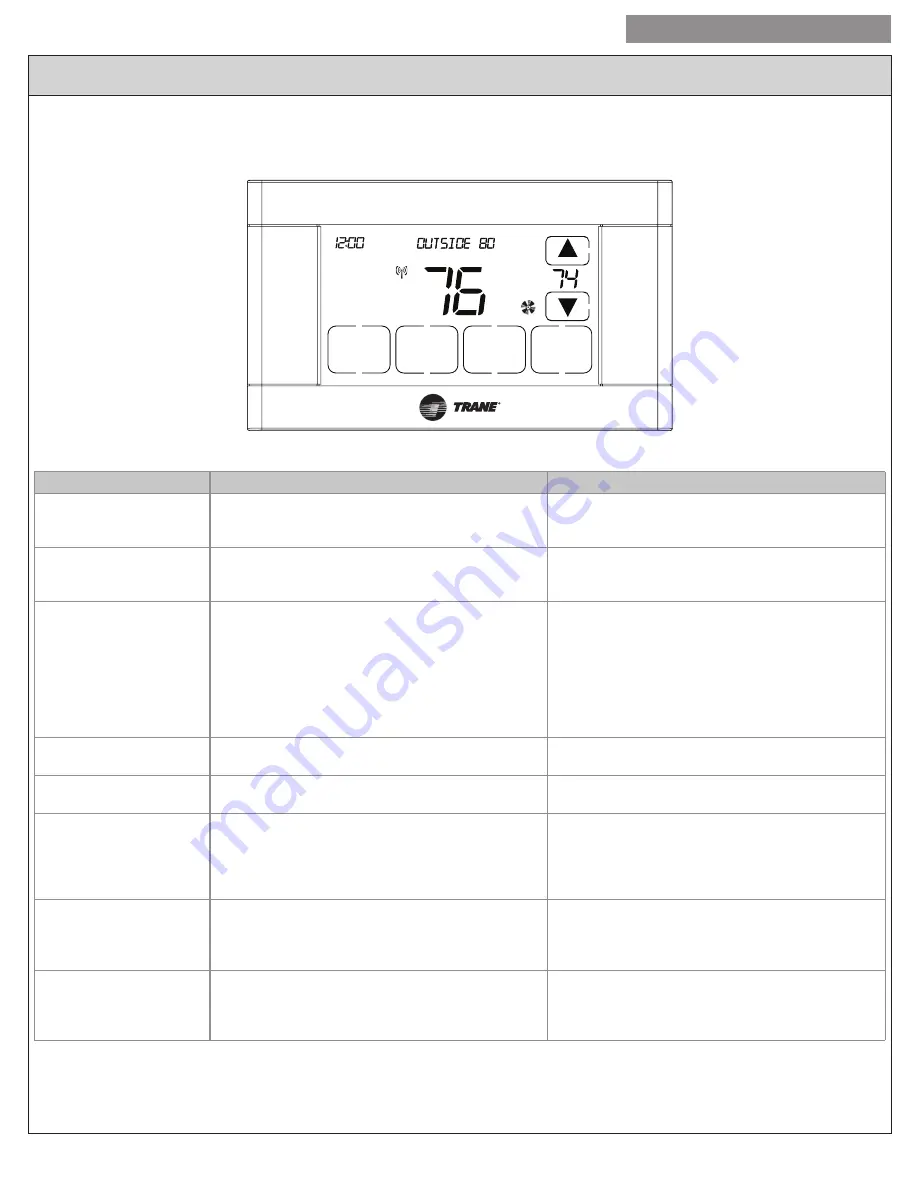
Normally, the 524 Control displays the Home Screen as shown above.

Item

Description

Notes

Clock Display

The current time is displayed in the upper left corner 

of the main screen. The time will blink when the clock 

has not been set.

See 

TIME/DATE

 for more information. If the Control is 

connected to Nexia™ Home Intelligence, the clock will 

be updated automatically.

Dynamic Labels and 

Function Control Buttons

The buttons are defined by the dynamic labels in each 

button. As you navigate through menus, the labels for 

the buttons will change.

Setpoint Display and 

Setpoint Up/Down Buttons

The current heating or cooling setpoint is displayed. 

These setpoints may be set using Nexia™ Home 

Intelligence, the Control’s internal schedule, or by 

pressing the Setpoint Up/Down buttons. Pressing 

the setpoint button changes the setpoint screen. The 

current mode is displayed at the top of the screen. 

Adjust the setpoint by pressing the up or down arrows. 

To change setpoint mode press the 

MODE

 button.

The heating and cooling setpoints will push each other 

if they are adjusted to within the minimum heat/cool 

separation setting. The default is 3 degrees.

Temperature Display

The 524 Control displays the current temperature as 

sensed by the internal temperature sensor.

The internal temperature sensor offset can be 

adjusted if necessary. 

MENU

 Button

Press to access other menus

Other menus can be accessed by pressing the 

MENU


button.

SCHED

 Button

Press to change the schedule mode

Hold: System maintains the current temperature 

setpoints and schedules are disregarded.

Run: Run the system schedule

Energy Saving Mode (ESM): Temperature setpoints 

selected in ESM are maintained. 

MODE

 Button

Press to change the system mode

Off: System off

Heat: Heating only

Cool: Cooling only

Auto: Heating/Cooling as necessary

FAN

 Button

Press to change the fan mode

Auto: Fan is on when cooling/heating is necessary

On: Fan constantly on

Circ: Fan is on for a user-selected number of minutes 

per hour. 

Operation

Summary of Contents for TZEMT524AA21MA

Page 1: ...is not compatible with the following system types Radiant floor systems Wall heating systems Î Î NOTE A 24 Volt common and hot wire MUST be connected to the control for operation CAUTION ELECTRICAL HAZARD Can cause electrical shock or equipment damage Disconnect power to heating and cooling equip ment before beginning installation MERCURY NOTICE When this Comfort Control is replacing an old thermo...

Page 2: ... 2 If your existing thermostat has a terminal named C COM X or B with a wire connected to it skip to 6 Label and remove old thermostat wires on page 3 The B terminal on Trane American Standard Weathertron and York thermostats is the 24V Common terminal On all other thermostats it servers another purpose 5 Connecting a 24V common wire 1 Locate all unused disconnected wires from the thermostat wire ...

Page 3: ... you had to connect a new 24 VAC common wire you will use the C label on that wire If you have a W terminal use the W1 label on that wire If your thermostat has any terminals with names that do not match any on the label write down the terminal names and wire colors for later reference TAKE A PICTURE It is recommended that you take a picture that clearly shows the wires attached to your existing t...

Page 4: ...equipment consult a qualified HVAC professional before proceeding Gas Hydronic With Fan Hydronic Without Fan Electric You have a BOILER You have a BOILER and an air handler You have a BOILER and a radiator or baseboard heaters You have an ELECTRIC furnace or an air handler INDOOR UNIT TYPE Your Indoor Heat Stages INDOOR HEAT STAGES Observe the wires connected to your existing thermostat and follow...

Page 5: ...ll the wires through the hole in center of wall plate 2 Position the new wall plate over the existing opening 3 Attach wall plate to wall using the two screws provided Do not overtighten 12 Review the wiring chart information Refer the chart below to determine which wires connect to the corresponding terminal on the 524 Control Note than you may have more than one wire connected to a single termin...

Page 6: ... Installer Settings is displayed 3 Press Select Equipment Type is Displayed 4 Press Select Outdoor Unit Type with the current selection is displayed 5 Press Select Using the up and down arrows navigate to the type of outdoor unit you have as you determined in 8 Identify your system type on page 4 6 Press Done Press Next Indoor Unit Type with the current selection is displayed 7 Press Select Using ...

Page 7: ... familiar with HVAC systems Menu Item Equipment Settings Setting Range Description Compressor Stage 1 MRT 3 9 Minutes Select the minimum runtime MRT of stage 1 compressor operation Compressor MOT 5 9 minutes Select the minimum offtime MOT for compressor operation Indoor Heat Stage 1 MRT 3 9 Minutes Select the minimum runtime MRT of stage 1 indoor heat Indoor Heat Stage 2 MRT 3 9 Minutes Select the...

Page 8: ...ription Blower On Delay Cooling 0 30 seconds Non Variable Speed blower only Select the cooling blower on delay Blower Off Delay Cooling 0 90 Seconds Non Variable Speed blower only Select the cooling blower off delay Blower On Delay Heating 0 30 Seconds Non Variable Speed blower only Select the compressor heating blower on delay Blower On Delay Heating 0 60 Seconds Select the hydronic heating blowe...

Page 9: ...ule or by pressing the Setpoint Up Down buttons Pressing the setpoint button changes the setpoint screen The current mode is displayed at the top of the screen Adjust the setpoint by pressing the up or down arrows To change setpoint mode press the MODE button The heating and cooling setpoints will push each other if they are adjusted to within the minimum heat cool separation setting The default i...

Page 10: ...creen times out Backlight Timeout 0 90 Seconds 20 Select how long after the last button press before the backlight dims Backlight On Percent 0 100 Percent Select the screen brightness when the backlight is lit Backlight Off Percent 0 100 Percent Select the screen brightness when the backlight dims Buzzer Enable Yes No Select whether button presses are audible Security Unlocked Display Lock Guest A...

Page 11: ...n all selections have been made press the Done button to register your changes and exit this menu item Press Next or Back to navigate to the next or previous menu item Menu Item Reminders Setting Range Description Filtration Enable Yes No Selecting yes enables the Filter Reminder feature System Maint Enable Yes No Selecting yes enables the System Maintenance Reminder feature When all selections ha...

Page 12: ...s NEXT or BACK until the desired day is displayed This is the from day and will be a day for which you previously programmed a schedule 4 Press SELECT 5 Press YES to copy the schedule to this day or NO to skip this day Cycle through the days of the week until your selection is complete 6 Press DONE to complete the copying process Press DONE again to return to the User Settings menu Schedule Menu I...

Page 13: ...while enrollment is taking place Enrollment is complete when the orange light becomes solid 3 Verify enrollment of the 524 Control 1 Press MENU from the 524 Control Home screen 2 Press NEXT to advance to the About screen and press SELECT 3 Press NEXT to advance through the menu options to Node ID If the number listed there is anything other than 00 the 524 Control has been successfully enrolled If...

Page 14: ...Wave Thermostat General V2 Device class used by the Z Wave control If you are using a controller that is not a Nexia bridge consult the instructions that came with the controller to find out how to enroll and exclude devices Installer settings are described earlier in this document Menu Item Exclude from Net About Installer Settings Clean Screen About Setting Description Version Current firmware v...

Page 15: ... system Heating will not come on 1 System mode is not set to Heat Auto or setpoint is set too low 2 Delta On for heating is set too high 3 Minimum off time delay is being enforced 4 Heating system may need service 1 Select the correct system mode and or raise the setpoint 2 Change the delta On setting for heating mode 3 Intended operation if objectionable lower the minimum off time delay lowest se...

Page 16: ... to the home If yes temporarily unpower the new equipment and then re test 524 Features TZEMT524AA21MA Comfort Control Features 24v Z Wave comfort control Remote access via smart phone tablet or P C requires a Nexia bridge Internet access and a Nexia Home Intelligence account Interactive 4 3 touchscreen 7 Day programmable 4 periods day Filter and maintenance service reminders Energy Savings Mode E...

Page 17: ...aints solvents or other chemicals Further the terms and conditions of this One 1 Year Limited Electronics and Mechanical Warranty do not apply to Purchased Product when 1 used in common area applications 2 used for purposes for which it was not designed or intended 3 subjected to alteration modification abuse misuse negligence or accident improper storage improper installation or maintenance or op...

Page 18: ...ly approved by the party responsible for compliance could void the user s authority to operate the equipment Les changements ou modifications non approuvés expressément par la partie responsable de la conformité pourrait annuler l autorité de l utilisateur à faire fonctionner l équipement This device complies with Industry Canada licence exempt RSS standard s Operation is subject to the following ...

Page 19: ...19 USER GUIDE 524 Control Installation and User Guide ...

Page 20: ...ww trane com Trane has a policy of continuous product and product data improvement and it reserves the right to change design and specifications without notice Literature Order Number 18 HD46D1 1 File number Supersedes NA Date 12 04 2014 Trane ...

Reviews: