


THE TRAC SECTION
TRACK ADJUSTMENT
The track belts are adjusted at the factory. The adjuster
bolt is torqued to 10 ft-lbs.
*
The track belt may stretch
and need further adjustment after a period of use.
To adjust the track, remove the battery cover, loosen the
two clamp bolts on top of the frame at each side using
the 3/4 size wrench provided. Lift the foot rest and turn
the adjuster bolt in front of the frame on each side
evenly. Tighten the adjuster bolts on each side to 10 ft-lbs.
*
After proper tension or
torque is obtained, re-tighten the clamp bolts.
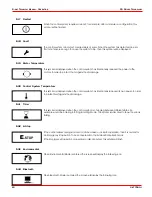
FOOT REST IN
UP POSITION
Clamp bolts (4)
Adjuster bolts (2)
TRACK REPLACEMENT
NOTICE: Track replacement should be done only on a flat hard surface.
Raise the tail wheel all the way up. Remove the jack and tool pouch from under the
battery cover. Assemble the jack. Slide the jack under the machine at an angle toward the
side you want to work on. Place the stem part of the jack under the tail wheel. Lower the
tail wheel until the side of the machine rises.
TURN OFF THE JOYSTICK AND
UNPLUG THE CABLE.
Remove the wrench from under the battery cover. Lift the foot rest. Using the supplied
multi-wrench, find the end marked 7/8. Turn the adjuster bolt on each side of the front
frame counter-clockwise until the adjuster bolts are loosened, about 2". Using the end
marked 3/4, loosen the two clamp bolts on each side of the frame top. Push both front
wheels back near the end of their slots. Pull out the drive pin in the rear wheel and turn it
1/4 turn, so that the wheel turns by hand.
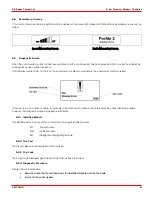
Slip the track on the wheels, making sure
the track center rib is in the grooves of all
the wheels. Tighten the adjuster bolts on
each side to 10 ft-lbs.
*
Measure each side,
front to rear axle, and adjust until equal. Re-
tighten the clamp bolts on both sides.
Release the drive pin and turn the
track/wheel to engage the drive pin. Plug the
cable into the joystick, turn it on and raise
the tail wheel. Remove the jack, put it and
the multi-tool away, and you are ready to
go. Check track tension after approximately 20 hours of runtime, and adjust accordingly.
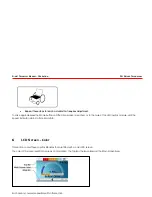
PLACE AGAINST THE CENTER AXLE
SLIDE JACK UNDER DECK FROM THE REAR
ASSEMBLE JACK
AS SHOWN
PLACE UNDER THE
TAILWHEEL PLATE
*
10 ft-lbs is a handle 6 inches long with 20 pounds applied at the end of the handle. If you are using the wrench supplied
with the machine the handle is about 6 inches long
.
Page 7
10-13-00 revised 9-13-06


