background image

75

Chapter 3 .    

Configure Touch P5 as a Repeater

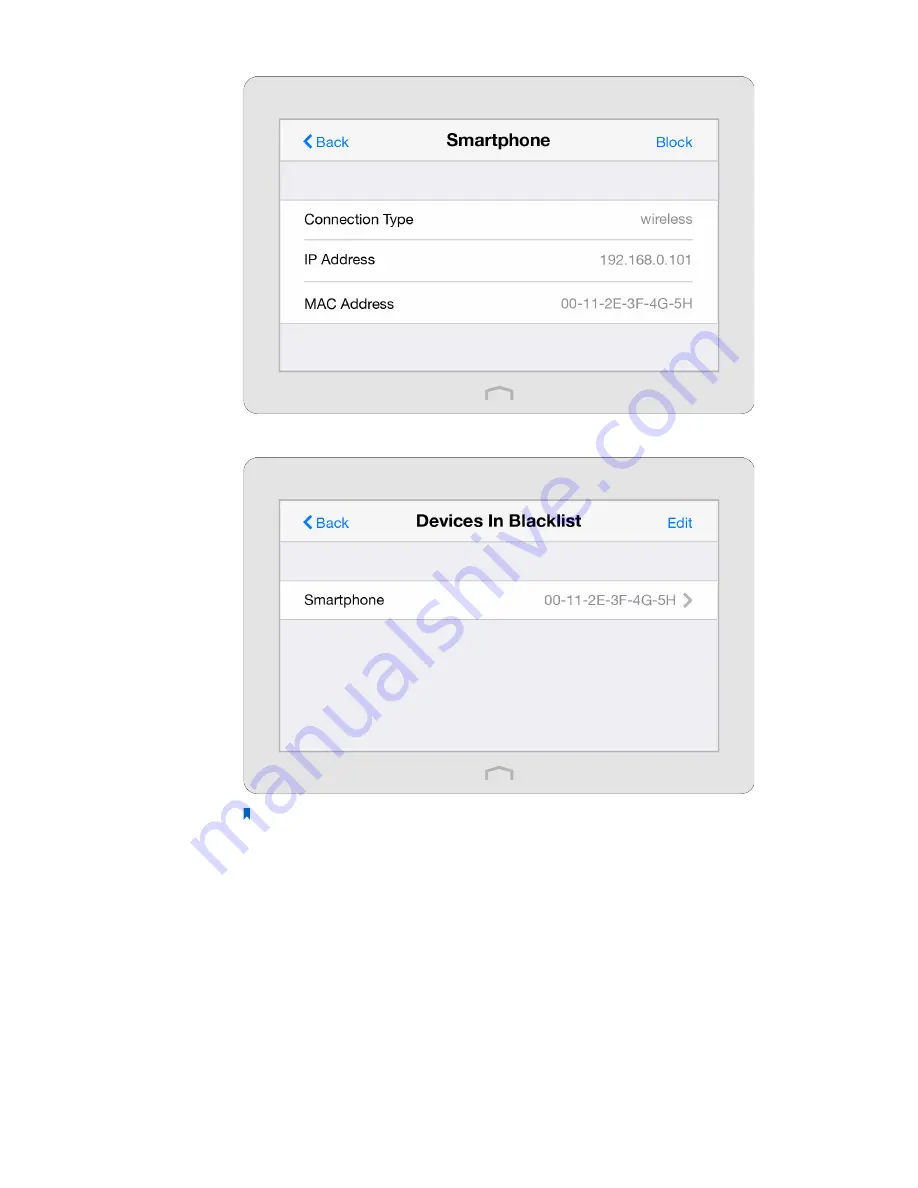
4.  The blocked device(s) will be added to 

Devices in Blacklist

 automatically.

Note: 

If you want to add a device manually or delete a blocked device, tap 

Edit

 on the 

Devices In 

Blacklist 

page to set up according to your needs.

Now devices in the blacklist cannot connect to your Touch P5.

Done!

Summary of Contents for Touch P5 AC1900

Page 1: ...REV1 0 0 1910011363 Touch P5 User Guide AC1900 Touch Screen Wi Fi Gigabit Router...

Page 2: ...Control 22 2 10 Printer Server 24 2 11 DDNS 28 2 12 LAN 29 2 13 DHCP Server 30 2 14 QoS 33 2 15 Clock 36 2 16 Screen Settings 39 2 17 Reboot Reset 40 2 18 Administrator Password 41 2 19 About 42 2 20...

Page 3: ...Administrator Password 82 3 11 About 83 3 12 FAQ 84 Chapter 4 Configure Touch P5 as an Access Point 85 4 1 Connect Your Touch P5 86 4 2 Log into Your Touch P5 87 4 3 Quick Setup 89 4 4 Mode Selection...

Page 4: ...he perfect way to accelerate a home multimedia network and solve congestion that multiple devices may cause 1900Mbps Concurrent Dual Band More Bandwidth Less Interference With 1300Mbps wireless speed...

Page 5: ...networked devices or remotely via FTP server 3 dual band external antennas and high power amplifiers provide maximum omni directional wireless coverage and reliability Beamforming Technology brings a...

Page 6: ...is periodically daily by default generated by your Touch P5 Home Screen Repeater Mode Total Clients Tap here to view clients information and block unauthorized clients Wireless Settings Tap here to ch...

Page 7: ...r a USB 2 0 printer USB 3 0 It s on the right front corner of your Touch P5 For connecting to a 3 0 USB storage device or a 3 0 USB printer It is also compatible with USB 2 0 devices Internet In route...

Page 8: ...er Mozilla Firefox and Apple Safari 1 5 Position Your Touch P5 Place your Touch P5 in a well ventilated place far from any heater or heating vent Avoid direct irradiation of any strong light such as s...

Page 9: ...iguration for all functions and it requires a connection wired or wireless between your Touch P5 and the device you are using to log into the web based management page Touchscreen utility supports con...

Page 10: ...on the modem and wait 2 minutes for it to restart 5 Turn on your Touch P5 and wait until the system boot on the screen completes 6 Connect your computer to your Touch P5 Option 1 Wired Connect your c...

Page 11: ...ed to use the new password that you have set to log in Option 2 Through Web based Utility The web based utility can be used on any Windows Macintosh or UNIX OS with a web browser such as Microsoft Int...

Page 12: ...9 Chapter 2 Configure Touch P5 as a Router Note Apps on the touchscreen will also need to use the new password that you have set to log in...

Page 13: ...open it 2 Set your Region and Time Zone and tap Next Note Per FCC regulations all Wi Fi products marketed in the U S are fixed to the U S region 3 Follow the on screen instructions to complete the co...

Page 14: ...ed and wireless devices simultaneously Repeater Mode Touch P5 can extend your existing wireless coverage by repeating the wireless signal Access Point Mode Touch P5 can transform your existing wired n...

Page 15: ...S region To enable or disable the wireless function Select the wireless network 2 4GHz or 5GHz and enable the Wireless Radio If you don t want to use the wireless function just uncheck the box If you...

Page 16: ...2 11b and 802 11g wireless clients 802 11b g n mixed Select if you are using a mix of 802 11b 802 11g and 802 11n wireless clients Note When 802 11n only mode is selected only 802 11n wireless station...

Page 17: ...etermines the interval of the DTIM Delivery Traffic Indication Message Enter a value between 1 and 15 beacon intervals The default value is 1 indicates the DTIM Interval is the same as Beacon Interval...

Page 18: ...of your Touch P5 is disabled Also the WPS function will be disabled if your wireless encryption for both 2 4GHz and 5GHz is WEP Please make sure the wireless function is enabled and is configured with...

Page 19: ...ection failed will appear if the connection cannot be established within 2 minutes Option 2 Use the PIN Use this option if your client device asks for your Touch P5 s PIN 1 Tap Connect to this router...

Page 20: ...ings won t be effective To change the guest network name SSID or hide SSID 1 Enter a new SSID using up to 32 characters The default SSID is TP LINK_Guest_XXXX TP LINK_Guest_XXXX_5G and the value is ca...

Page 21: ...w guests to see each other Select this checkbox to allow the clients in your guest network to access each other Allow guests to access my local network Select this checkbox to allow the clients in you...

Page 22: ...point Control what types of websites my children or other home network users can visit and even the times of day they are allowed to access the Internet For example I want to allow my children s devic...

Page 23: ...Multiple Select to set Internet access time for multiple days simultaneously AM PM Select to set time for the corresponding day s 4 Select the time period and the date and tap Done Note The access tim...

Page 24: ...elow are some sample entries to allow access a Enter a web address keyword e g wikipedia in blacklist to block access to the websites containing that keyword b Enter a web address domain name e g www...

Page 25: ...s wired or wireless from connecting to your Touch P5 Block some specific client devices from connecting to my Touch P5 1 On the menu screen tap the Devices Control icon to open it Toggle the button to...

Page 26: ...s will be added to Devices in Blacklist automatically Note If you want to add a device manually or delete a blocked device tap Edit on the Devices In Blacklist page to set up according to your needs N...

Page 27: ...uch P5 with a USB cable Restart the Printer Server app again to see the Printer Name listed on the screen Note You can check Printer Compatibility List at http www tp link com app usb to verify whethe...

Page 28: ...as Auto Connect Printer on every computer that needs printer service 1 Double click the icon on your desktop to launch the USB Printer Controller 2 Highlight the printer you share Windows Mac 3 Click...

Page 29: ...26 Chapter 2 Configure Touch P5 as a Router Mac 4 Select the printer you share then click Apply Windows Mac...

Page 30: ...this printer Windows Mac Note The Print Server also allows different clients to share the scan feature of MFPs Multi Function Printers To scan with TP LINK USB Printer Controller right click the print...

Page 31: ...cal servers FTP HTTP etc using domain name in no need of checking and remembering the IP address Note DDNS does not work if the ISP assigns a private WAN IP address such as 192 168 0 x to your Touch P...

Page 32: ...ith the Subnet Mask also defines the subnet that the connected devices are on If the IP address conflicts with another device on your local network or your network requires a specific IP subnet you ca...

Page 33: ...ient that is connected to your Touch P5 Once reserved the IP address will only be assigned to the same client by the DHCP server 1 On the menu screen tap the DHCP Server icon to open it 2 Configure th...

Page 34: ...s the LAN IP address of your Touch P5 Enter Primary DNS and Secondary DNS if the ISP offers 6 Tap Save To view the client information 1 Select DHCP Client List 2 You can view the information of connec...

Page 35: ...ble This Entry box and tap Save to make the settings effective shown as figure below Note If you want to modify a reserved address tap the reserved address to modify it If you want to add or delete a...

Page 36: ...QoS Quality of Service app can help to specify priority levels for some devices or applications thus help to avoid the situation 1 On the menu screen tap the QoS icon to open it 2 Select QoS Settings...

Page 37: ...y Tap Save to add the rule to the list Select By Application to add the rule Tap Application to select the corresponding application if the application is not listed tap Custom Application to enter be...

Page 38: ...35 Chapter 2 Configure Touch P5 as a Router 5 The QoS rule will list in the priority table Note If you want to add or delete a QoS rule tap Edit to set up according to your needs...

Page 39: ...e settings To set the time of your Touch P5 1 Select Time Settings 2 Toggle on or off to customize the time display in 12 hour or 24 hour format 3 Two ways for you to configure the system time Get aut...

Page 40: ...second NTP Server Optional d Tap Obtain to get the time and then tap Save Manually Select to set the date and time manually then tap Save To set up daylight saving time of your Touch P5 1 Select Dayl...

Page 41: ...lect Clock Display 2 Select the clock type and tap Save 3 To use your Touch P5 as a clock you need to stay at the home page of Clock app Then the clock will display on the screen while your Touch P5 i...

Page 42: ...5 1 On the menu screen tap the Screen Settings icon to open it 2 Drag the scroll bar to set the brightness of the screen 3 By default the screen saver will start if the screen is idle for 3 minutes yo...

Page 43: ...ctory default settings 1 On the menu screen tap the Reboot Reset icon to open it 2 Reboot Your Touch P5 will shut down and boot again Reset To reset your Touch P5 to its factory default settings and a...

Page 44: ...On the menu screen tap the Administrator Password icon to open it 2 Enter the old password Enter the new password and enter again to confirm 3 Tap Save Note 1 If you disable this function your touchs...

Page 45: ...42 Chapter 2 Configure Touch P5 as a Router 2 19 About The About app displays the product model hardware and firmware information of your Touch P5 On the menu screen tap the About icon to open it...

Page 46: ...ve it to avoid data damage Select Advanced USB Settings Device Settings and click 2 Access Your USB Disk By default all the network clients can access all folders on your USB disk Refer to the followi...

Page 47: ...heck box network clients can modify this folder Enable Media Sharing Tick to enable media sharing for this folder and you can view photos play music and watch movies stored on the USB disk directly fr...

Page 48: ...e and use the name to access your USB disk 1 Visit http tplinkwifi net then log in with the username and password you set for your Touch P5 2 Go to Advanced USB Settings Sharing Access 3 Make sure Net...

Page 49: ...xternal power has been connected If you use a USB hard drive make sure its file system is FAT32 or NTFS Before you physically disconnect a USB device from your Touch P5 safely remove it to avoid data...

Page 50: ...ard To upload use a third party app for network files management Pad Use a third party app for network files management Note Click DDNS to learn how to set up a domain name for your Touch P5 2 Customi...

Page 51: ...d on Note If you use USB hubs make sure no more than four devices are connected to your Touch P5 If the USB storage device requires using bundled external power make sure the external power has been c...

Page 52: ...to disable Share All then click Add to add a new sharing folder 4 Select the Volume Name and Folder Path then enter a Folder Name as you like 5 Tick Enable Media Sharing and click OK Note Touch P5 can...

Page 53: ...ontact your ISP or judge according to the information provided by your ISP 1 Static IP Fill in blanks and click Save 2 Dynamic IP Click Advanced to have more configuration if ISP requires Click Save 3...

Page 54: ...51 Chapter 2 Configure Touch P5 as a Router 5 Click Status on the left to check whether you succeed or not The following figure is an example of a successful PPPoE configuration...

Page 55: ...oxy IPTV can work behind your Touch P5 now You can connect your set top box to any of your Touch P5 s LAN port If IGMP is not the technology your ISP apply to provide IPTV service 1 Select the Enable...

Page 56: ...53 Chapter 2 Configure Touch P5 as a Router Your IPTV setup is done now You may need other configurations on your set top box before enjoying your TV Done...

Page 57: ...realize the service and provide it to the Internet users At the same time virtual server can keep the local network safe as other services are still invisible from the Internet Virtual server can be...

Page 58: ...Service Type WAN IP External Port or Ser vice Type Domain Name External Port to visit your local resources 2 23 2 Open Ports Dynamically by Port Triggering Port triggering can specify a triggering por...

Page 59: ...camera and database software you can set the computer to be a DMZ host Note DMZ is more applicable in the situation that users are not clear about which ports to open When it is enabled the DMZ host i...

Page 60: ...ime communication such as VoIP or telephone conference or remote assistance etc Note 1 Only the application supporting UPnP protocol can use this feature 2 UPnP feature needs the support of operating...

Page 61: ...nload the latest firmware file from our website TP LINK Support 2 Visit http tplinkwifi net and log in with the username and password you set for your Touch P5 Go to Advanced System Tools Firmware Upg...

Page 62: ...t and you will need to re configure your Touch P5 Q4 What can I do if I forgot my administrator password With your Touch P5 powered on press and hold the Reset button on the back panel until the Touch...

Page 63: ...60 Chapter 2 Configure Touch P5 as a Router 4 Click LAN settings deselect the following three options and click OK 5 Go to Advanced Restore advanced settings and click OK...

Page 64: ...p manufacturer 2 Make sure the wireless adapter driver is installed successfully and the wireless adapter is enabled On Windows 7 a If you see the message No connections are available it is usually be...

Page 65: ...you can find other wireless network except your own please follow the steps below 1 Make sure your computer device is still in the range of your Touch P5 modem move closer if it is currently too far...

Page 66: ...repeater devices are set to work in half duplex instead of full duplex mode In other words the repeater has to process one way communication between your host network and the terminal clients so the t...

Page 67: ...its extended network 1 Install the antennas and position them vertically 2 Plug your Touch P5 s power adapter into an electrical outlet near your host network then turn on it and wait until the syste...

Page 68: ...location Be sure it is always within the wireless coverage of the host network Half way Between Generally the ideal location for your Touch P5 is half way between the host network and wireless client...

Page 69: ...to log into your Touch P5 1 Install the antennas and position them vertically 2 Plug your Touch P5 s power adapter into an electrical outlet near your host network then turn on it and wait until the...

Page 70: ...Generally the ideal location for your Touch P5 is half way between the host network and wireless client If the wireless signal is not satisfactory you may place your Touch P5 somewhat nearer to the ho...

Page 71: ...uch P5 shares your host network s Wi Fi password for both 2 4GHz and 5GHz networks but may have different wireless network name if you customize the names during the configuration Please connect your...

Page 72: ...e devices can connect to the wireless network of the host router Host Router DVR Game Console Smart TV If both 2 4GHz and 5GHz wireless bands of your Touch P5 are connected to host network the 5GHz ba...

Page 73: ...red and wireless devices simultaneously Repeater Mode Touch P5 can extend your existing wireless coverage by repeating the wireless signal Access Point Mode Touch P5 can transform your existing wired...

Page 74: ...work and extended network according to your needs 1 On the menu screen tap the Wireless Settings icon to open it Set your Region Note Per FCC regulations all Wi Fi products marketed in the U S are fix...

Page 75: ...ur Touch P5 closer to your host router then tap Rescan Or select Other to enter the SSID manually 5 Once a network is selected the SSID and security settings of that network will automatically be fill...

Page 76: ...D to copy the host router s SSID or create a new name using up to 32 characters This field is case sensitive Hide SSID Select this checkbox if you want to hide your Touch P5 s SSID from the Wi Fi netw...

Page 77: ...rs wired or wireless from connecting to your Touch P5 Block some specific client devices from connecting to my Touch P5 1 On the menu screen tap the Devices Control icon to open it Toggle the button t...

Page 78: ...s will be added to Devices in Blacklist automatically Note If you want to add a device manually or delete a blocked device tap Edit on the Devices In Blacklist page to set up according to your needs...

Page 79: ...nd Random changes may lead to Internet disconnection 1 On the menu screen tap the LAN icon to open it 2 Tap Type to select Use the following IP address and tap Done 3 Tap IP Address to enter an IP add...

Page 80: ...also manually reserve an IP address for a client that is connected to your Touch P5 Once reserved the IP address will only be assigned to the same client by the DHCP server 1 On the menu screen tap th...

Page 81: ...s the client will be automatically assigned a new dynamic IP address Default Gateway Optional Enter the LAN IP address of your Touch P5 Primary Secondary DNS Optional Enter this parameters as provided...

Page 82: ...hich will be reserved for the device 4 Enter the Description for the device 5 Check the Enable This Entry box and tap Save to make the settings effective shown as figure below Note If you want to modi...

Page 83: ...P5 1 On the menu screen tap the Screen Settings icon to open it 2 Drag the scroll bar to set the brightness of the screen 3 By default the screen saver will start if the screen is idle for 3 minutes y...

Page 84: ...ctory default settings 1 On the menu screen tap the Reboot Reset icon to open it 2 Reboot Your Touch P5 will shut down and boot again Reset To reset your Touch P5 to its factory default settings and a...

Page 85: ...1 On the menu screen tap the Administrator Password icon to open it 2 Enter the old password Enter the new password and enter again to confirm 3 Tap Save Note 1 If you disable this function your touch...

Page 86: ...83 Chapter 3 Configure Touch P5 as a Repeater 3 11 About The About app displays the product model hardware and firmware information of your Touch P5 On the menu screen tap the About icon to open it...

Page 87: ...he Internet 1 Check if the Internet is working properly by connecting to your host network If not contact your Internet Service Provider 2 Move closer to the host router Clear obstacles in the way bet...

Page 88: ...lement of ports for your wired router Your Touch P5 supports two configuration methods Web based utility and Touchscreen utility Web based utility includes the configuration for all functions and it r...

Page 89: ...n is through an Ethernet cable from the wall instead of a wired router connect the Ethernet cable directly to your Touch P5 s Internet port 3 Turn on your Touch P5 and wait until the system boot on th...

Page 90: ...ed utility can be used on any Windows Macintosh or UNIX OS with a web browser such as Microsoft Internet Explorer Mozilla Firefox or Apple Safari Follow the steps below to log into your Touch P5 1 If...

Page 91: ...88 Chapter 4 Configure Touch P5 as an Access Point...

Page 92: ...ap Next Note Per FCC regulations all Wi Fi products marketed in the U S are fixed to the U S region 3 Follow the on screen instructions to complete the configuration 4 Once the configuration is comple...

Page 93: ...wired and wireless devices simultaneously Repeater Mode Touch P5 can extend your existing wireless coverage by repeating the wireless signal Access Point Mode Touch P5 can transform your existing wir...

Page 94: ...he U S region To enable or disable the wireless function Select the wireless network 2 4GHz or 5GHz and enable the Wireless Radio If you don t want to use the wireless function just uncheck the box If...

Page 95: ...11g n mixed Select if you are using both 802 11b and 802 11g wireless clients 802 11b g n mixed Select if you are using a mix of 802 11b 802 11g and 802 11n wireless clients Note When 802 11n only mo...

Page 96: ...on of your Touch P5 is disabled Also the WPS function will be disabled if your wireless encryption for both 2 4GHz and 5GHz is WEP Please make sure the wireless function is enabled and is configured w...

Page 97: ...Connection failed will appear if the connection cannot be established within 2 minutes Option 2 Use the PIN Use this option if your client device asks for your Touch P5 s PIN 1 Tap Connect to this AP...

Page 98: ...sers wired or wireless from connecting to your Touch P5 Block some specific client devices from connecting to my Touch P5 1 On the menu screen tap the Devices Control icon to open it Toggle the button...

Page 99: ...ice s will be added to Devices in Blacklist automatically Note If you want to add a device manually or delete a blocked device tap Edit on the Devices In Blacklist page to set up according to your nee...

Page 100: ...emand Random changes may lead to Internet disconnection 1 On the menu screen tap the LAN icon to open it 2 Tap Type to select Use the following IP address and tap Done 3 Tap IP Address to enter an IP...

Page 101: ...n also manually reserve an IP address for a client that is connected to your Touch P5 Once reserved the IP address will only be assigned to the same client by the DHCP server 1 On the menu screen tap...

Page 102: ...ires the client will be automatically assigned a new dynamic IP address Default Gateway Optional Enter the LAN IP address of your Touch P5 Primary Secondary DNS Optional Enter this parameters as provi...

Page 103: ...s which will be reserved for the device 4 Enter the Description for the device 5 Check the Enable This Entry box and tap Save to make the settings effective shown as figure below Note If you want to m...

Page 104: ...ch P5 1 On the menu screen tap the Screen Settings icon to open it 2 Drag the scroll bar to set the brightness of the screen 3 By default the screen saver will start if the screen is idle for 3 minute...

Page 105: ...s factory default settings 1 On the menu screen tap the Reboot Reset icon to open it 2 Reboot Your Touch P5 will shut down and boot again Reset To reset your Touch P5 to its factory default settings a...

Page 106: ...pp 1 On the menu screen tap the Administrator Password icon to open it 2 Enter the old password Enter the new password and enter again to confirm 3 Tap Save Note 1 If you disable this function your to...

Page 107: ...4 Chapter 4 Configure Touch P5 as an Access Point 4 13 About The About app displays the product model hardware and firmware information of your Touch P5 On the menu screen tap the About icon to open i...

Page 108: ...ck panel until the Touch P5 logo displays Note Once your Touch P5 is reset all the settings will be lost and you will need to re configure your Touch P5 Q3 What can I do if I forgot my administrator p...

Page 109: ...category 5 5e cable maximum 100m EIA TIA 568 100 STP maximum 100m Safety Emissions FCC CE Wireless Frequency Band 2 4GHz 5GHz Radio Data Rate 11b 1 2 5 5 11Mbps 11a g 6 9 12 18 24 36 48 54Mbps 11n up...

Page 110: ...that are connected to a DHCP server DMZ Demilitarized Zone A Demilitarized Zone allows one local host to be exposed to the Internet for a special purpose service such as Internet gaming or videoconfe...

Page 111: ...duct names are trademarks or registered trademarks of their respective holders No part of the specifications may be reproduced in any form or by any means or used to make any derivative such as transl...

Page 112: ...used by unauthorized modifications to this equipment Such modifications could void the user s authority to operate the equipment FCC RF Radiation Exposure Statement This equipment complies with FCC RF...

Page 113: ...terf rences et 2 cet appareil doit accepter toute interf rence y compris celles susceptibles de provoquer un fonctionnement non souhait de l appareil This device has been designed to operate with the...

Page 114: ...nect the product or the power adapter from the power source Don t disassemble the product or make repairs yourself You run the risk of electric shock and voiding the limited warranty If you need servi...

Page 115: ...tives 2006 95 EC Directives 1999 519 EC Directives 2011 65 EU EN 300 328 V1 8 1 EN 301 489 1 V1 9 2 EN 301 489 17 V2 2 1 EN 55022 2010 AC 2011 EN 55024 2010 EN 61000 3 2 2006 A1 2009 A2 2009 EN 61000...

Reviews: