background image

TL-WR941N/TL-WR941ND

 Wireless N Router  


2. Is 

the 

TCP/IP 

configuration for your PC correct? 

)


Note:  

If the Router's IP address is 192.168.1.1, your PC's IP address must be within the range of 
192.168.1.2 ~ 192.168.1.254. 

3.2  Quick Installation Guide 

With a Web-based (Internet Explorer or Netscape

®

 Navigator) utility, it is easy to configure and 

manage the TL-WR941ND Wireless N Router. The Web-based utility can be used on any 

Windows, Macintosh or UNIX OS with a Web browser. 

1.  To access the configuration utility, open a web-browser and type in the default address 

http://192.168.1.1

 in the address field of the browser. 


Figure 3-3

    Login the Router 

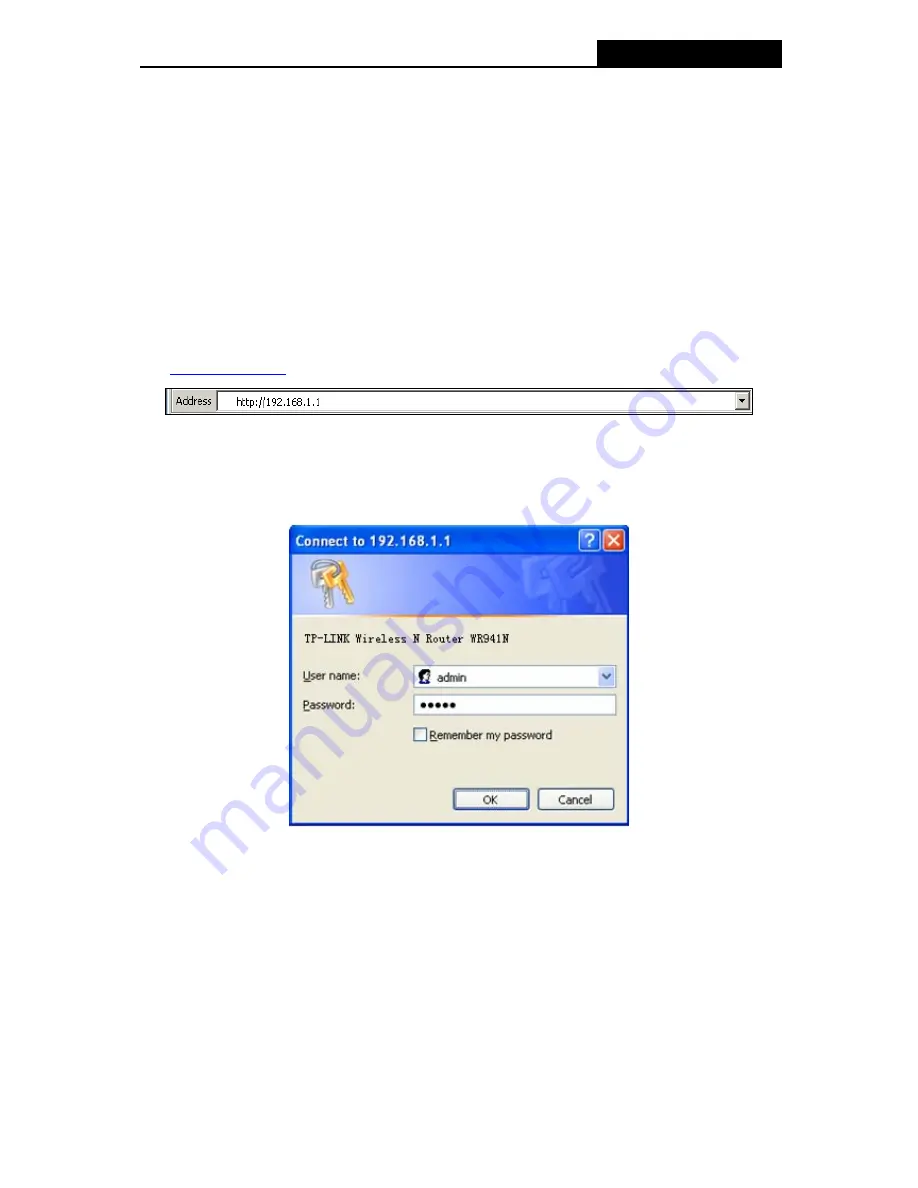
After a moment, a login window will appear, similar to the Figure 3-4. Enter 

admin 

for the User 

Name and Password, both in lower case letters. Then click the 

OK

 button or press the 

Enter

 key. 


Figure 3-4  Login Windows 

)


Note: 

If the above screen does not pop-up, it means that your Web-browser has been set to a proxy. Go 
to Tools menu>Internet Options>Connections>LAN Settings, in the screen that appears, cancel 
the Using Proxy checkbox, and click 

OK

 to finish it.


2.  After successfully login, you can click the 

Quick Setup

 to quickly configure your Router.   

-10- 

Summary of Contents for TL-WR941N

Page 1: ...TL WR941N TL WR941ND Wireless N Router Rev 1 0 5 1910010234...

Page 2: ...ce with the instructions may cause harmful interference to radio communications However there is no guarantee that interference will not occur in a particular installation If this equipment does cause...

Page 3: ...tional restrictions This device is intended for home and office use in all EU countries and other countries following the EU directive 1999 5 EC without any limitation except for the countries mention...

Page 4: ...N 301 489 17 V1 3 2 2008 EN 61000 3 2 2006 EN 61000 3 3 1995 A1 2001 A2 2005 EN60950 1 2006 Recommendation 1999 519 EC EN62311 2008 Directives 2004 108 EC The above product is in conformity with the f...

Page 5: ...tem Requirements 6 2 2 Installation Environment Requirements 6 2 3 Connecting the Router 6 Chapter 3 Quick Installation Guide 8 3 1 TCP IP Configuration 8 3 2 Quick Installation Guide 10 Chapter 4 Con...

Page 6: ...ty 52 4 9 1 Basic Security 52 4 9 2 Advanced Security 54 4 9 3 Local Management 55 4 9 4 Remote Management 56 4 10 Parental Control 57 4 11 Access Control 60 4 11 1 Rule 60 4 11 2 Host 63 4 11 3 Targe...

Page 7: ...77 4 16 1 Time Setting 78 4 16 2 Diagnostic 79 4 16 3 Firmware Upgrade 80 4 16 4 Factory Defaults 81 4 16 5 Backup Restore 81 4 16 6 Reboot 82 4 16 7 Password 83 4 16 8 System Log 83 4 16 9 Statistic...

Page 8: ...Router DC Power Adapter for TL WR941N TL WR941ND Wireless N Router Quick Installation Guide Resource CD for TL WR941N TL WR941ND Wireless N Router including This Guide Other Helpful Information Note M...

Page 9: ...s Multiple Security Protections With multiple protection measures including SSID broadcast control and wireless LAN 64 128 152 bit WEP encryption Wi Fi protected Access WPA2 PSK WPA PSK as well as adv...

Page 10: ...ides WPA WPA2 WPA PSK WPA2 PSK authentication TKIP AES encryption security Shares data and Internet access for users supporting Dynamic IP Static IP PPPoE Internet access Supports Virtual Server Speci...

Page 11: ...Wireless function is disabled WLAN Flashing The Wireless function is enabled Off There is no device linked to the corresponding port On There is a device linked to the corresponding port but there is...

Page 12: ...use the power adapter provided with this TL WR941N 941ND Wireless N Router RESET There are two ways to reset to the Router s factory defaults 1 Use the Factory Defaults function on System Tools Factor...

Page 13: ...onnecting the Router Before installing the Router make sure your PC is connected to the Internet through the broadband service successfully If there is any problem please contact your ISP After that p...

Page 14: ...941N TL WR941ND Wireless N Router electrical outlet The Router will start to work automatically 7 Power on your PC and Cable DSL Modem Figure 2 1 Hardware Installation of the TL WR941ND Wireless N Rou...

Page 15: ...to how to do this please refer to Appendix B Configuring the PC 2 Configure the network parameters The IP address is 192 168 1 xxx xxx is any number from 2 to 254 Subnet Mask is 255 255 255 0 and Gat...

Page 16: ...2 it means the connection between your PC and the Router is failed Figure 3 2 Failure result of Ping command Please check the connection following these steps 1 Is the connection between your PC and...

Page 17: ...ion utility open a web browser and type in the default address http 192 168 1 1 in the address field of the browser Figure 3 3 Login the Router After a moment a login window will appear similar to the...

Page 18: ...nction If you are sure of what kind of connection type your ISP provides you can select the very type and click Next to go on configuring 4 If you select Auto Detect the Router will automatically dete...

Page 19: ...e next screen will appear as shown in Figure 3 8 Figure 3 8 Quick Setup Static IP IP Address This is the WAN IP address as seen by external users on the Internet including your ISP Enter the IP addres...

Page 20: ...er in a region other than one of those specified in this field If your country or region is not listed please contact your local government agency for assistance Channel This field determines which op...

Page 21: ...ect the outcome It would also be a good idea to write down the key and all related wireless security settings No Change If you chose this option wireless security configuration will not change These s...

Page 22: ...fter your successful login you will see the fifteen main menus on the left of the Web based utility On the right there are the corresponding explanations and instructions The detailed explanations for...

Page 23: ...ND Wireless N Router Figure 4 1 Router Status 4 3 Quick Setup Please refer to Section 3 2 Quick Installation Guide 4 4 QSS This section will guide you add a new wireless device to an existing network...

Page 24: ...evice to the existing network manually by clicking this button b To add a new device If the wireless adapter supports Wi Fi Protected Setup WPS you can establish a wireless connection between wireless...

Page 25: ...xt screen appears Click Finish to complete the QSS configuration The QSS Configuration Screen of Wireless Adapter Method Two Step 1 Press the QSS button on the front panel of the Router Step 2 For the...

Page 26: ...3 Wait for a while until the next screen appears Click Finish to complete the QSS configuration The QSS Configuration Screen of Wireless Adapter Method Three Step 1 Keep the default QSS Status as Ena...

Page 27: ...click Connect Step 3 For the configuration of the wireless adapter please choose Push the button on my access point in the configuration utility of the QSS as below and click Next The QSS Configurati...

Page 28: ...Enabled and click the Add device button in Figure 4 2 then the following screen will appear Step 2 Choose Enter the new device s PIN and enter the PIN code of the wireless adapter in the field behind...

Page 29: ...he Current PIN code of the Router in Figure 4 2 each Router has its unique PIN code Here takes the PIN code 12345670 of this Router for example Step 2 For the configuration of the wireless adapter ple...

Page 30: ...as been successfully added to the network b The QSS function cannot be configured if the Wireless Function of the Router is disabled Please make sure the Wireless Function is enabled before configurin...

Page 31: ...ss to login the Router b If the new LAN IP Address you set is not in the same subnet the IP Address pool of the DHCP server will change accordingly at the same time while the Virtual Server and DMZ Ho...

Page 32: ...u find error when you go to a Web site after entering the DNS addresses it is likely that your DNS servers are set up improperly You should contact your ISP to get DNS server addresses Get IP with Uni...

Page 33: ...Figure 4 8 Figure 4 8 WAN PPPoE User Name Password Enter the User Name and Password provided by your ISP These fields are case sensitive Secondary Connection It s available only for PPPoE Connection...

Page 34: ...necting The connection will only be established in the period from the start time to the end time both are in HH MM format Note Only when you have configured the system time on System Tools Time page...

Page 35: ...y ISP check box and enter the IP address provided by your ISP in dotted decimal notation Detect Online Interval The Router will detect Access Concentrator online at every interval The default value is...

Page 36: ...LD qld bigpond net au MTU Size The normal MTU Maximum Transmission Unit value for most Ethernet networks is 1500 Bytes It is not recommended that you change the default MTU Size unless required by you...

Page 37: ...be disconnected automatically after a specified inactivity period and re established when you attempt to access the Internet again Click the Connect button to connect immediately Click the Disconnect...

Page 38: ...uter to disconnect from your Internet connection after a specified period of inactivity Max Idle Time If your Internet connection has been terminated due to inactivity Connect on Demand enables the Ro...

Page 39: ...you attempt to access the Internet again To use this option click the radio button If you want your Internet connection to remain active at all times enter 0 in the Max Idle Time field Otherwise ente...

Page 40: ...dio button Connect Manually You can configure the Router to make it connect or disconnect manually After a specified period of inactivity Max Idle Time the Router will disconnect from your Internet co...

Page 41: ...t MAC address of the WAN port If your ISP requires you to register the MAC address please enter the correct MAC address into this field in XX XX XX XX XX XX format X is any hexadecimal digit Your PC s...

Page 42: ...dering your wireless network security the default SSID is set to be TP LINK_xxxxxx xxxxxx indicates the last unique six numbers of each Router s MAC address This value is case sensitive For example TP...

Page 43: ...d that you set the Mode to 802 11b g n and all of 802 11b 802 11g and 802 11n wireless stations can connect to the Router Channel width Select any channel width from the pull down list The default set...

Page 44: ...t want to use wireless security select this check box but it s strongly recommended to choose one of the following modes to enable security WEP It is based on the IEEE 802 11 standard If you select th...

Page 45: ...P key entry is invalid 64 bit You can enter 10 hexadecimal digits any combination of 0 9 a f A F zero key is not promoted or 5 ASCII characters 128 bit You can enter 26 hexadecimal digits any combinat...

Page 46: ...atically based on the wireless station s capability and request Encryption When WPA PSK or WPA is set as the Authentication Type you can select either Automatic or TKIP or AES as Encryption Note If yo...

Page 47: ...Add New button The Add or Modify Wireless MAC Address Filtering entry page will appear shown in Figure 4 21 Figure 4 21 Add or Modify Wireless MAC Address Filtering entry To add or modify a MAC Addre...

Page 48: ...55 58 01 are able to access the Router but all the other wireless stations cannot access the Router you can configure the Wireless MAC Address Filtering list by following these steps 1 Click the Enabl...

Page 49: ...ata frame The default value is 2346 Fragmentation Threshold This value is the maximum size determining whether packets will be fragmented Setting the Fragmentation Threshold too low may result in poor...

Page 50: ...Statistics you can see the MAC Address Current Status Received Packets and Sent Packets for each connected wireless station Figure 4 23 The Router attached wireless stations MAC Address The connected...

Page 51: ...ver which provides the TCP IP configuration for all the PC s that are connected to the Router on the LAN Figure 4 25 DHCP Settings DHCP Server Enable or Disable the DHCP server If you disable the Serv...

Page 52: ...e To use the DHCP server function of the Router you must configure all computers on the LAN as Obtain an IP Address automatically mode 4 7 2 DHCP Clients List Choose menu DHCP DHCP Clients List you ca...

Page 53: ...e Router reserved Status The status of this entry either Enabled or Disabled To Reserve IP addresses 1 Click the Add New button Pop up Figure 4 28 2 Enter the MAC address in XX XX XX XX XX XX format a...

Page 54: ...S Email and FTP A virtual server is defined as a service port and all requests from the Internet to this service port will be redirected to the computer specified by the server IP Any PC that was used...

Page 55: ...r server has more than one type of available service please select another service and enter the same IP Address for that computer or server To modify or delete an existing entry 1 Click the Modify in...

Page 56: ...necessary the external host will be able to connect to the local host using one of the ports defined in the Incoming Ports field Trigger Port The port for outgoing traffic An outgoing connection usin...

Page 57: ...elect Enable in Status field 6 Click the Save button to save the new rule Figure 4 33 Add or Modify a Triggering Entry To modify or delete an existing entry 1 Click the Modify in the entry you want to...

Page 58: ...ecause its IP Address may be changed when using the DHCP function Figure 4 34 DMZ To assign a computer or server to be a DMZ server 1 Click the Enable radio button 2 Enter the local host IP Address in...

Page 59: ...opened Internal Port Internal port which the router opened for local host IP Address The UPnP device that is currently accessing the router Status The port s status displayed here Enabled means that...

Page 60: ...PP to be tunneled through an IP network To allow PPTP tunnels to pass through the Router keep the default Enabled z L2TP Passthrough Layer 2 Tunneling Protocol L2TP is the method used to enable Point...

Page 61: ...tacked by TCP SYN Flood UDP Flood and ICMP Flood in the screen as shown in Figure 4 38 Figure 4 38 Advanced Security Packets Statistics Interval 5 60 The default value is 10 Select a value between 5 a...

Page 62: ...LOOD Attack Filtering TCP SYN FLOOD Packets Threshold 5 3600 The default value is 50 Enter a value between 5 3600 When the current TCP SYN FLOOD Packets numbers is beyond the set value the Router will...

Page 63: ...digit Only the PCs with MAC address listed can use the password to browse the built in web pages to perform Administrator tasks while all the others will be blocked After click the Add button your PC...

Page 64: ...255 then all the hosts can access the Router from internet Note 1 To access the Router you should type your Router s WAN IP address into your browser s address in IE or Location in Navigator box follo...

Page 65: ...o add a new entry please follow the steps below 1 Click the Add New button and the next screen will pop up as shown in Figure 4 42 2 Enter the MAC address of the PC e g 00 11 22 33 44 AA you d like to...

Page 66: ...cess www google com on Saturday only while the parent PC with MAC address 00 11 22 33 44 BB is without any restriction you should follow the settings below 1 Click Parental Control menu on the left to...

Page 67: ...to complete the settings Then you will go back to the Parental Control Settings page and see the following list as shown in Figure 4 43 Figure 4 43 Parental Control Settings 4 11Access Control Figure...

Page 68: ...e Router Deny means that the Router rejects the packets to go through the Router Status This field displays the status of the rule Enabled means the rule will take effect Disabled means the rule will...

Page 69: ...oogle com only from 18 00 to 20 00 on Saturday and Sunday and forbid other hosts in the LAN to access the Internet you should follow the settings below 1 Click Access Control Host in the left to enter...

Page 70: ...ssary for the Access Control Rule Figure 4 47 Host Settings Host Description Here displays the description of the host and this description is unique Information Here displays the information about th...

Page 71: ...0 11 22 33 44 AA you should first follow the settings below 1 Click Add New button in Figure 4 47 to enter the Add or Modify a Host Entry page 2 In Mode field select MAC Address from the drop down lis...

Page 72: ...rom Common Service Port drop down list so that the Target Port will be automatically filled If the Common Service Port drop down list doesn t have the service you want specify the Target Port manually...

Page 73: ...www google com only you should first follow the settings below 1 Click Add New button in Figure 4 50 to enter the Add or Modify an Access Target Entry page 2 In Mode field select Domain Name from the...

Page 74: ...can edit or delete an existing schedule To add a new schedule follow the steps below 1 Click Add New button shown in Figure 4 53 and the next screen will pop up as shown in Figure 4 54 2 In Schedule...

Page 75: ...chedule Description field create a unique description for the schedule e g Schedule_1 3 In Day field check the Select Days radio button and then select Sat and Sun 4 In Time field enter 1800 in Start...

Page 76: ...determines which portion of an IP Address is the network portion and which portion is the host portion Gateway This is the IP Address of the gateway device that allows for contact between the Router...

Page 77: ...ngress Bandwidth in the next screen Their values you configure should be less than 100000Kbps For optimal control of the bandwidth please select the right Line Type and ask your ISP for the total band...

Page 78: ...download bandwidth through the WAN port the default is 0 Enable This displays the status of the rule Modify Click Modify to edit the rule Click Delete to delete the rule To add modify a Bandwidth Cont...

Page 79: ...dress The MAC address of the controlled computer in the LAN IP Address The assigned IP address of the controlled computer in the LAN Bind Check this option to enable ARP binding for a specific device...

Page 80: ...the Find button in the page as shown in Figure 4 64 Figure 4 64 Find IP MAC Binding Entry Click the Enable All button to make all entries enabled Click the Delete All button to delete all entries 4 14...

Page 81: ...s well Likewise Load All only loads the items without interference to the IP MAC Binding list 4 15Dynamic DNS Choose menu Dynamic DNS and you can configure the Dynamic DNS function The Router offers t...

Page 82: ...ype the User Name for your DDNS account 3 Type the Password for your DDNS account 4 Click the Login button to log in to the DDNS service Connection Status The status of the DDNS service connection is...

Page 83: ...NS account 3 Type the Domain Name you received from dynamic DNS service provider here 4 Click the Login button to log in to the DDNS service Connection Status The status of the DDNS service connection...

Page 84: ...you received from dynamic DNS service provider 4 Click the Login button to log in the DDNS service Connection Status The status of the DDNS service connection is displayed here Click Logout to log ou...

Page 85: ...the Router will get the time from the NTP Server preferentially In addition the Router built in some common NTP Servers so it can get time automatically once it connects the Internet To configure the...

Page 86: ...e resolution to a given host or gateway z Traceroute This diagnostic tool tests the performance of a connection Note You can use ping traceroute to test both numeric IP address or domain name If pingi...

Page 87: ...use this tool at one time Options Number of Pings Ping Size and Ping Timeout are used for Ping function Option Tracert Hops are used for Tracert function 4 16 3 Firmware Upgrade Choose menu System Too...

Page 88: ...s 3 Do not turn off the Router or press the Reset button while the firmware is being upgraded otherwise the Router may be damaged 4 The Router will reboot after the upgrading has been finished 4 16 4...

Page 89: ...and the Router will restart automatically Keep the Router on during the upgrading process to prevent any damage 4 16 6 Reboot Choose menu System Tools Reboot you can click the Reboot button to reboot...

Page 90: ...user name and password of the Router because all users who try to access the Router s Web based utility or Quick Setup will be prompted for the Router s default user name and password Note The new use...

Page 91: ...stem Log Auto Mail Feature Indicates whether auto mail feature is enabled or not Mail Settings Set the receiving and sending mailbox address server address validation information as well as the timeta...

Page 92: ...is required by most mailboxes that need User Name and Password to log in Note Only when you select Authentication do you have to enter the User Name and Password in the following fields z User Name Yo...

Page 93: ...button to go to the next page or click the Previous button return to the previous page 4 16 9 Statistics Choose menu System Tools Statistics you can view the statistics of the Router including total t...

Page 94: ...d and transmitted in the last Packets Statistic interval seconds Bytes The total amount of bytes received and transmitted in the last Packets Statistic interval seconds ICMP Tx The total amount of the...

Page 95: ...icking Connect Figure A 1 PPPoE Connection Type 4 If your ADSL lease is in pay according time mode select Connect on Demand or Connect Manually for Internet connection mode Type an appropriate number...

Page 96: ...he WAN MAC Address field The format for the MAC Address is XX XX XX XX XX XX Then click the Save button It will take effect after rebooting Figure A 3 MAC Clone 3 I want to use Netmeeting what do I ne...

Page 97: ...our browser and click DMZ submenu On the DMZ page click Enable radio button and type your IP address into the DMZ Host IP Address field using 192 168 1 169 as an example remember to click the Save but...

Page 98: ...Management submenu On the Remote Management page type a port number except 80 such as 88 into the Web Management Port field Click Save and reboot the Router Figure A 8 Remote Management Note If the ab...

Page 99: ...a Virtual server Entry 5 The wireless stations cannot connect to the Router 1 Make sure the Wireless Router Radio is enabled 2 Make sure that the wireless stations SSID accord with the Router s SSID...

Page 100: ...s manual if needed 1 Install TCP IP component 1 On the Windows taskbar click the Start button point to Settings and then click Control Panel 2 Click the Network and Internet Connections icon and then...

Page 101: ...window will display and the IP Address tab is open on this window by default Now you have two ways to configure the TCP IP protocol below Setting IP address automatically Select Obtain an IP address a...

Page 102: ...LAN IP address is 192 168 1 1 type IP address is 192 168 1 x x is from 2 to 254 and Subnet mask is 255 255 255 0 3 Type the Router s LAN IP address the default IP is 192 168 1 1 into the Default gatew...

Page 103: ...TL WR941N TL WR941ND Wireless N Router Figure B 4 96...

Page 104: ...LEDs Power System WLAN WAN LAN 1 4 QSS Safety Emissions FCC CE Wireless Frequency Band 2 4 2 4835GHz Radio Data Rate 11n up to 300Mbps Automatic 11g 54 48 36 24 18 12 9 6M Automatic 11b 11 5 5 2 1M A...

Page 105: ...tion for security DDNS Dynamic Domain Name System The capability of assigning a fixed host and domain name to a dynamic Internet IP Address DHCP Dynamic Host Configuration Protocol A protocol that aut...

Page 106: ...me WEP Wired Equivalent Privacy A data privacy mechanism based on a 64 bit or 128 bit or 152 bit shared key algorithm as described in the IEEE 802 11 standard Wi Fi A trade name for the 802 11b wirele...

Reviews: