background image


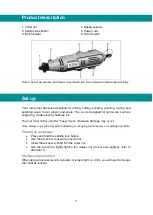
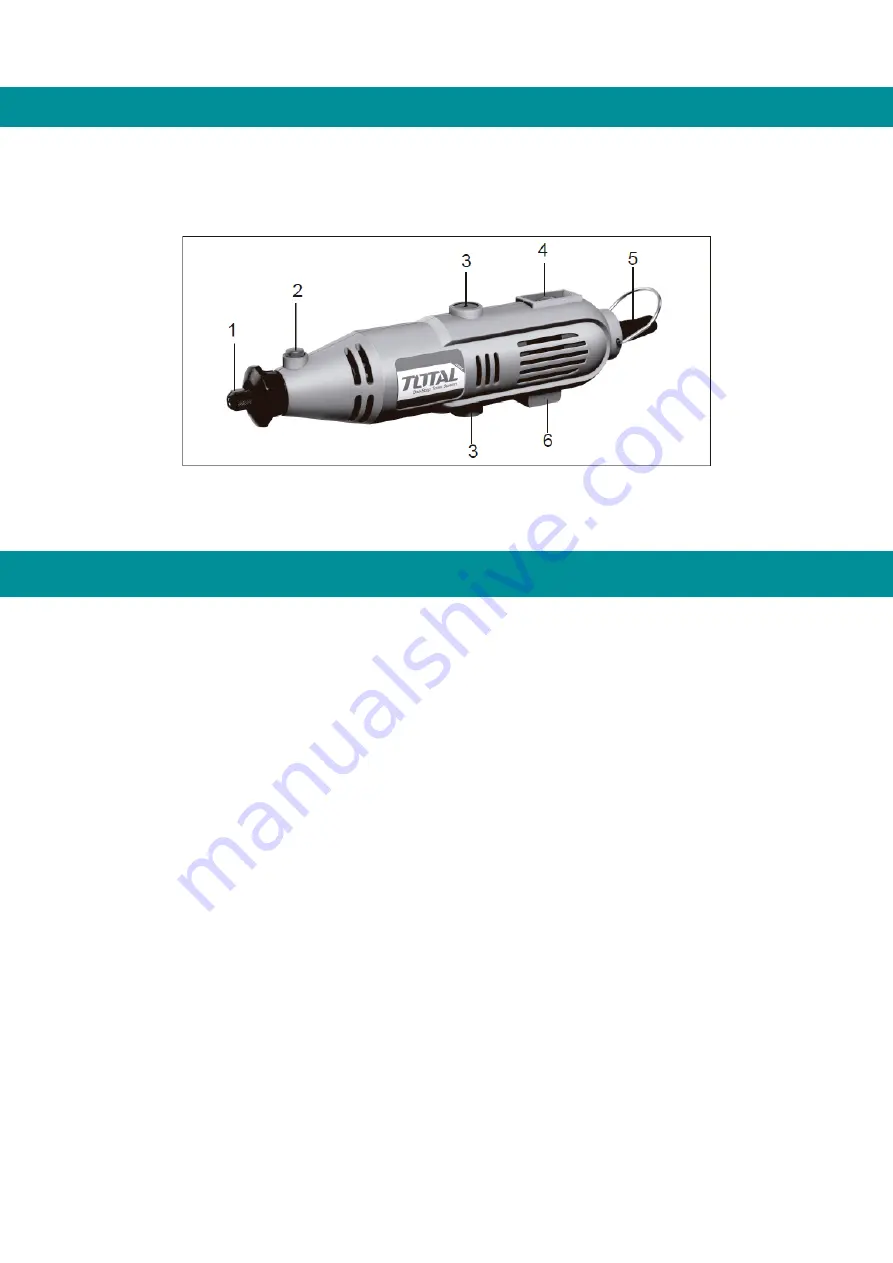
Product description


1. Collet nut 

2. Spindle lock button 

3. Brush holder 

4. Speed selector 

5. Power cord 

6. On/off switch


Note 2: Not all accessories illustrated or described need to be included in the standard delivery. 


Set up 


Your rotary tool has been designed for drilling, cutting, sanding, grinding, routing and 

polishing wood, metal, plastic and stone. The tool is designed for light work, such as 

engraving, model making, hobbies, etc. 
The tool must not be used for "heavy" work, otherwise damage may occur. 

Note: Always unplug the tool before attaching or changing the accessory or replacing any refills. 

Placing an accessory 

  Press and hold the spindle lock button. 

  Use the wrench to loosen the nozzle nut. 

  Insert the accessory shaft into the collet nut. 

  Use the wrench to lightly tighten the caliper nut (do not over-tighten), refer to 

diameter 3. 

Necklace replacement 

When using an accessory with a smaller or larger shaft, i.e. drills, you will need to change 

the collar as follows: 

Summary of Contents for TG501032

Page 1: ...1 v MINI GRINDER ...

Page 2: ...ing or jewelry to prevent them from being caught in moving parts Don t force the tool it will do a better and safer job at the rate for which it was designed When not in use store it in a dry and high place or keep it locked up out of reach of children Use the tool only for its intended purpose Protect the cord and do not carry the tool by the cord or pull on the cord to remove the plug from the o...

Page 3: ...ghtness especially if you use the tool at a very high speed Use only accessories supplied or recommended by your dealer other accessories may cause personal injury Use the correct speed Clean the ventilation slots after use Do not operate the tool with any part of the housing missing or damaged Always wear eye protection with this tool Warning Sanding will produce harmful toxic dusts on lead paint...

Page 4: ...s power tool produces an electromagnetic field during operation This field can in some circumstances interfere with active or passive medical implants To reduce the risk of serious injury we recommend that persons with medical implants consult their physician before using this power tool If the cable is damaged or cut during work do not touch the cable immediately unplug the tool Never use the mac...

Page 5: ...ork such as engraving model making hobbies etc The tool must not be used for heavy work otherwise damage may occur Note Always unplug the tool before attaching or changing the accessory or replacing any refills Placing an accessory Press and hold the spindle lock button Use the wrench to loosen the nozzle nut Insert the accessory shaft into the collet nut Use the wrench to lightly tighten the cali...

Page 6: ...adjust to the slowest speed before power on To turn on the tool place the on off switch in the l position To turn off the tool turn the on off switch to the O position Speed adjustment The tool has a variable speed control for precise speed adjustment High performance is achieved by correct speed setting and not high pressure Set the speed selector to the required speed Note Choose a low speed whe...

Page 7: ...he help line Cleaning Periodically clean the ventilation slots Use only mild soap and a damp cloth to clean the tool Many household cleaners contain chemicals that can seriously damage plastic Do not use gasoline turpentine lacquer paint thinners or similar products on any part of the tool Do not put any liquid inside the tool and never immerse any part of the tool in liquid Use of accessories The...

Page 8: ... To fit the drum first loosen the small screw at the top of the drum support this will allow the rubber to relax Slide the sanding drum into the bracket To secure simply tighten the screw and the rubber drum will swell gripping the sanding drum Environment Do not dispose of electrical appliances as unsorted municipal waste use separate collection facilities Contact your local authority for informa...

Page 9: ...9 Exploded view ...

Page 10: ...10 MINI GRINDER ...

Reviews: