background image

28

Advanced playback

To quit the JPEG playback, press STOP.

• Pressing the OPEN/CLOSE button to open

the disc tray can also quit the playback.

To pause playback

Press PAUSE/STEP during playback

To resume nor mal playback, press
PLAY.

To change the image

To view the succeeding image, press SKIP 

 .

To view the previous image, press SKIP 

 .

To magnify image

Press ZOOM repeatedly.

Each time you press the ZOOM button, the
magnification level changes as follows:

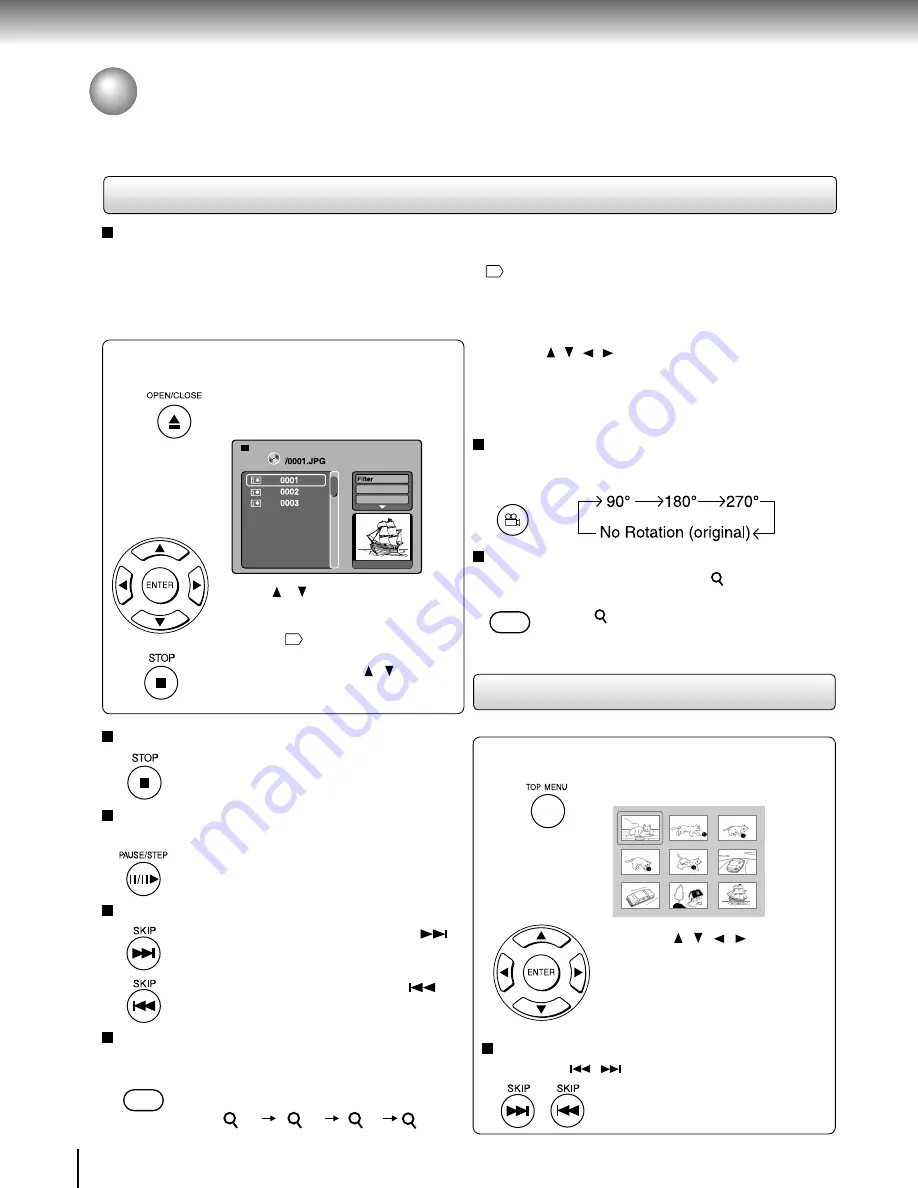
Press OPEN/CLOSE to open the disc tray,
place a disc that contains JPEG files.

Viewing JPEG Files

You can play JPEG files that have been recorded on a CD-R or CD-RW on the DVD player.
You can select a preferred view: a page of 9 thumbnail images or a single image view.
Also, rotating, enlarging and shifting of each image can be possible.

Preparations

• Prepare a disc that contains JPEG files you want to view (see next page for Jpeg files compatibility). In Setup

Menu, it is preferred to select “Original” for “View Mode” 

32

.

• Make your TV shape conform to the 4:3 picture size.  Only 4:3 pictures can be played regardless of the function

settings via the on-screen displays of the DVD player.  If the TV is adjusted to other sizes, e.g. “16:9”, images will
appear to be horizontally expanded. For details, refer to the owner’s manual of your TV.

1

Press OPEN/CLOSE to close the disc
tray. A list of folders/files will appear on
the screen.

A list of files in the
disc appears.
(Selection mode)
e.g.

Press   /   button to select your
desired file, and then press ENTER or
PLAY button to star t slide show
playback 

33

.

Press STOP to display a folder list.

Note: When you press   /   button to
select the left file, the selected picture
will appear at the lower right corner.

Viewing JPEG files

Press the   /   /   /    buttons to view a different part of the
image. You may move the image from the centre position to
UP, DOWN, LEFT and RIGHT direction. When you reach
the edge of the image, the display will not shift anymore in
that direction.

To rotate an image

Press the ANGLE button repeatedly. The image will rotate   in
the clockwise direction as follows:

To resume normal playback

Press the ZOOM repeatedly until the 

Off

 is displayed.

• Original picture is restored when the

Off

 appears.

• Depending on the file size, some files

may not display the entire image.

ZOOM

1

2

3

Off

ANGLE

Viewing a thumbnail view

Press the   /   /   /   to select an
image, press PLAY to view one
image in full-screen and automatically
images will be displayed one by one
again in a few seconds.

1

Press TOP MENU in full-screen review.

Turn the page if necessary

Press SKIP 

 / 

 to review other thumbnail screen.

e.g.

ZOOM

W: 515  H:770

Repeat

Off

Mode

Normal

1 / 3

Summary of Contents for XD-E500KY

Page 1: ... DIGITAL VIDEO 2 11 17 20 30 37 Introduction Connections Basic playback Advanced playback Function setup Others 24F 1080p 1080i 480p 576p 720p OWNER S MANUAL 2008 Toshiba Corporation 1080p Up scaling DVD Player ...

Page 2: ...d maintenance servicing instructions in this owner s manual CLASS 1 LASER PRODUCT The symbol for Class Double lnsulation WARNINGS The main plug is used as disconnect device and it should remain readily operable during intended used In order to disconnect the apparatus from the mains completely the main plug should be disconnected from the mains socket outlet completely The mains plug of apparatus ...

Page 3: ...s extension cords or integral convenience receptacles as this can result in a risk of fire or electric shock 15 Never expose the apparatus to dripping or splashing or place items such as vases aquariums any other item filled with liquid or candles on top of the unit 16 Keep your fingers well clear of the disc tray as it is closing Neglecting to do so may cause serious personal injury 17 Do not pla...

Page 4: ...k or shake when carrying Do not use volatile liquids such as insect spray near the DVD player Do not leave rubber or plastic products in contact with the DVD player for a long time They will leave marks on the finish The top and rear panels of the DVD player may become warm after a long period of use This is not a malfunction When the DVD player is not in use be sure to remove the disc and turn of...

Page 5: ...wners Use of this copyright protection technology must be authorized by Macrovision Corporation and is intended for home and other limited viewing uses only unless otherwise authorized by Macrovision Corporation Reverse engineering or disassembly is prohibited On handling discs Do not touch the playback side of the disc Do not attach paper or tape to discs On cleaning discs Fingerprints and dust o...

Page 6: ... with PBC function Version 1 1 Sound and movie can be played on this DVD player in the same way as an audio CD VIDEO CD equipped with PBC function Version 2 0 In addition to operation of a VIDEO CD not equipped with the PBC function you can enjoy playback of interactive software with search function by using the menu displayed on the TV screen Menu Playback Some of the functions described in this ...

Page 7: ...uming playback from the same location 18 Locating a Desired Section 19 Locating a title using the top menu 19 Locating a specific chapter or track 19 Advanced playback AccessingaSpecificLocationDirectly 20 Locating a specific title chapter time 20 Repeating a Specific Segment 21 Repeating a specific segment 21 Playing in a Varied Order 21 Playing titles chapters or tracks in a varied order 21 Play...

Page 8: ... Some discs may only display track numbers Some discs may only display track numbers No disc Audio CD VIDEO CD DVD VIDEO DVD display Bad disc LOAD CLOSE OPEN Chapter Track number Indicator Multifunctional indicator indicates operating status or messages etc Power off Picture During thumbnail viewing 24F 1080p 1080i 17 19 17 10 17 8 13 HDMI indicator 17 PAUSE button 17 17 SKIP buttons 480p 576p 720...

Page 9: ...rol MENU button Use the MENU button to display the menu included on many DVDs To operate a menu follow the instructions in Locating a title using the top menu 19 RETURN button Return to menu display for VCD 2 0 discs with menu 17 HDMI button 20 23 24 25 18 19 18 19 19 21 20 22 30 12 17 20 18 24 25 17 17 19 18 19 26 17 26 17 17 21 23 13 PIC MODE button T SEARCH button ...

Page 10: ...nt battery acid from leaking into the battery compartment Battery shall not be exposed to excessive heat such as sunshine fire or the like Operating with the remote control Point the remote control at the remote sensor and press the buttons Distance About 7 m 23 feet from the front of the remote sensor Angle About 30 in each direction of the front of the remote sensor Do not expose the remote sens...

Page 11: ... outputs of the DVD player to a Y cable adapter not supplied and then connect to your TV Connect the DVD player directly to your TV If you connect the DVD player to a VCR TV VCR combination or video selector the playback picture may be distorted as DVDs are copy protected Analogue audio out will not have sound if DTS playback is selected NormalTV Audio Video cable supplied To 2ch AUDIO OUT R red L...

Page 12: ...o out will not have sound if DTS playback is selected Progressive outputs Some TVs or monitors are equipped with component video inputs that are capable of reproducing a progressively scanned video signal Connecting to these inputs allows you to view the highest quality pictures with less flicker Consumers should note that not all high definition television sets are fully compatible with this prod...

Page 13: ...ut signals as below See the HDMI indicator and select the appropriate output signal Notes Refer to the owner s manual of the connected TV as well When you connect the DVD player to yourTV be sure to turn off the power and unplug both units from the wall outlet before making any connections If you have a HDMI with HDCP equipped monitor or display you can connect it to this player using a HDMI cable...

Page 14: ... reserved for Laser disc use only and is incompatible with the OPTICAL OUT COAXIAL DIGITAL AUDIO OUT jack of the DVD player Connect the COAXIAL DIGITAL AUDIO OUT jack of the DVD player to the DIGITAL COAXIAL input of a Receiver or Processor Connect the OPTICAL OUT jack of the DVD player to the DIGITAL OPTICAL input of a Receiver or Processor Refer to the owner s manual of the connected equipment a...

Page 15: ...owing the latest movies and is now available to reproduce this realistic effect in the home You can enjoy motion picture and live concert DVDs with this dynamic realistic sound by connecting the DVD player to a 6 channel amplifier equipped with a Dolby Digital decoder or Dolby Digital processor If you have a Dolby Surround Pro Logic decoder you will obtain the full benefit of Pro Logic from the sa...

Page 16: ...or home use on DVDs or audio CDs If you have a DTS decoder or processor you can obtain the full benefit of 5 1 channel DTS encoded sound tracks on DVDs or audio CDs Use DVDs or audio CDs encoded via the DTS recording system Make the following setting On screen display Select Page Digital Output Bitstream 75 Ω Ω Ω Ω Ω coaxial cable not supplied 34 Connecting to an amplifier equipped with a DTS deco...

Page 17: ...lay again press the RETURN button To pause playback still mode Press PAUSE STEP during playback To resume normal playback press the PLAY button The sound is muted during still mode To stop playback Press STOP To remove the disc Press OPEN CLOSE Remove the disc after the disc tray opens completely To start playback in the stop mode Press PLAY To obtain a higher quality picture Occasionally some pic...

Page 18: ...till playback Each time you press the PAUSE STEP button the picture advances one frame To resume normal playback Press PLAY Note The sound is muted during frame by frame playback Playing frame by frame Resuming playback from the same location Notes There may be a difference in the location where playback resumes depending on the disc Settings you changed using the on screen displays while the DVD ...

Page 19: ...arts from chapter 1 of the selected title 1 2 3 Notes The instructions above describe basic procedures which may vary depending on the contents of the DVD If different instructions appear on the TV screen follow those instructions If you display the top menu during playback and press the TOP MENU button again without selecting any title the DVD player may resume playback from the point where you f...

Page 20: ...ugh the menu by pressing the or button Press T again to remove this display To cancel the Bookmark Follow step 1 then press the CLEAR button to cancel the bookmark Move through the menu by pressing the or button to cancel other bookmarks Notes Some discs may not work with marking operation The marking is cancelled when you open the disc tray or turn the power off Some subtitles recorded around the...

Page 21: ...peat playback of the selected segment A B 2 1 A B RPT Playing in a Varied Order You can play titles chapters within a title or tracks in a varied order For Audio CD please see Playing MP3 WMA files 27 Playing titles chapters or tracks in a varied order Press PLAY MODE Press button to select desired features and then press ENTER button to toggle desired mode 1 e g PLAY MODE Press PLAY Press the PLA...

Page 22: ...ss CLEAR 2 Press number buttons to input the new title chapter track number To cancel the programmed selections 1 While the display appears on the TV screen press to move the highlighted bar to the item you want to cancel 2 Press CLEAR To resume normal playback from memory playback Press MEMORY button Press to move the highlighted bar to Clear All then press ENTER All the input programs will be cl...

Page 23: ...epending on the picture size you select e g ZOOM 2 1 2 3 Off Zooming a picture Selecting the Sound Enhancement E A M You can easily switch a preferred audio enhancement E A M Enhanced Audio Mode 3D To obtain expansive virtual surround sound effects from two speakers To use this enhancement on sounds output from the ANALOG AUDIO OUT jacks be sure to set Digital Output to PCM Effective in playback o...

Page 24: ...ubtitles automatically and you cannot turn them off even if you set the subtitle function to off During some scenes the subtitles may not appear immediately after you select your desired Some DVDs will allow you to make subtitle selections and turn subtitles on or off only via the disc menu Select the picture mode by pressing PIC MODE repeatedly Each time you press the PIC MODE button the picture ...

Page 25: ...angle you selected If no button is pressed within 10 seconds playback continues without changing the current angle 2 Selecting a Language You can select a preferred language and sound recording system from those included on the DVD Press AUDIO during playback The current audio setting is displayed Recorded audio format number changes sequentially The maximum number of possible audio formats is 8 T...

Page 26: ...ck Remaining time of the current title or track NAVI Select by pressing then press ENTER to access the feature Title number Chapter number Remaining time 00 30 34 01 00 52 1 1 5 12 Elapsed time On screen display operation 3 To turn off the display press DISPLAY again Bit rate Mbit s Amount of picture sound and subtitle data in the DVD transferred per second The larger the value is the more data pr...

Page 27: ...file in random order Music Intro Only playbacks the first 10 seconds of all the files on the current folder or all tracks on the disc Edit mode Memory operation works only when Edit mode is selected After finish storing the files tracks you want into the Program view list select Edit mode again and press ENTER to release edit mode Program view To view tracks files in the Program view list It is di...

Page 28: ...e horizontally expanded For details refer to the owner s manual of your TV 1 Press OPEN CLOSE to close the disc tray A list of folders files will appear on the screen A list of files in the disc appears Selection mode e g Press button to select your desired file and then press ENTER or PLAY button to start slide show playback 33 Press STOP to display a folder list Note When you press button to sel...

Page 29: ...nce video GMC Qpel Progressive B frames Frame rate 8 to 25 fps CD physical format Mode 1 Mode 2 X A Form 1 File system ISO9660 Level 1 2 or Joliet File name A file name should be in alphabet and numerals only and must incorporate MPG or AVI extension e g MPG AVI Total number of folders Less than 256 Total number of files Less than 1000 JPEG files compatibility Discs whose compatibility with this D...

Page 30: ...ttings OSD Language English To view on screen displays in English Français To view on screen displays in French To view on screen displays in Arabic To view on screen displays in Persian Ðóññêèé To view on screen displays in Russian Indonesia To view on screen displays in Indonesian 1 Press SETUP button 2 Press button to select OSD language 3 Press ENTER button then use the button to select a pref...

Page 31: ... Cyrillic Greek Hebrew Arabic Off ASCII OSD language DVD menu DivX subtitle Persian Russian French Arabic Note Some DVDs may not be played in a different language than you selected A prior language may be programmed on the disc Off OSD language DVD menu DivX subtitle Persian Russian French Arabic DVD Menu To select a preferred language English French Arabic Persian Russian or Indonesian for DVD me...

Page 32: ...Automatically fit the decoded image on screen without distortion Pan Scan Automatically display decoded image on full screen without distortion 1 Press SETUP button 2 Press button to select Video 3 Press button then use the button to select View Mode 4 Press ENTER button then use the button to the options Fill Original Auto Fit or Pan Scan 5 Press ENTER button 6 Press SETUP button to exit the menu...

Page 33: ...s SETUP button to exit the menu Notes When TV System is set to PAL or Auto you cannot select the 1080p 24F If the Video Output is not set to HDMI you cannot select the HDMI Resolution When the picture mode is Sharp Colour or Contrast the HDMI resolution cannot be set to 480p 576p and 720p Select the HDMI resolution according to the performance of the connected TV Aspect Ratio 16 9 HDMI Resolution ...

Page 34: ...The DVD player outputs sound in the PCM stereo format when you play a DVD recorded on the Dolby Digital MPEG1 or MPEG2 recording system Bitstream Disc audio raw data will be output Select Bitstream if your amplifier supports DTS Off To disable Digital Output Notes When you make a connection to a TV Dolby Surround Pro Logic or stereo system via the analogue audio jacks select PCM or Bitstream If th...

Page 35: ...rol Off Dim Ctrl On Use Default Settings If you want to return the initial language setting such as Language Video Audio and etc to the factory default do the following 1 Press SETUP button 2 Press button to select Misc 3 Press button to select Use Default Settings then press ENTER button 4 Press button to select Yes then press ENTER button The original setting will be restored Screen saver On Do ...

Page 36: ...tton for one touch play PLAY make sure a disc is inserted System information Get Set Menu Language This unit recognizes the OSD languages set for the TV and automatically set the same language as the player menu language OSD menu language for this unit Power off When you turn the TV off this unit will automatically turn off Receiving operational signal fromTV s Remote You can operate this unit wit...

Page 37: ...V SW TA TE TG TH TI TK TL TN TO TR TS TT TW UK UR UZ VI VO WO XH YO ZU Guarani Gujarati Hausa Hindi Croatian Hungarian Armenian Interlingua Interlingue Inupiak Indonesian Icelandic Hebrew Yiddish Javanese Georgian Kazakh Greenlandic Cambodian Kannada Kashmiri Kurdish Kirghiz Latin Lingala Laotian Lithuanian Latvian Lettish Malagasy Maori Macedonian Malayalam Mongolian Moldavian Marathi Maltese Bur...

Page 38: ...theDVDplayer Operatetheremotecontrolwithinabout7m Replacethebatterieswithnewones Page 11 13 1 7 1 7 11 13 3 3 11 13 1 2 1 7 11 16 1 7 3 4 5 1 1 1 7 6 1 7 1 7 5 3 4 1 0 1 0 1 0 Symptoms and correction Cause The power plug is disconnected The automatic power off function turned the unit off The TV is not set to receive DVD signal output The video HDMI cable is not connected securely Mismatch setting...

Page 39: ...to 35 C Operation status Horizontal Outputs Video output 1 0 V p p 75 Ω negative sync pin jack x 1 Component video output Y 1 0V p p 75 Ω negative sync pin jack x 1 PB PR 0 7 V p p 75 Ω pin jack x 2 Audio output COAXIAL DIGITAL 0 5V p p 75 Ω pin jack x 1 Audio output ANALOG 2 0 V rms 680 Ω pin jacks L R x 1 Audio output OPTICAL DIGITAL Optical connector x 1 HDMI output 19 pin Supplied Accessories ...

Page 40: ...811 E50091W0XX ...

Reviews: