background image

21

Operations

20

Turning the power off

1

Press the ON/STANDBY button.

A message appears on the screen, confirming that you wish to shut off the power. This
message will disappear after a moment. (This operation is no longer valid after the
message disappears.)

2

Press the ON/STANDBY button again.

The screen turns off, but the internal cooling fan continues to operate for a short while.
Then, the projector goes into standby mode.
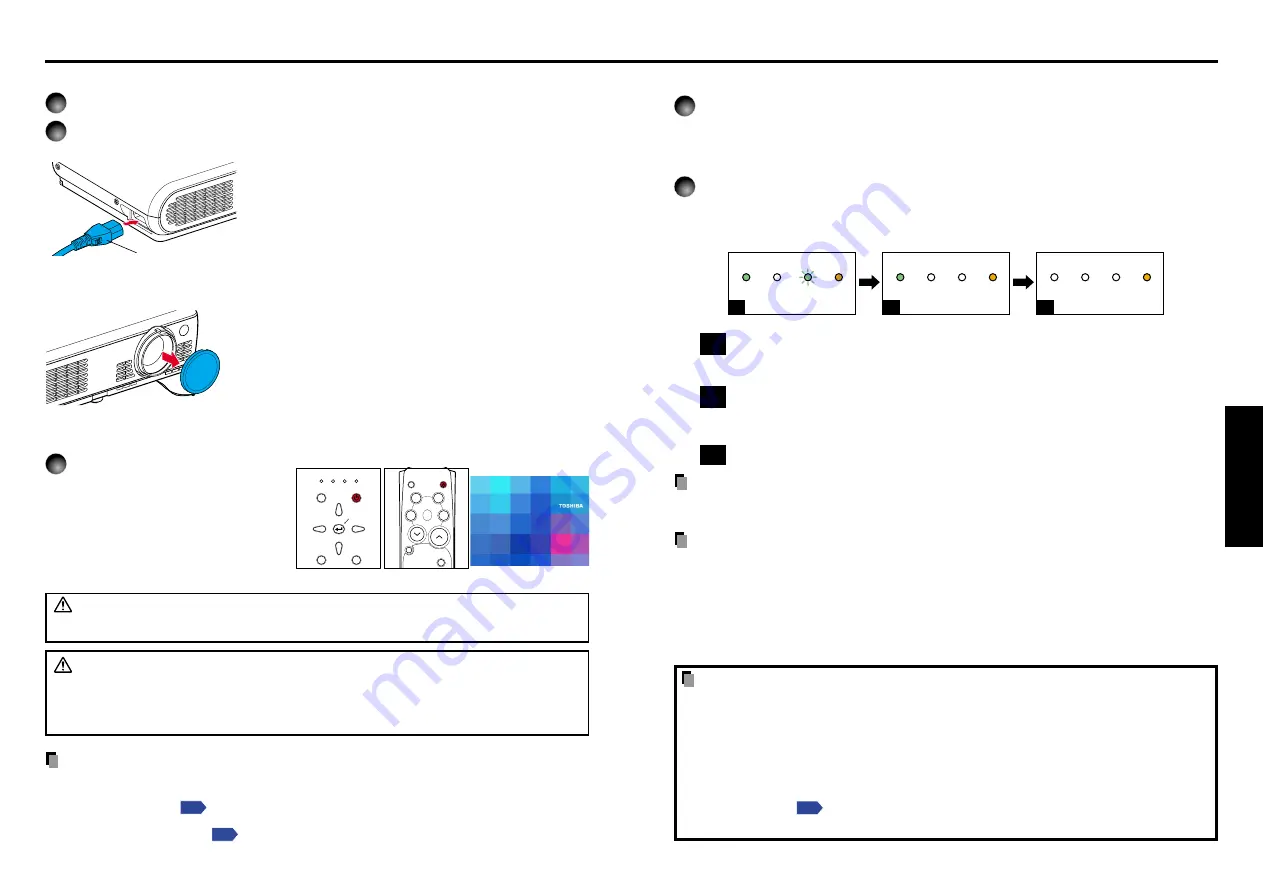
When cooling lamp

During internal cooling

After cooling is completed

FAN

TEMP

LAMP

ON

FAN

TEMP

LAMP

ON

A

FAN

TEMP

LAMP

ON

B

C

(Green)

(Green)

(Orange)

Flashing

(Green)

(Off)

(Orange)

(Off)

(Off)

(Orange)

A

During cooling, the LAMP indicator flashes. In this state, the power cannot be
turned back on. In addition, unplugging the power cord in this state will shorten
the life of the lamp.

B

After the LAMP indicator goes off, the cooling fan continues to operate for a
short while in order to expel excess internal heat. If you are in a hurry, there is
no problem with unplugging the power cord in this state.

C

In standby mode.

Note

• The projector consumes about 6W of power in standby. We recommend you to unplug the

power cord if you will not use the projector for an extended period.

PRECAUTIONS

• Before unplugging the power cord, make sure that the LAMP indicator is off. Unplugging

the power cord and cutting off the power while the projector is running or being cooled
will shorten the life of the lamp. 

However, please unplug the power cord if the

projector locks up or acts abnormally.

• If the power cord was unplugged before cooling was complete, give the lamp sufficient

time to cool before plugging it back in. If the lamp overheats, it may fail to light, and its
lifetime will be shortened.

LCD Panels

LCD panels wear out. In order to prolong the lifetime of your LCD panel, take the
following precautions.

• In order to extend the lifetime of the LCD panel, always turn off the power when not in

use, and make sure that the lamp is off. Keeping the lamp off is also very effective at
saving electricity.

• If the air filter becomes dirty and clogged, the projector’s internal temperature will rise,

shortening the lifetime of the LCD panel and causing malfunctions. Clean the air filter
from time to time 

p.32

, and replace it periodically. Contact the store where you

purchased your projector, or your local Service Station for replacement air filters.

Connecting the power cord

1

Insert the power cord connector into the AC IN socket of the projector.

2

Insert the power cord plug into a wall or other power outlet.

Removing the lens cover

Be sure to remove the lens cover when the power is
turned on. If it is left on, it could become deformed due
to heat.

 Turning the power on

Press the ON/STANDBY
button.

The power turns on, and the following
3 green indicators light: ON, LAMP,
and FAN. After a moment, the start-
up screen appears.

 WARNING

• Do not look into the lens during operation. Doing so could damage your vision.

 CAUTION

• Do not block the air intake or exhaust. Doing so could cause a fire due to internal overheating.
• Do not place your hands, face, or other objects near the air exhaust. Doing so could

cause burns, deform/break the object.

Notes

• The start-up screen will disappear after a moment. You can dismiss the start-up screen before this

by performing any operation. You can also configure the start-up screen not to appear via the

Display setting menu


p.31

.

• The first time you use the projector after purchase, after the start-up screen disappears, the

Language menu is displayed 

p.22

.

When the power cord is plugged in, the following
three green indicators will come on for several
seconds: ON, TEMP, and LAMP. Next, the ON
indicator will change to orange, indicating standby
mode.
(Do not perform any operations while the 3 green
indicators are on.)

(Supplied) Power cord connector

Control panel

Remote

Control

Turning the power on and off

Operations

FAN TEMP LAMP

ON

VOL. 

+

VOL. 

-

ON / STANDBY

INPUT

MENU

AUTO SET

KEYSTONE

INPUT

ON/
STANDBY

CALL

MUTE

RESIZE

FREEZE

AUTOSET

KEYSTONE

CANCEL

ZOOM

+

ZOOM

-

Start-up screen

Summary of Contents for TLP-S10

Page 1: ...Others Maintenance Operations Preparations Before Using OWNER S MANUAL 3LCD DATA PROJECTOR TLP S10 SVGA ...

Page 2: ...s is a Class A product In a domestic environment this product may cause radio interference in which case the user may be required to take adequate measures CAUTION Laser beam is emitted when the laser button of the remote control is pressed Do not look at the laser beam directly from the front of the remote control Do not turn the laser beam toward a person or to a mirror USA only USA only CANADA ...

Page 3: ...RUCTIONS Continued 11 Object and Liquid Entry Never push objects of any kind into this product through openings as they may touch dangerous voltage points or short out parts that could result in a fire or electric shock Never spill liquid of any kind on the product 12 Do not place the product vertically Do not use the product in the upright position to project the pictures at the ceiling or any ot...

Page 4: ...parts should break please handle with care to avoid injury and contact your dealer for repair service The broken pieces of glass may cause to injury In the unlikely event of the lamp rupturing thoroughly clean the area around the projector and discard any edible items placed in that area 18 Servicing Do not attempt to service this product yourself as opening or removing covers may expose you to da...

Page 5: ...ondense on the crucial internal parts To prevent the unit from possible damage do not use the unit for at least 2 hours when there is an extreme or sudden change in temperature Place and Manner of Installation Do not place in hot locations such as near heating equipment Doing so could cause malfunction and shorten the life of the LCD panel Avoid locations with oil or cigarette smoke Doing so will ...

Page 6: ...ruption corruption or loss of the memory contents etc arising from the use of or the inability to use this unit Toshiba Corporation accepts no liability whatsoever for any damages arising from not having followed the descriptions in this Instruction Manual Toshiba Corporation accepts no liability whatsoever for any damages arising from malfunctions arising from combination with equipment or softwa...

Page 7: ...istortion Keystone 25 Zooming out the images 25 Cutting off the picture and sound temporarily Mute 26 Freezing the image Freeze 26 Enlarging the picture size Resize 27 Displaying Information Status display 28 Using the menus 29 How to use the menus 29 The image adjustment menu 30 The default setting menu 30 The display setting menu 31 Reset menu Special menu 31 Maintenance Air filter cleaning 32 L...

Page 8: ... RS 232C port on a controlling computer for operating the projector p 40 Note The shape and number of supplied power cords vary depending on the product destination The Supplied CD ROM The supplied CD ROM contains an owner s manual including information omitted in this Owner s manual Getting started and Acrobat Reader to view the manual Installing Acrobat Reader Windows Run the CD ROM select the R...

Page 9: ...s happens point the remote control at the main unit again and repeat the operation Preparing and using the remote control Names of each part on the control panel and remote control Control panel FAN TEMP LAMP ON VOL VOL 1 2 3 4 5 6 7 8 9 10 ON STANDBY INPUT MENU AUTO SET KEYSTONE ZOOM ZOOM INPUT ON STANDBY CANCEL CALL MUTE RESIZE FREEZE AUTOSET KEYSTONE MENU VOL VOL ZOOM ZOOM 1 2 3 4 5 6 12 13 14 ...

Page 10: ... setting is floor mounted front projection Set the placement style in the default setting menu p 30 in accordance with your needs Placement Floor mounted front projection AC IN Floor mounted rear projection 90 a 90 Projection Distance and Screen Size Use the figures tables and formulas below to determine the screen size and projection distance Screen sizes are approximate values for full size pict...

Page 11: ...n use and make sure that the lamp is off Keeping the lamp off is also very effective at saving electricity If the air filter becomes dirty and clogged the projector s internal temperature will rise shortening the lifetime of the LCD panel and causing malfunctions Clean the air filter from time to time p 32 and replace it periodically Contact the store where you purchased your projector or your loc...

Page 12: ...images to be shown improperly If this happens turn off the computer s LCD display For information on how to turn off the LCD display see the owner s manual of your computer If a signal not supported by the projector is input the icon will appear If a no signal is being input from the connected device the icon will appear If an unavailable operation button is pressed the icon will appear 1 3 2 1 Tu...

Page 13: ...e optimum state for each type of the input signal by using simple operations 1 Press the AUTO SET button The Auto setting menu appears 2 Press the AUTO SET button again The menu item is automatically adjusted set For computer input the icon will appear during processing Note Auto adjustment setting may not be performed correctly for input signals other than those supported by the projector p 38 p ...

Page 14: ... 1 2 4 3 Using handy features Continued Cutting off the picture and sound temporarily Mute When you want to project the images of another projector overhead projector etc temporarily this projector s images and sound can be turned off Press the remote control s MUTE button The picture and sound are cut off The Mute function is released when pressing the MUTE button again To cancel the command pres...

Page 15: ...ote control once When the button is pressed once the Setting display menu appears Pressing it again displays information p 29 The table below shows what kind of information is displayed Press the button or press the CALL or CANCEL button on the remote control to serve the same purpose again to dismiss the display Yes displayed No not displayed Item Description Computer Y PB PR Video S video Input ...

Page 16: ...Use this menu to adjust image related items Items that can be adjusted are marked with Yes and those that cannot are marked with No Item Description Computer Y PB PR Video S video Contrast Lower Higher Yes Yes Yes Yes Brightness Darker Brighter Yes Yes Yes Yes Color Lighter Deeper No Yes Yes Yes Tint Note 1 Reddish Greenish No No Yes Yes Sharpness Softer Sharper No Yes Yes Yes R level Less red Mor...

Page 17: ...to get inside the projector Air filter cleaning Maintenance WARNING Request cleaning and maintenance of a ceiling mounted unit from your projector dealership Lens cleaning Clean the lens with a commercially available blower and or lens cleaner The lens is easily scratched so do not rub it with hard objects or strike it Main unit cleaning Clean the main unit after unplugging the power cord Wipe dir...

Page 18: ...ult to turn on the lifetime of the lamp has ended or the projector is malfunctioning Unplug the power cord and wait for a short while then turn the power back on If a lamp burns out replace it with a new one After approx one minute of abnormal display the projector returns to the standby state waiting for internal cool down Power went out during use Internal overheating or the outside temperature ...

Page 19: ...o far p 18 Are the sharpness or sampling phase adjustments off p 24 p 30 Are the brightness or contrast adjustments off p 30 Is the lamp nearing the end of its service life p 30 Are the color tint R level G level or B level adjustments off p 30 Is the screen dirty Is the lamp nearing the end of its service life p 28 Are the remote control s batteries drained Are the batteries inserted into the rem...

Page 20: ... 720 x 400 640 x 480 800 x 600 832 x 624 1024 x 768 1152 x 864 1280 x 960 1280 x 1024 1400 x 1050 1600 x 1200 1792 x 1344 1856 x 1392 1920 x 1440 Note Signals whose resolution exceeds the LCD panel s number of pixels p 37 will be compressed For this reason some information may be lost or image quality may be affected List of supported signals Y PB PR signals Signal format fh kHz fv Hz 480i 525i 60...

Page 21: ...eric characters supported 4 Replies Acknowledge ACK 06h CR 0Dh Data Normally ended ACK 06h ESC 1Bh Aborted No acknowledge NAK 15h If commands are to be sent consecutively wait for the response from the projector before sending the next command Main Commands Note Contact your dealer for control cable and other commands Separately Sold Product Replacement Lamp Model TLPLV3 Note Design specifications...

Page 22: ......

Reviews: