

GT950
Quick Connect Guide
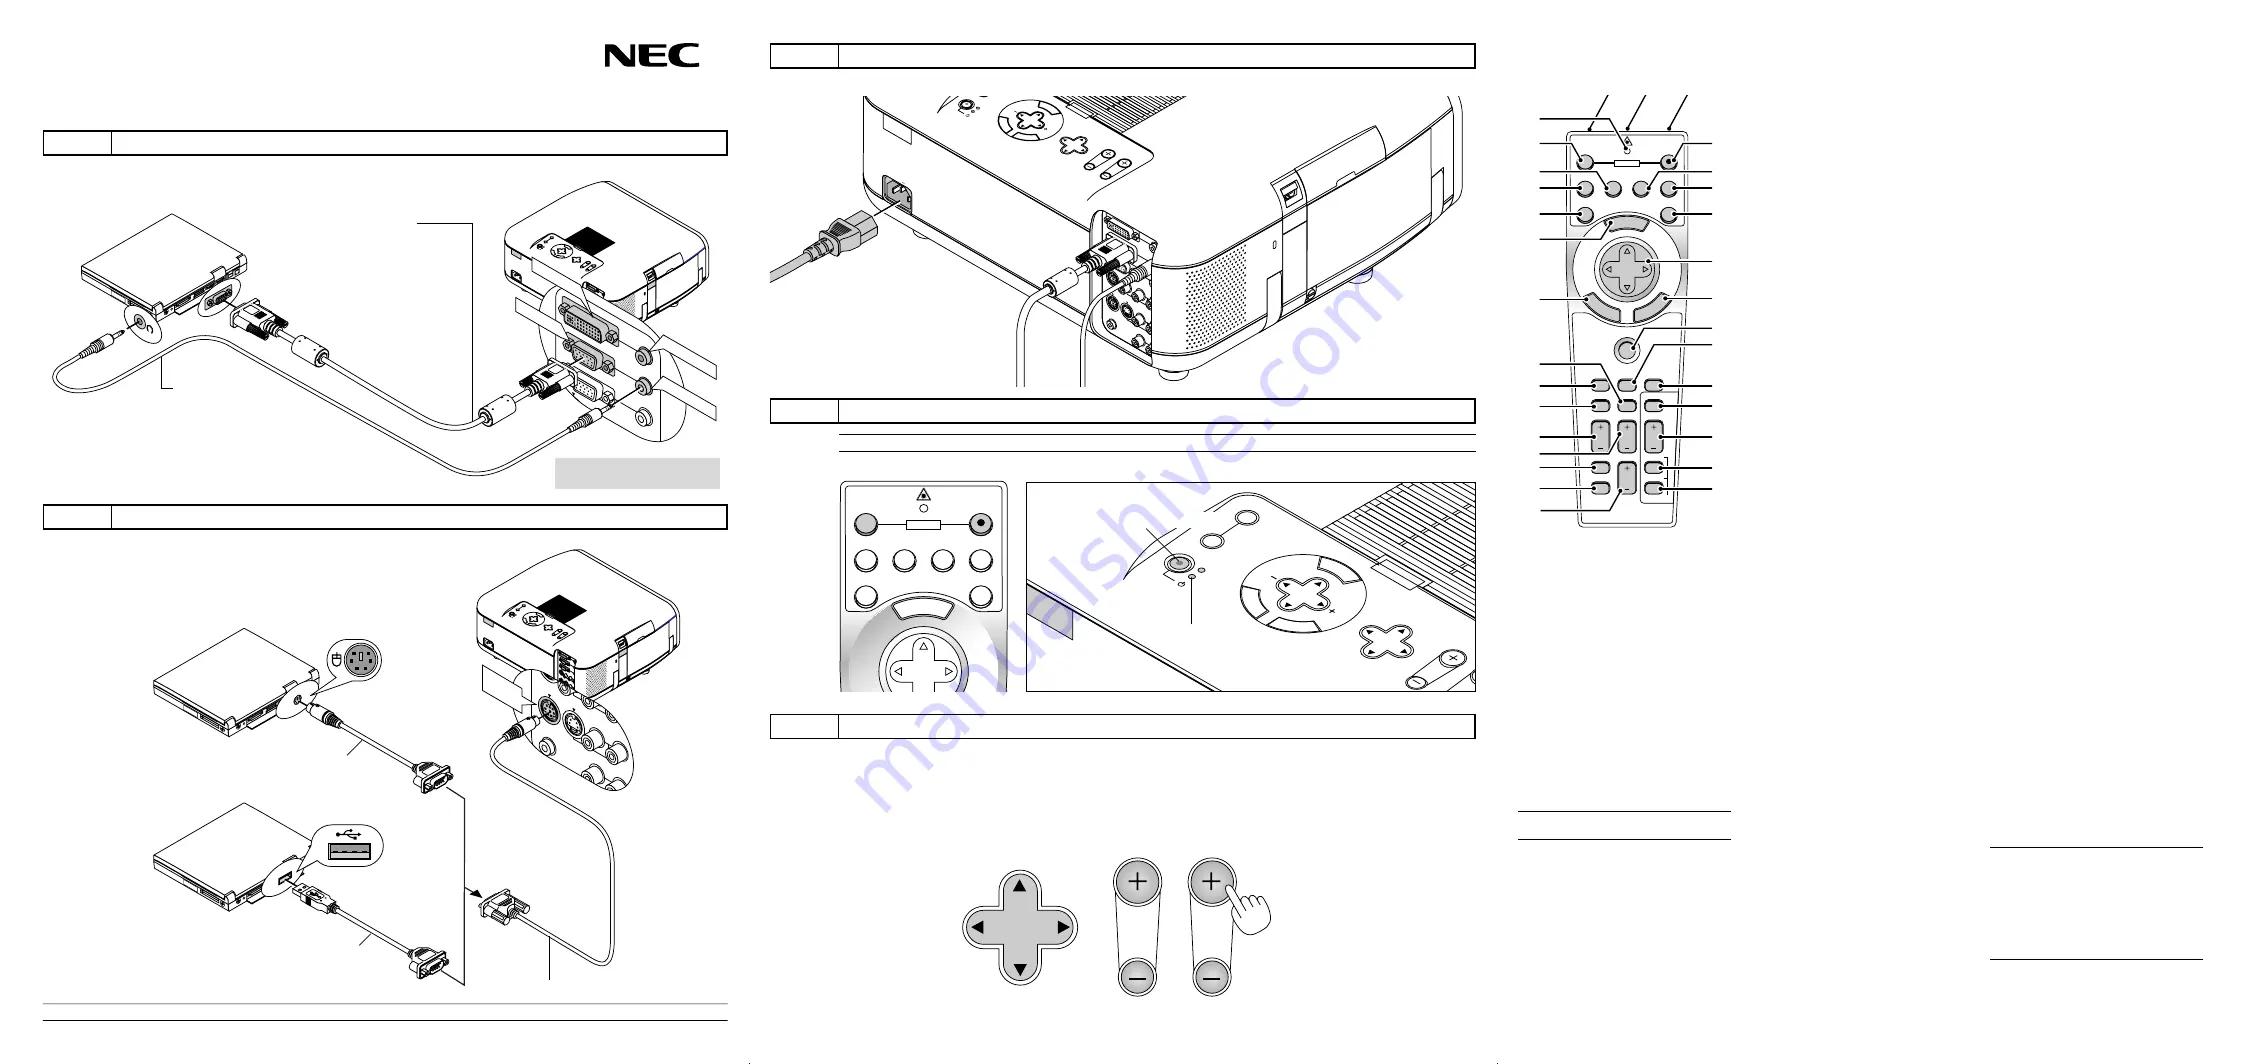
Connections
AUDIO IN
AUDIO IN
AUDIO OUT
DVI IN
RGB IN
RGB OUT
PC CONTROL
R
L/MONO
VIDEO
DVI IN
AUDIO IN
RGB IN
AUDIO IN
Step 1
Connect the supplied 15pin-15pin signal cable.
Power down all eguipment
before making connections.
Audio cable
(not supplied)
RGB signal cable (supplied)
To mini D-Sub 15-pin connector on the projector.
PUT
AUDIO OUTPUT
AUDIO
OUT
UTPUT
PC CONTROL
MOUSE
OUTPUT
REMOTE
CONTROL
INPUT
AUDIO IN
AUDIO IN
R
L/MONO
VIDEO
S-VIDEO
MOUSE
OUTPUT
Step 2
Connecting the remote mouse to your computer.
Macintosh with USB Port
IBM PS/2
Serial cable (supplied)
Step 3
Connect the supplied power cable.
SELECT
LENS SHIFT
FOCUS
ZOOM
STATUS
POWER
ON/STAND BY
AUTO
ADJUST
ME
NU
EN
TE
R
CA
N CEL
AC IN
AUDIO INPU
AUDIO INPU
AUDIO OUTP
AUDIO OUTPUT
DVI-I INPUT
RGB INPUT
RGB OUTPUT
PC CONTROL
MOUSE
OUTPUT
REMOTE
CONTROL
INPUT
AUDIO INPUT
AUDIO INPUT
R
L/MONO
VIDEO
S-VIDEO
Step 4
Turn on the Projector.
SOURCE
SELECT
LENS SHIFT
FOC
STATUS
POWER
ON/STAND BY
AUTO
ADJUST
ME
N
U
EN
T
E
R
C
ANCEL
Indicators
MENU
OFF
VIDEO
AUTO ADJ.
S-VIDEO
RGB1
RGB2
LASER
ON
SELECT
POWER
Power "ON/STAND BY" button
MENU
E
NT
ER
CA
NC
E
L
PJ
FOCUS
ZOOM
OFF
VIDEO
AUTO ADJ.
S-VIDEO
RGB1
RGB2
LASER
ON
VOLUME
SHIFT
HELP
POINTER
KEYSTONE MAGNIFY
FREEZE
PIC-MUTE
PC CARD
SLIDE
FOLDER
SLIDE
LIST
SELECT
POWER
Remote Control Features
1. Infrared Transmitter
Direct the remote control toward the remote
sensor on the projector cabinet.
2. Laser Pointer
Beams a laser light when "Laser" button is
pressed.
3. Remote Jack
Connect your remote control cable here for
wired operation.
4. LED
Flashes when any button is pressed.
5. Power ON Button
If the main power is applied, you can use this
button to turn your projector on.
6. Power OFF Button
If the main power is applied, you can use this
button to turn your projector off.
NOTE:
To turn off the projector, press and hold the
POWER OFF button for a minimum of two seconds.
7. VIDEO Button
Press this button to select an NTSC, PAL,
SECAM or NTSC4.43 compatible video source
from a VCR, DVD player, laser disc player or
document camera.
8. S-VIDEO Button
Press this button to select an S-Video source
from a VCR.
9. RGB 1 Button
Press this button to select a video source from
computer or component equipment connected
to your RGB port.
10. RGB 2 Button
Press this button to select DVI analog or DVI
digital signal from a PC with DVI output to the
DVI-I INPUT connector.
The RGB 2 button toggles between DVI analog
and DVI digital.
11. AUTO ADJ Button
Use this button to adjust an RGB or DVI (digi-
tal/analog) source for an optimal picture. Some
signals may not be displayed correctly or take
time to switch between sources.
12. LASER Button
Press and hold this button to activate the laser
pointer. When lit, you can use the laser to draw
your audience's attention to a red dot that you
can place on any object.
13. MENU Button
Displays the menu for various settings and ad-
justments.
14. SELECT (
▲▼
䊴
䊳
) (Mouse) Button
When you are in the Computer mode, these
buttons work as a computer mouse.
When you are in the Projector mode, which is
indicated by lighting the PJ button:
▲▼
:
Use these buttons to select the menu of
the item you wish to adjust.
䊴
䊳
:
Use these buttons to change the level of a
selected menu item.
A press of the
䊳
button executes the se-
lection.
When the pointer is displayed, these
▲▼
䊴
䊳
buttons move the pointer.
15. ENTER (Left Click) Button
When you are in the Computer mode, this but-
ton works as the mouse left button.
When this button is pressed and held for a mini-
mum of 1.5 seconds, the drag mode is set.
When you are in the Projector mode, which is
indicated by lighting the PJ button:
Use this button to enter your menu selection. It
works the same way as the "Enter" button on
the cabinet.
16. CANCEL (Right Click) Button
When you are in the Computer mode, this but-
ton works as the mouse right button.
When you are in the Projector mode, which is
indicated by lighting the PJ button:
Press this button to exit "Menus". It works the
same way as the “Cancel” button on the cabi-
net.
17. PJ Button
Press this button to switch the Select, Cancel,
and Enter buttons between the Projector mode
(lit red) and the Computer mode. Press this
button or any one of the Power ON/OFF, Menu,
Focus, Zoom, Shift, Help, Pointer, Magnify, PC
Card, Folder List or Slide List buttons to switch
to the Projector mode and the PJ button lights
red. To switch back to the Computer mode,
press the PJ button again.
18. FOCUS Button
Press this button to display the Focus adjust-
ment window. Use the or - button to
obtain the best focus.
19. ZOOM Button
Press this button to display the Zoom adjust-
ment window. Use the or - button to
zoom in or out.
20. SHIFT Button
Press this button to display the Shift adjustment
window. Use the Select
䊴
,
䊳
,
▲
, or
▼
button to
shift the lens horizontally, vertically or diago-
nally.
21. HELP Button
Provides information about operation and ad-
justment procedures or the set information for
the current menu or adjustment during menu
operation.
22. POINTER Button
Press this button to display one of the eight
pointers; press again to hide the pointer. You
can move your pointer icon to the area you want
on the screen using the Select button.
23. KEYSTONE (+) (–) Button
Press the (+) or (–) button to correct the key-
stone (trapezoidal) distortion, and make the im-
age square.
24. MAGNIFY (+) (–) Button
Use this button to adjust the image size up to
400%.
When the pointer is displayed, the image is
magnified about the center of the pointer. When
the pointer is not displayed, the image is mag-
nified about the center of the screen.
When the image is magnified, the pointer is
changed to the magnifying icon.
25. FREEZE Button
This button will freeze a picture. Press again to
resume motion.
26. PICTURE MUTE Button
This button turns off the image and sound for a
short period of time. Press again to restore the
image and sound.
NOTE: When the menu is displayed, a press of
this button mutes an image and sound without
turning off the menu.
27. VOLUME (+) (–) Button
Press (+) to increase the volume and (–) to de-
crease it.
28. PC CARD Button
Press this button to select the PC Card Viewer
source.
29. SLIDE (+) (–) Button
Press (+) to select the next folder or slide and
(–) to select the previous folder or slide.
30. FOLDER LIST Button
Press this button to select PC Card Viewer
source to display a list of folders included in a
PC card.
31. SLIDE LIST Button
Press this button to select PC Card Viewer
source to display a list of slides included in a
PC card.
*NOTE:
The default is the Computer mode, which
allows you to use the Select, Cancel, and Enter but-
tons as your computer mouse. When the POWER
ON/OFF, MENU, FOCUS, ZOOM, SHIFT, HELP,
POINTER, MAGNIFY, PC CARD, FOLDER LIST, or
SLIDE LIST button is pressed, the PJ button lights
red to indicate that you are in the Projector mode. If
no buttons are pressed within 10 seconds, the light
goes out and the Projector mode is canceled.
1
2
3
5
9
10
12
14
16
17
19
20
28
29
30
31
4
6
8
7
11
13
15
22
18
21
23
24
25
26
27
Step 5
Set up the Projector.
Adjust the Lens Shift to properly position the projected image on the screen. See page E-29 of
the user's manual for more information on lens shift adjustment.
To adjust the projector' s focus or to zoom in and out, use the Focus or Zoom button.
If the projected image does not appear square to the screen then use keystone correction
for proper adjustment. See page E-33 of the user’s manual for information on keystone correc-
tion.
LENS SHIFT
FOCUS
ZOOM
Mouse adapter for USB
(supplied)
Mouse adapter for IBM PS/2
(supplied)
NOTE:
To reactivate your computer's on-board mouse control, power the computer down and unplug the serial cable.
The MOUSE OUT port allows you to remotely operate
your PC's mouse.
It makes clicking through your computer- generated
presentations easy.
Printed in Japan
7N8P0681
NOTE:
To turn off the projector, press and hold the Power "ON/STAND BY" button for a minimum of two seconds.
Connect a DVI cable (not supplied) when using DVI input.


