
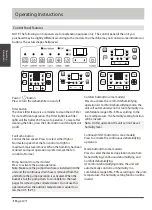
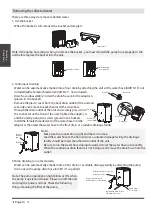


Filter
Mode
Fan
Timer
Filter
Full
Cont.
On Off
Turbo
Auto defrost
Comfort
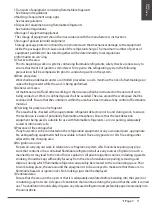
Filter button
The check filter feature is a reminder to clean the Air Filter
for more efficient operation. The Filter light(Clean filter
light) will flash after 250 hours of operation. To reset after
cleaning the filter, press the Filter button and the light will
go off.
Fan/Turbo button
Control the fan speed. Press to select either High or
Normal fan speed. Set the fan control to High for
maximum moisture removal. When the humidity has been
reduced and quiet operation is preferred, set the fan
control to Normal.
Pump button(On some models)
Press to activate the pump operation.
Note: Make sure the pump drain hose is installed into the
unit and the continuous drain hose is removed from the
unit before the pump operation is activated. When the
bucket is full,the pump starts to work.Refer to the next
pages for removing the collected water. Do not use this
operation when the outdoor temperature is equel to or
less than 0°C (32°F).
Comfort button(On some models)
Press to activate the comfort dehumidifying
operation. At Comfort dehumidifying mode, the
unit will automatically control room humidity in a
comfortable range 45%~55% according to the
room temperature. The humidity setting function
will be invalid.
Note: On this operation,the unit can not be set
humidity level.
Continue(CONT.) button(On some models)
Press to activate the continuous dehumidifying
operation.
Mode button(On some models)
Press to select the desired operation mode from
Dehumidifying,Continuous dehumidifying and
Comfort dehumidifying.
At Comfort dehumidifying mode, the unit will
automatically control room humidity in a
comfortable range 45%~55% according to the room
temperature. The humidity setting function will be
invalid.
Page 12
Operating Instructions
Control Panel Features
NOTE: The following control panels
are for explanation purpose only. The control panel of the unit you
purchased may be slightly different according to the models. Your machine may not contain some indicators or
buttons. The actual shape shall prevail.
Operating
Instructions
Press to turn the dehumidifier on and off.
Power / button
Summary of Contents for TDDP2012ES2C
Page 18: ......
Page 19: ......
Page 22: ...当机型为非可燃冷媒机型时 请进行以下变更 删除Pg6 Pg10 WARNING for Using R32 R290 Refrigerant 内容 ...