– 42 –
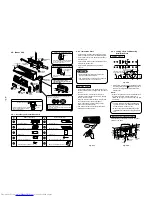
9-2. Indoor Unit
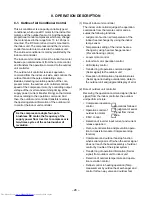
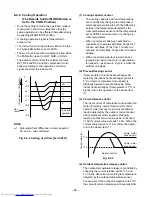
3
Front cabinet
Front panel
Shield pipe
(local part)
2
Wireless remote control
Batteries
Cover
Use 6-mm thick heat resisting polyethylene foam
(Inside of the ceiling).
Use 10-mm thick heat resisting polyethylene foam
outside of the room.
Bottom
Rear
Right
Rear left
Left
Cut the piping hole
sloping slightly
For the rear left and left piping
Insert the something by fist-size between
the indoor unit and wall, and lift indoor
unit to make work easier.
Do not allow the drain hose to get slack.
Make sure to run the drain hose sloped
downward.
The auxiliary piping can be
connected the left, rear left, rear,
right or bottom.
Insulation of refrigerant pipes insulates the pipes
separately, not together.
Before installing the wireless remote control
• With the remote control cover opened,
load the supplied batteries correctly,
observing their polarity.
Clip anchor
(local part)
Hanger
66 mm or more
Hanger
Installation
plate
Mounting
screw
Hanger
120 mm or more
Air filter
(Attach to the front cabinet.)
Pan head
wood screw
Remote
control
holder
Wireless
remote
control
Deodorizing
filter
120 mm
or more
7
1
9
Purifying
filter
6
5
4
2
Wall
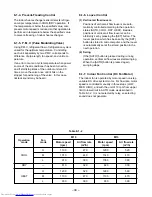
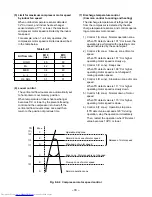
9-2-1. Accessory and Installation Parts
Deodorizing filter x 1
Part
No.
Name of parts (Q'ty)
Part
No.
Name of parts (Q'ty)
Installation plate x 1
Wireless remote control x 1
Remote control holder x 1
Battery x 2
Pan head wood screw Ø3,1x 16 x 2
B Label x 2
Mounting screw Ø4 x 25 x 6
Purifying filter x 1
Indoor unit Installation manual x 1
1
2
3
4
5
6
7
8
9
10
B
9-2-2. Installation Place
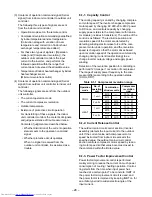
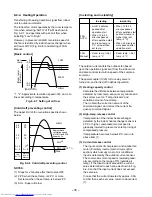
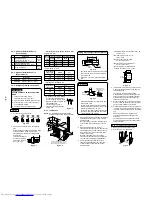
• A place which provides the spaces around the
indoor unit as shown in the installation diagram.
• A place where there is no obstacle near the air
inlet and outlet.
• A place which allows an easy installation of the
piping to the outdoor unit.
• A place which allows the front panel to be
opened.
CAUTION
• Direct sunlight to wireless receiver of the
indoor unit should be avoided.
• The microprocessor in the indoor unit should
not be too close to r-f noise sources.
Remote Control
• A place where there are no obstacles such as a
curtain that may block the signal from the remote
control.
• Do not install the remote control in a place
exposed to direct sunlight or close to a heating
source, such as a stove.
• Keep the remote control at least 1 m apart from
the nearest TV set or stereo equipment.
(This is necessary to prevent image distur-
bances or noise interference.)
• The location of the remote control should be
determined as shown below.
Fig. 9-2-1
7m
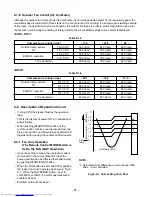
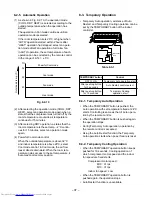
9-2-3. Cutting a Hole and Mounting
Installation Plate
Cutting a Hole
The center of the piping slot
is above the arrow.
The center of the pipe
hole is above the arrow.
80mm
Pipe hole
65mm
40,5 mm
Indoor unit
Pipe
hole
65,5mm
120mm
Thread
Weight
1
Installation
plate
9 Mounting
screw
Pipe hole
65,5mm
40mm
Anchor bolt hole
66mm
Fig. 9-2-2
1. After determining the pipe hole position on the
mounting plate (80 mm
), drill the pipe hole
(ø65 mm) at a slight downward slant to the
outdoor side.
NOTE :
• When drilling the pipe hole in the wall that the a
metal lath, wire lath or metal plate covers
inside, be sure to use a pipe hole brim ring sold
separately.
• There may be a wire conduit embedded in
the wall. Check on the blueprint or ask the
builder whether it is done or not.
• Make sure of the proper installation of the
installation plate before mounting the indoor
unit.
Mounting the Installation Plate
For installation of the indoor unit, use the paper
pattern on the back.
Fig. 9-2-3

