background image

Safety 

Precautions

Follow These Instructions Carefully

• Do not select a location for installation 

where there may be excessive water or 

humidity, such as a bathroom. Deterioration 

of insulation may be a cause of electric 

shock or fire.  

• When relocating or repairing the unit, please 

contact the supplying retail dealership. A 

kink in the wiring may cause electric shock 

or fire. 

• During a malfunction, (such as a burning 

odor or not cooling), stop operating the unit 

and turn off the circuit breaker. Continuous 

operation may be a cause of fire, or electric 

shock. Please request repair or service from 

the supplying retail dealership or a Toshiba 

dealership. 

• Grounding should be requested from the 

supplying retail dealership or professional 

vendors. Insufficient grounding work may be 

the cause of electric shock. Do not connect 

the earth wire to a gas pipe, water pipe, 

lightning conductor, or telephone earth wire. 

• If the indoor unit piping outlet is exposed 

due to relocation, close the opening. 

Touching internal electrical parts may cause 

injury or electric shock. 

• Do not insert any material (metal, paper, or 

water, etc.) into the air outlet or air intake 

opening. There are high voltage sections 

or a fan operating at high speed which may 

cause an injury or electric shock.

• You must use an independent power outlet 

for the power supply. If a power outlet other 

than the independent outlet is used, it may 

cause a fire. 

• When the air-conditioning unit does not 

cool or not warm there may be a leakage 

of refrigerant. Please consult the supplying 

retail dealership. The refrigerant used in 

the air-conditioning unit is safe. It will not 

leak under normal operating conditions but 

 DANGER

• Do not install, repair, open or remove the 

cover. It may expose you to dangerous 

voltages. Ask the dealership or the 

specialist to do this.

• Turning off the power supply will not prevent 

potential electric shock.

• The appliance shall be installed in 

accordance with national wiring regulations.

• There must be incorporated in the fixed 

wiring and the means of disconnecting a 

contact separation of at least 3 mm in all 

poles.

 WARNING

• Do not expose your body directly to cool or 

warm air for a long time.

• Do not insert your finger or any article into 

the air inlet/outlet.

• When an abnormality (burning smell, etc.) 

occurs, stop the air conditioner and turn off 

the circuit breaker.

• Installation must be requested from the 

supplying retail dealership or professional 

installation vendors. Installation requires 

special knowledge and skill. Customer 

installation can cause fire, electric shock, 

injury or water leakage. 

• Do not select a location for installation 

where flammable gas may leak. If there is 

any gas leakage or accumulation around 

the unit, it can be a cause of fire. 

• Do not turn ON/OFF the circuit breaker or 

operate buttons with a wet hand. It may be 

a cause of electric shock. 

• Do not disassemble, modify or relocate the 

unit by yourself. It may become the cause 

of fire, electric shock, or water leakage. For 

repair or relocation, please request service 

from the supplying retail dealership or a 

Toshiba dealership. 

Read the precautions in this manual

carefully before operating the unit.

This appliance is filled with R32.

• 

Keep this manual where the operator can easily find it.

• 

Read the precautions in this manual carefully before operating the unit.

• 

This appliance is intended to be used by expert or trained users in shops, in light industry and on 

farms, or for commercial use by lay persons.

• 

The precautions described herein are classified as DANGER, WARNING and CAUTION. They 

both contain important information regarding safety. Be sure to observe all precautions without fail.

4

Summary of Contents for RAS-M10PKVPG-E

Page 1: ...onditioner To use the product safely and correctly please read this manual carefully before use Please keep this manual in a convenient location for future reference Toshiba air conditioner Owner s Manual Indoor unit RAS M10PKVPG E RAS M13PKVPG E RAS M16PKVPG E ...

Page 2: ...lock 11 Check transmitting and receiving 12 Hi POWER operation page 13 Automatic operation page 14 Cooling Heating Dry operation and Fan only operation page 15 Plasma purifier page 17 Air volume Air direction and Swing louvers page 18 Changing the air volume 18 Changing the air direction 18 Swing louvers operation 18 Movement of vertical air direction louvers 18 Comfort air flow page 19 Wide air f...

Page 3: ...IMER 23 Edit Weekly timer program 25 Deactivating WEEKLY TIMER operation 25 To delete programs 26 WEEKLY TIMER usage example page 27 Set preferred operation page 30 PRESET operation 30 Energy Saving page 31 ECO operation 31 Limit maximum Electric Power consumption and Silent Operation Outdoor Unit page 32 Power Selection 32 Silent operation Outdoor Unit 32 Fireplace and 8 C Heating Operation page ...

Page 4: ...t may expose you to dangerous voltages Ask the dealership or the specialist to do this Turning off the power supply will not prevent potential electric shock The appliance shall be installed in accordance with national wiring regulations There must be incorporated in the fixed wiring and the means of disconnecting a contact separation of at least 3 mm in all poles WARNING Do not expose your body d...

Page 5: ...refrigerant different from the one specified for top ups or replacement as abnormally high pressure etc Otherwise abnormally high pressure may be generated in the refrigeration cycle which may result in a failure or explosion of the product or an injury to your body CAUTION Check that the circuit breaker is installed correctly If the circuit breaker is not properly installed it may cause an electr...

Page 6: ... front panel air filter is cleaned wipe away any water and allow to dry If water remains it may cause an electric shock Once the front panel is removed do not touch the metal parts of the unit It may cause an injury Do not touch the air intake section or the aluminum fins of the unit It may cause injury When you hear thunder and there might be a lightning strike stop operating the unit and disconn...

Page 7: ...Air inlet Front panel Operation display Remote control receiving module Vertical wind direction louver Horizontal wind direction louver Air outlet Air filter Plasma ion charger Air purifier Temperature sensor Temporary switch Indoor unit 7 ...

Page 8: ... 2 pieces How to attach the remote control holder Attach the remote control holder to a wall or a column with the supplied attachment screws for the remote control holder Remote control holder Screws to attach remote control holder How to attach detach from the remote control holder Insert the stick out of the remote control holder into the hole of the lower remote control and set it while pressin...

Page 9: ... Notice When the notice sounds it means the operating setting returns to the datum point Example When temperature setting Datum points Adjust temperature How to open the remote control cover Pull it down while slightly depressing the upper part of the cover 22 C 23 C 24 C 25 C 26 C Pi Pi Pi Pi PiPi Pi PiPi PiPi Pi Temperature 24 C Swing Cancel Air volume Automatic Horizontal wind direction Straigh...

Page 10: ...lay Weekly timer display Clock and timer setting display Quiet speed display Mode selection button Air flow selection button ECO operation button Plasma purifier button Fireplace 8 C heating operation button Clock setting button Check button Louver swing button Fan speed selection button Louver direction selection button Hi POWER operation button Weekly timer setting button Reset button Filter cle...

Page 11: ...batteries if no sound is received from the indoor unit or there is a failure to select the desired function Replace both batteries at the same time with AAA alkaline batteries If not planning to use for one or more months remove the batteries to avoid failure Setting the clock 1 Press the CLOCK button Press with the tip of pencil 2 Adjust the Day The day SU will appear and change to the next day a...

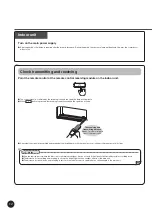
Page 12: ...ht such as sunlight affects of the main unit The distance for transmission and receiving is shorter if the remote control is operated at an oblique angle to the main unit Point the remote control at the remote control receiving module on the indoor unit The correct signal is confirmed by the receiving tone and the operation lamp will illuminate When button is pressed the receiving tone will sound ...

Page 13: ...ER operation To automatically control room temperature and airflow for faster cooling or heating operation except in DRY and FAN ONLY mode Hi POWER appears on the remote control display Hi POWER operation 13 ...

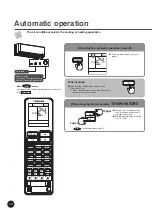
Page 14: ...ously if pressed continuously The temperature range available is 17 C 30 C PiPi sounds when reaching 24 C Higher Lower When it stops After stopping inside drying operation starts Timer lamp is on When operating period is less than 10 minutes the operation is not performed When PiPi sounds it notices that the operation setting returns to the datum point Page 9 Timer lamp Operation mode Cooling Dry ...

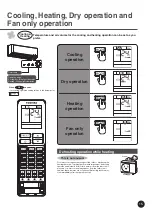
Page 15: ...heat exchanger of the outdoor unit during the heating operation To prevent performance impairment defrosting operates automatically At this time warm air from the indoor unit may stop or water or steam may appear from the outdoor unit However these features are not unusual Defrosting function may start immediately after the operation stops Steam Water Cooling operation Dry operation Heating operat...

Page 16: ...ting range is 17 C 30 C When at 24 C PiPi When stopping Inside drying starts after the operation stops TIMER lamp turns on Inside drying lamp will not operate if the operating time is 10 minutes or less Notes Refrigerant flow may make noise However this is not defect When the outside temperature is low the temperature in the room may become lower than the temperature selected On dry mode the air v...

Page 17: ...ot operate or When using together with the air conditioning Air volume and direction setting of air conditioner have priority Operate Plasma purifier while air conditioning Operate air conditioning during Plasma purifier Stop both Plasma purifier and air conditioning Stop only Plasma purifier Press the button Press to select Press the button Press the button Operation Stop Notes Plasma purifier op...

Page 18: ...he air volume press FAN When the air volume is set to Quiet the air volume becomes Automatic Changing the air direction press FIX When pressed the vertical and horizontal louver modes change one step Do not move the air direction louvers by hand adjust only with the remote control Swing louvers operation press Swing When changing the middle vertical direction louver press the button and to change ...

Page 19: ...ma purifier function is working Horizontal direction louvers can be adjusted within a range of approx 30 degrees when wide air flow or spot air flow is selected While operating Auto Cool Heat Dry and these modes with PURE Select Every time When pressed the air flow direction changes Spot left Cancel Air Flow Spot right Spot center Wide left Wide center Wide right Pressing Indoor unit causes Pi sou...

Page 20: ...n 2 degrees Celsius Every time when pressed within 3 seconds Display example is when 10 00 is selected Cancel comfort sleep Timer off during comfort sleep The time for stopping the operation is displayed on the remote control After the operation stops drying of the inside is not performed Comfort sleep operation cannot be set up when Plasma purifier functions are operating independently To cancel ...

Page 21: ...ime is displayed Go to 2 if the same time as a previous setting can be used 2 Select During time off drying inside is not performed Timer off can be selected with the previous operation setting even while stopped The operation starts when selected To change the selected time press or to change the setting 1 Select operation start for 6 00 AM Forward Backward Selected time and current operating mod...

Page 22: ...rature setting d Fan speed setting e Special operation 8 C ECO Hi POWER Silent Examples of WEEKLY TIMER uses 1 Living room ON ECO MON FRI ON Hi POWER 23 C 24 C OFF OFF SUN and SAT ON ON 24 C 22 C OFF OFF ON Hi POWER 2 Living room with heavy cool Non stop air conditioning MON FRI ON ECO ON Hi POWER 23 C 10 C 17 C 24 C ON ON ECO SUN and SAT ON ON ON ON 24 C 10 C 23 C 17 C ON ECO 3 Bedroom 25 C Sunda...

Page 23: ...sed PG 1 appears on the LCD Press to change the program number in the sequence program 1 to program 4 PG 1 PG 2 PG 3 PG 4 4 Press or to select the desired time The time can be set between 0 00 and 23 50 in 10 minute intervals Press and hold the button to change setting time for 1 hr Only one of ON or OFF timer can be set on each program ON timer display OFF timer display OFF timer is used to stop ...

Page 24: ...ng module then press SET button until you hear the PiPi sound This means the setting operation has been completed As the air conditioner is receiving the signal you will hear separate Pi sounds corresponding to the number of days in the selected setting An incomplete setting is indicated if the TIMER lamp is blinking Press twice Notes 1 Place the remote control where the indoor unit can receive th...

Page 25: ... press to select program number to be confirmed Resetting the operation 3 Press to exit confirming mode Deactivating WEEKLY TIMER operation Press while WEEKLY is displayed on the LCD The WEEKLY indicator will disappear from the LCD However the program will remain in the remote control The TIMER lamp goes off To reactivate the WEEKLY TIMER operation again press again LCD shows the next program The ...

Page 26: ...l be cleared and the LCD will blink 4 Press to delete the program Press while the LCD is blinking The program has now been deleted All programs 1 Press The day of the week and the program number will be displayed 2 Press and hold for 3 seconds All programs will be deleted and LCD displays current operation Notes Make sure the remote control receiving module on the air conditioner receives the sign...

Page 27: ...living room operation Setting SU MO TU WE TH FR SA PG 1 Timer ON ON ON ON ON ON Clock 7 00 6 00 6 00 6 00 6 00 6 00 Mode Auto Auto Auto Auto Auto Auto Temperature 22 C 23 C 23 C 23 C 23 C 23 C Fan Low Low Low Low Low Low Add on operation ECO ECO ECO ECO ECO PG 2 Timer ON OFF OFF OFF OFF OFF Clock 12 00 8 00 8 00 8 00 8 00 8 00 Mode Heat Temperature 24 C Fan Low Add on operation Hi POWER PG 3 Timer...

Page 28: ...operation Setting SU MO TU WE TH FR SA PG 1 Timer ON ON ON ON ON ON Clock 7 00 6 00 6 00 6 00 6 00 6 00 Mode Heat Heat Heat Heat Heat Heat Temperature 23 C 23 C 23 C 23 C 23 C 23 C Fan Low Low Low Low Low Low Add on operation ECO ECO ECO ECO ECO PG 2 Timer ON ON ON ON ON ON Clock 12 00 8 00 8 00 8 00 8 00 8 00 Mode Heat Heat Heat Heat Heat Heat Temperature 24 C 10 C 10 C 10 C 10 C 10 C Fan Auto Au...

Page 29: ... ON ON ON ON ON ON ON Clock 2 00 2 00 2 00 2 00 2 00 2 00 2 00 Mode Auto Auto Auto Auto Auto Auto Auto Temperature 24 C 24 C 24 C 24 C 24 C 24 C 24 C Fan Low Low Low Low Low Low Low Add on operation ECO ECO ECO ECO ECO ECO ECO PG 2 Timer OFF OFF OFF OFF OFF OFF OFF Clock 6 00 6 00 6 00 6 00 6 00 6 00 6 00 Mode Temperature Fan Add on operation PG 3 Timer ON ON ON ON ON ON ON Clock 21 00 21 00 21 00...

Page 30: ...e memory and can be used for future requirements PRESET OPERATION 1 Select your preferred operation 2 Press and hold for 3 seconds to store the setting The mark displays 3 Press to operate the preset operation The following functions cannot be set Fireplace 8 C heating operation Weekly timer Louver swing ...

Page 31: ...vated this function provides automatic control for the setting of room temperature ECO appears on the remote control display The set temperature will be automatically adjusted appropriately However the temperature is raised by no more than 2 degree Celsius ECO OPERATION ...

Page 32: ...ifetime Silent Operation Keep outdoor unit operating silently to ensure either yourself or neighborhood will have a tight sleep in nighttime By this feature the heating capacity will be optimized to deliver such silent experience The silent operation can be selected from one of two purposes Silent 1 and Silent 2 There are three setting parameters Standard level Silent 1 Silent 2 Silent 1 Though op...

Page 33: ...ult setting Fireplace 1 Fireplace 2 Fireplace 1 The indoor unit s fan will continue to run by the same speed previously selected by end user Fireplace 2 The indoor unit s fan will continue to run at super low speed programmed from factory 8 C Heating Operation Heat mode operation for keep room temperature 5 13 C with less of energy usage Fireplace and 8 C Operation Normal operation 8 C Fireplace 2...

Page 34: ... adjust brightness which can be set at 4 levels or to turn it off LAMP BRIGHTNESS ADJUSTMENT Rremote control LCD Operation display Brightness Lamp illuminates an operation with full brightness 100 Lamp illuminates an operation with 50 brightness 50 Lamp illuminates an operation with 50 brightness and the operation mode lamp is turned off 50 All lamps are turned off All turned off In the examples o...

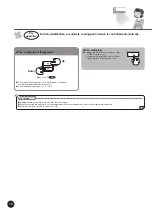
Page 35: ...n rooms where frying of food occurs where heavy smokers congregate or in a humid room the internal parts of the air conditioner the heat exchanger or the exhaust fan may become covered with dirt or mold which can t be removed Inside drying operation is not performed in On Off timer Weekly timer and Comfort sleep if remote control is not in position to send signal to air conditioner Timer lamp illu...

Page 36: ... you and lift them up until fixed and stop Beware an arm of the front panel might come off and fall How to remove the front panel Pull and lift up front panel until it stops move arms on left and right side to outward direction then pull toward you to remove front panel Beware a piece of the front panel might come off and fall Arm Arm How to attach the front panel Reverse the procedure to attach t...

Page 37: ...oner Expertise is necessary when selecting the cleaning method and cleaner If washing inside the air conditioner is necessary please request service from the supplying retail dealership Page 36 Filter optional Filter is an optional part by separate sale and can be attached in 2 pieces Please purchase at supplying retail dealership How to install 1 Open the front panel 2 Remove the air filter Air f...

Page 38: ...ntinuously 5 times per 1 sec Check the unit with all 52 check codes to as shown in below table Press or button to to move the check codes backward If there is a fault the indoor unit will Pi for 10 seconds Pi Pi Pi Note the check code on the display of the remote control The display will indicate a 2 digit alphanumeric code All indicators on the indoor unit will flash 5 times per 1 sec 3 Press to ...

Page 39: ...n in the off position Turn it on as required 3 seconds 1 Press and hold the Temporary switch on the indoor unit for 3 seconds to set the operation 3 Pi sounds and OPERATION lamp blinks 5 times sec for 5 seconds 2 Press and hold the Temporary switch on the indoor unit for 3 seconds to cancel the operation 3 Pi sounds but OPERATION lamp does not blink In case the ON timer or OFF timer is set AUTO RE...

Page 40: ...with a Pi sound However continue to press it Setting completes when the Pi sounds 5 times and the operation lamp blinks To cancel it repeat the above operation in this case the operation lamp does not blink Start the operation smoothly and reduce the operating noise Concern about the operating noise Press for 20 seconds Quiet When setting is complete Pi Pi Pi Pi Pi 1 second 1 second again 1 second...

Page 41: ...oltage variation or covering of the air inlet Remove any obstructions and reset the circuit breaker after 30 seconds Air flow stops These are not faults Air flow may stop during Heating operation It does not reach the set temperature It may not reach the set temperature depending on the indoor or outdoor conditions It is caused by a large difference between set temperature and room temperature whe...

Page 42: ...ol match the indoor unit Page 40 The vertical direction louvers do not move or move in a narrow range even when is pressed Is timer set Page 21 Is the inside drying operation on Setting temperature is not displayed even when is pressed Is it set to Plasma purifier only Page 17 Air conditioner does not stop operating even when is pressed Is inside drying operation on Page 35 Press 2 more times to s...

Page 43: ...1121450199 1 ...

Reviews: