2 Troubleshooting Procedures
2.9 Optical drive Troubleshooting
2.9 Optical drive Troubleshooting
This section describes how to determine if the optical drive in the Slim Select Bay is
functioning properly. Perform the steps below starting with Procedure 1 and continue with
the other procedures as required.
Procedure 1: Diagnostic Test Program Execution Check
Procedure 2: Connector Check and Replacement Check
Procedure 1
Diagnostic Test Program Execution Check
The CD-ROM/DVD-ROM test program is stored in the Diagnostics Disk.
For the test, prepare test Media.
Then insert the Diagnostics Disk in the computer’s floppy disk drive, turn on the computer
and run the test. Refer to Chapter 3,
Tests and Diagnostics,
for more information about the
diagnostics test procedures.
If any errors occur while executing the CD-ROM/DVD-ROM test, go to Procedure 2.
Procedure 2
Connector Check and Replacement Check
The optical drive is connected to the system board. The connectors may be disconnected
from the system board or may be damaged. Disassemble the computer following the steps
described in Chapter 4,
Replacement Procedures
and perform the following checks:
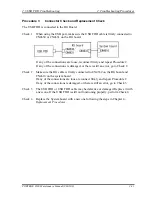
Check 1 Make sure the drive to test is firmly connected to CN1810 on the system board.
If the connection is loose, reconnect firmly and repeat Procedure 1. If there is still
an error, go to Check 2.
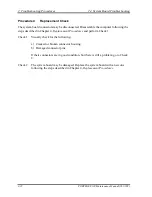
Check 2 The optical drive may be defective or damaged. Replace it with a new one. If
there is still an error, go to Check 3.
Check 3 Replace the system board with a new one following the steps in Chapter 4,
Replacement Procedures
.
2-40
PORTEGE S100 Maintenance Manual (960-508)
Summary of Contents for Portege S100 Series
Page 10: ...x PORTEGE S100 Maintenance Manual 960 508 ...
Page 11: ...Chapter 1 Hardware Overview ...
Page 12: ...1 Hardware Overview 1 ii PORTEGE S100 Maintenance Manual 960 508 ...
Page 25: ...1 2 2 5 inch Hard Disk Drive 1 Hardware Overview PORTEGE S100 Maintenance Manual 960 508 1 11 ...
Page 36: ...Chapter 2 Troubleshooting Procedures ...
Page 37: ...2 Troubleshooting Procedures 2 ii PORTEGE S100 Maintenance Manual 960 508 ...
Page 41: ...2 Troubleshooting Procedures 2 vi PORTEGE S100 Maintenance Manual 960 508 ...
Page 92: ...Chapter 3 Tests and Diagnostics ...
Page 93: ...3 Tests and Diagnostics 3 3 ii PORTEGE S100 Maintenance Manual 960 508 ...
Page 199: ...3 31 SETUP 3 Tests and Diagnostics PORTEGE S100 Maintenance Manual 960 508 3 101 ...
Page 212: ...3 Tests and Diagnostics 3 31 SETUP 3 114 PORTEGE S100 Maintenance Manual 960 508 ...
Page 213: ...Chapter 4 Replacement Procedures ...
Page 214: ...4 Replacement Procedures 4 ii PORTEGE S100 Maintenance Manual 960 508 ...
Page 218: ...4 Replacement Procedures 4 vi PORTEGE S100 Maintenance Manual 960 508 ...
Page 310: ...4 Replacement Procedure 4 29 Fluorescent Lamp 4 92 PORTEGE S100 Maintenance Manual 960 508 ...
Page 311: ...Appendices ...
Page 312: ...Appendices App ii PORTEGE S100 Maintenance Manual 960 508 ...
Page 318: ...Appendices App viii PORTEGE S100 Maintenance Manual 960 508 ...
Page 324: ...Appendices Appendix A Handling the LCD Module A 6 PORTEGE S100 Maintenance Manual 960 508 ...
Page 330: ...Appendices Appendix B Board Layout B 6 PORTEGE S100 Maintenance Manual 960 508 ...
Page 356: ...Appendices Appendix C Pin Assignments C 26 PORTEGE S100 Maintenance Manual 960 508 ...
Page 366: ...Appendices Appendix E Key Layout E 2 PORTEGE S100 Maintenance Manual 960 508 ...
Page 368: ...Appendices Appendix F Wiring diagrams F 2 PORTEGE S100 Maintenance Manual 960 508 ...
Page 370: ...Appendices Appendix G BIOS rewrite procedures G 2 PORTEGE S100 Maintenance Manual 960 508 ...
Page 372: ...Appendices Appendix H EC KBC rewrite procedures H 2 PORTEGE S100 Maintenance Manual 960 508 ...
Page 374: ...Appendices Appendix I Reliability I 2 PORTEGE S100 Maintenance Manual 960 508 ...

