48
Maintenance List
11
TROUBLE SHOOTING
Part
Heat exchanger
Fan motor
Filter
Fan
Air inlet/outlet grilles
Drain pan
Ornamental panel, louvers
Check (visual/auditory)
• Dust/dirt clogging,
scratches
• Sound
• Dust/dirt, breakage
• Vibration, balance
• Dust/dirt, appearance
• Dust/dirt, scratches
• Dust/dirt clogging,
drain contamination
• Dust/dirt, scratches
Maintenance
• Wash the heat exchanger when it is clogged.
• Take appropriate measures when abnormal sound is generated.
• Wash the filter with water when it is contaminated.
• Replace it when it is damaged.
• Replace the fan when vibration or balance is terrible.
• Brush or wash the fan when it is contaminated.
• Fix or replace them when they are deformed or damaged.
• Clean the drain pan and check the downward slope for smooth
drainage.
• Wash them when they are contaminated or apply repair coating.
n
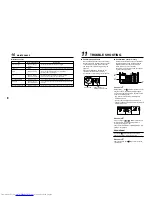
Confirmation and check
When a trouble occurred in the air conditioner,
the check code and the indoor unit No. appear
on the display part of the remote controller.
The check code is only displayed during the
operation.
If the display disappears, operate the air
conditioner according to the following
“Confirmation of error history” for confirmation.
n
Confirmation of error history
When a trouble occurred on the air conditioner,
the trouble history can be confirmed with the
following procedure. (The trouble history is
stored in memory up to 4 troubles.)
The history can be confirmed from both operat-
ing status and stop status.
Procedure
1
When pushing
SET
and
TEST
buttons at the same time for
4 seconds or more, the following display appears.
If [
Service check] is displayed, the mode enters
in the trouble history mode.
• [01 : Order of trouble history] is displayed in
CODE No. window.
• [Check code] is displayed in CHECK window.
• [Indoor unit address in which an error occurred] is
displayed in Unit No.
Procedure
2
Every pushing of “
/
TEMP.” button used to
set temperature, the trouble history stored in
memory is displayed in order.
The numbers in CODE No. indicate CODE No. [01]
(latest)
→
[04] (oldest).
REQUIREMENT
Do not push
CL
button because all the trouble
history of the indoor unit will be deleted.
Procedure
3
After confirmation, push
TEST
button to return to the
usual display.
10
MAINTENANCE
Check code
Indoor unit No. in
which an error occurred
1
3
2


