24
u
4-way Air Discharge Cassette, 1-way Air Discharge Cassette (2SH series),
Under CeilingType
n
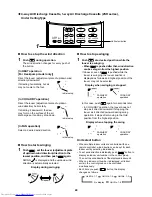
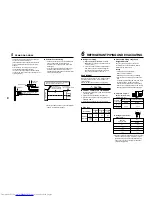
How to set up the wind direction
1
Push
SWING/FIX
during operation.
The wind direction changes for every push of
the button.
[In HEAT operation
(For Heat-pump model only)]
Direct the louver (adjustment plate of up/down wind
direction) downward.
If directing horizontally, hot air
may not come to the foot.
[In COOL/DRY operation]
Direct the louver (adjustment plate of up/down
wind direction) horizontally.
If directing it downward, the dew
may form on the surface of the air
discharge port and may drop down.
[In FAN operation]
Select a desired wind direction.
n
How to start swinging
1
Push
SWING/FIX
, set the louver (adjustment plate
of up/down wind direction) direction to the
lowest position, and then push
SWING/FIX
again.
SWING
is displayed and the up/down wind
direction is automatically selected.
Display during swinging
n
How to stop swinging
1
Push
SWING/FIX
at a desired position while the
louver is swinging.
• When
SWING/FIX
is pushed after that, wind direction
can be set again from the highest position.
∗
However, even if
SWING/FIX
is pushed while the
louver is swinging, the louver position is
displayed as follows and highest position of the
louver may not be selected.
Display when swinging is stopped
In this case, push
SWING/FIX
again two seconds later.
• In COOL/DRY operation, the louver does not
stop as it directs downward. If stopping the
louver as it directs downward during swing
operation, it stops after moving to the third
position from the highest position.
Display when stopping the swing
Unit select button
• When multiple indoor units are controlled with one
remote controller, wind direction can be set for each
indoor unit by selecting individually.
• To set wind direction individually, push
UNIT LOUVER
button to
display an indoor unit number in the control group.
Then set the wind direction of the displayed indoor unit.
• When no indoor unit number is displayed, all indoor
units in the control group can be controlled
simultaneously.
• Each time you push
UNIT LOUVER
button, the display
changes as follows:
Unit select button
1
SET
TIME
TIMER SET
TEST
FILTER
RESET
CL
FAN
SAVE
SWING/FIX
VENT
MODE
UNIT LOUVER
Initial setup
Initial setup
Initial setup
Repeat
FAN/HEAT
operation
COOL/DRY
operation
FAN/HEAT
operation
COOL/DRY
operation
Unit No. 1-2
Unit No. 1-1
Unit No. 1-3
No display
Unit No. 1-4

