15
Cable connection
REQUIREMENT
• As the remote controller cable has no polarity, there is no problem if connections to indoor unit terminal blocks
A and B are reversed.
• Be sure to pass the cable through the bushing of cable connection port of the indoor unit.
• Keep a margin (approx. 100m) on a cable to hang down the electric parts box at servicing, etc.
• The low-voltage circuit is provided for the remote controller. (Do not connect high-voltage circuit.)
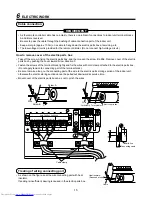
How to remove cover of the electric parts box
• Take off the screw A fixing the electric parts box, and then loosen the screw B a little. Remove cover of the electric
parts box by pushing the cover toward arrow direction C.
• Fasten the screws of the terminal block tightly and fix the wires with cord clamp attached to the electric parts box.
(Do not apply tension to connecting part of the terminal block.)
• Be sure to make a loop on the connecting part of the wire to the electric parts storing section of the indoor unit;
otherwise the electric storing section cannot be pulled out downward at service time.
• Mount cover of the electric parts box so as not to pinch the wires.
Treating of wiring connecting port
• As shown on the figure, seal the wire connecting port with heat
insulator.
If sealing is insufficient, dewing is caused in the electric parts box.
L N
10
10
30
70
Earth line
Connecting cable
Cable
Heat insulator
(Required at site)
R
(L)
S
(N)
DON’T APPLY 220-240V
FOR INTER-UNIT
FOR AI-NET
FOR REMOTE CONTROL
U1
U2
A
B
X
Y
Cable clamp
Wire
Cord clamp Terminal block Electric parts box
Wire
Screw B
Screw A
C
6
ELECTRIC WORK


