


e-STUDIO160/200/250 SCANNER
7 - 26
December 2002 TOSHIBA TEC
Fig. 7-8-26
JIG (wire)
Wire
Scanner
drive shaft
058-1
Fig. 7-8-25
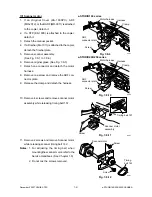
Spring plate
Spring plate
Mirror 1
Spring plate
Adjusting screw
056-2
7. Detach top cover L. (See Fig. 2-6-4)
8. Detach top cover R. (See Fig. 2-6-5)
9. Release the lamp cable.
(See Fig. 7-8-19 to 7-8-22)
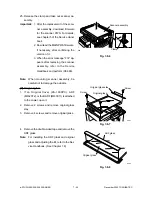
10. Loosen 2 screws, release wire, and remove car-
riage 1.
11. Remove spring plate securing mirror 1 and re-
move mirror 1.
Notes:
1. Clean the surface of mirror 1 if dirty.
2. For mounting Carriage 1 and adjusting
the distortion, refer to the Service Hand-
book. (See Chapter 1.8)
[CAUTION]
Never turn the angle adjusting screw of mirror. Be
careful that holding or pushing the lamp part can
damage the lamp.
[H] Carriage 2/mirror 2/mirror 3
1. If an Original Cover (KA-1600PC), ADF
(MR-2012), or the RADF (MR-3011) is attached
to the copier, detach it.
2. If a STP (KK-1600) is attached to the copier,
detach it.
3. Detach the manual pocket.
4. If a Finisher (MJ-1011) is attached to the copier,
detach the finisher plate.
5. Detach top cover. (See Fig. 2-6-2)
6. Detach scanner cover. (See Fig. 2-6-3)
7. Detach top cover L. (See Fig. 2-6-4)
8. Detach top cover R. (See Fig. 2-6-5)
9. Release the lamp cable.
(See Fig. 7-8-19 to 7-8-22)
10. Remove carriage 1. (See Fig. 7-8-24)
Summary of Contents for e-studio 160
Page 2: ... 2002 TOSHIBA TEC CORPORATION All rights reserved ...
Page 223: ...e STUDIO160 200 250 PCB BOARD 16 2 December 2002 TOSHIBA TEC 16 2 PWA F RLY 16 02 01 ...
Page 224: ...December 2002 TOSHIBA TEC 16 3 e STUDIO160 200 250 PC BOARD 16 3 PWA F PIF 16 03 01 ...
Page 226: ...December 2002 TOSHIBA TEC 16 5 e STUDIO160 200 250 PC BOARD 16 6 PWA F SLG 16 06 01 ...
Page 228: ...17 WIRE HARNESS CONNECTION DIAGRAMS 17 1 ...
Page 255: ...1 1 KANDA NISHIKI CHO CHIYODA KU TOKYO 101 8842 JAPAN ...


