background image

– 15 –

Compliant Manager

Installation Manual

• When a zone is selected, group numbers registered in the zone are displayed.
• Groups whose numbers are displayed are already registered.
• Even when addresses have been registered, the registration can be cancelled with the 

 button.

(4) Select the unit to be registered in the group selected in step (3).

• Switch refrigeration system No.1 to 31 with the 

 button, and then switch indoor unit No.1 to 64 with the 

 button.

• When no system exists, indoor unit number is displayed as “- -”.
• System number 31 is for a local adapter and heat exchange ventilators. An indoor unit number is always 

displayed regardless of whether the unit exists or not.

(5) Press the 

 button to register the setting or press the 

 button to cancel the setting.

(6) To continue registration, repeat steps (3) to (5).
(7) Press the 

 button to terminate the address setting.

C Automatic setting

Set central control addresses automatically from the Compliant Manager.
(Central control addresses are set automatically in ascending order of unit number.)
(1) Press the 

 button and ZONE 

 button simultaneously for at least 4 seconds.

(CODE No. C1 flashes.)

(2) Press the SET TEMP. 

 or 

 button to change the CODE No. to C2.

(3) Press the 

 button. (Central control addresses are automatically registered. This registration requires several 

minutes. 

 lights during this address setting.)

(4)

 goes out and the indication of C2 flashes, which shows completion of the automatic address 

registration.

(5) Press the 

 button to exit the address setting mode.

<Checking duplicate central control address>

NOTE

This function is not available for custom air conditioners.
For details, refer to the manual of the TCC-LINK adapter.

(1) Press the 

 button and ZONE 

 button simultaneously for at least 4 seconds.

(CODE No. C1 flashes.)

(2) Press the SET TEMP. 

 or 

 button to change the CODE No. C3.

(3) Press the 

 button to start checking a duplicate central control address error. (

 lights during this 

check.)

(4) When 

 goes out, the check has been completed.

* When nothing appears in the group number display area at the end of checking, no duplicate address error 

has been detected.

* When a group number in the group number display area flashes at the end of checking, a duplicate address 

error has been detected.
(Correct the duplicate address.)

14-EN

Summary of Contents for Compliant Manager BMS-CM1280FTLE

Page 1: ...COMPLIANT MANAGER Model name BMS CM1280TLE BMS CM1280FTLE Installation Manual Save These Instructions ENGLISH ...

Page 2: ... INSTALLATION OF THE COMPLIANT MANAGER 5 4 CONNECTION OF POWER CABLES SIGNAL WIRES EARTH WIRES 6 5 MODE SETTING FOR THE CONTROLLER 8 6 SWITCHES FOR SETTING 10 7 CENTRAL CONTROL ADDRESS GROUP NUMBER SETTING 14 8 ZONE SETTING 17 9 CHANGING RETURN BACK TIME TEMPERATURE SETTINGS 18 10 TEST RUN 21 11 SPECIFICATIONS 21 1 EN ...

Page 3: ...If flammable gas leaks and remains around the unit it may catch fire Perform wiring correctly in accordance with the specified current capacity Failure to do so may result in short circuiting overheating or fire Connect the specified cables for the terminals securely to prevent external forces from affecting them Failure to do so may result in disconnection overheating or fire Make sure that the g...

Page 4: ...n Manual 1 Network Setting Manual Packaged for BMS CM1280FTLE only CD R 1 Packaged for BMS CM1280FTLE only Clamp filter 2 BMS CM1280TLE 4 BMS CM1280FTLE Tie wraps 2 BMS CM1280TLE 4 BMS CM1280FTLE 180 8 5 5Ø 8 5 155 142 172 19 69 90 158 42 46 66 120 8 17 9 76 12 7 106 6 70 140 108 90 Reserve space of 10mm or more when installing the unit Dimensions of unit fixing holes in the wall etc 3 EN ...

Page 5: ... is induced into the power supply of the Compliant Manager take proper measures such as attaching of a noise filter Panel Shield plate Base Power supply box The panel is secured with the claw This screw secures the power supply box base and shield plate The panel is secured with the screw at the bottom This hole is provided for penetration of the power supply box fixing screw Remove the screw at t...

Page 6: ...nergy Monitoring Interface Digital I O Interface TCC LINK main Bus LINE2 Outdoor Unit Indoor Unit Remoto controller TCC LINK main Bus LINE1 Outdoor Unit Indoor Unit Remoto controller Schedule Timer RS 485 1 Secure the power cable with the clamp in the case 1 Optional N L 20 80 15 10 35 20 10 Length of stripped power cable Length of stripped TCC LINK and RS 485 communication wire Length of stripped...

Page 7: ... Fire alarm input Voltage applied A contacts All stop Pulse or static All start Pulse or static Fire alarm Static Photocoupler input Select non voltage contacts thatallowminute current 12V 1mA Pulse width 300 ms or more Wiring length 100 m or less No Line Description 1 For TCC LINK Type 2 wire sheld cord Wire size 1 25mm 1000m max total length including 2 00mm 2000m max air conditioner area Length...

Page 8: ...ith the remote controller are inhibited by the setting of the Compliant Manager ON side Remote control mode This Compliant Manager is used as a remote controller Settings with the Compliant Manager are inhibited by the setting of another central control unit DIP SW1 DIP SW2 2 3 4 5 5 6 All groups OFF OFF OFF OFF OFF OFF LINE 1 Group 1 to 16 ON OFF OFF OFF OFF ON Group 17 to 32 OFF ON OFF OFF OFF O...

Page 9: ...ection is used groups and zones outside this range are not displayed and cannot be operated means the entire set group range Zones can be registered and operated only within the set group range No groups outside the range can be registered or operated The group control mode is available only for one line Multiple group ranges can be specified by the control group setting Example When groups 33 to ...

Page 10: ...rmal Fire alram Normal 4 SW3 ON OFF 3 Must be set to OFF SW2 ON OFF 4 Must be set to OFF 5 LINE 2 LINE 1 7 OFF ON Buzzer Control group Selection Line 8 OFF ON Indicate SW1 2 3 4 5 SW2 6 ALL groups group 1 16 group 17 32 group 33 48 group 49 64 Control groups Selection SW1 ON OFF 1 SUB MAIN 6 RCU CENTRAL 7 SUB MAIN 8 INHIBIT PERMIT Central Individual Sys con Central RCU change Central Control To av...

Page 11: ...roller mode selection OFF Central control mode ON Remote controller mode Central control mode Individual setting by remote controller can be inhibited by Compliant Manager Remote controller mode Setting by Compliant Manager is inhibited by other centra control equipments 7 Central control Main Sub selection OFF Main ON Sub This setting is required when multiple Compliant Manager units are used or ...

Page 12: ... ON ON OFF 5 Ditto All indoor units CENTRAL 2 OFF OFF ON 6 Ditto All OFF and all indoor units to be CENTRAL 2 ON OFF ON 6 Control group selection enable OFF Normal mode ON Control group selection Set this bit to ON when the control group selection is used To use the control group selection set SW1 2 to 5 and SW2 5 to 6 For details see the table on the previous page 7 Buzzer OFF With buzzer sound O...

Page 13: ...DI3 Fire alarm Normal Factory setting All OFF 2 Synchronization of Setting Zone data OFF With transfer ON Without transfer This bit specifies whether to perform synchronous communication of Setting Zone data between Compliant Managers When this bit is set to ON without transfer synchronous communication is not performed and when zone setting is made the data is not reflected in other Compliant Man...

Page 14: ...r automatic setting to set central control addresses A Manual setting from wired remote controller Set central control addresses group numbers from a standard wired remote controller The following setting procedure is described based on button operations of the wired remote controller RBC AMT32E or RBC AMT31E 1 Press the button and button simultaneously for at least 4 seconds Note Do not press the...

Page 15: ...mber 1 Press the button and ZONE button simultaneously for at least 4 seconds CODE No C1 flashes 2 Press the SET TEMP or button to change the CODE No to C2 3 Press the button Central control addresses are automatically registered This registration requires several minutes lights during this address setting 4 goes out and the indication of C2 flashes which shows completion of the automatic address ...

Page 16: ...ompleted select CODE No C1 with the SET TEMP or button 2 Press the button 3 The number of group in which the error has been detected flashes Select the flashing group number to be corrected with the GROUP or button 4 Press the button to clear the set incorrect central control address After that set a correct central control address 5 Press the button to terminate the duplicate address correction 1...

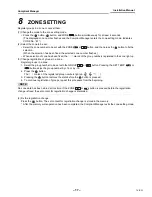
Page 17: ...e light up 3 Change registration of groups in a zone Register groups in a zone 1 Select the group number to be set with the GROUP or button Pressing the SET TEMP or button skips the group number by 16 or by 16 2 Press the button The marks of the registered group numbers light up 3 Pressing the button restores the state before the button is pressed 4 To continue registration of groups repeat this p...

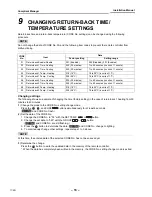
Page 18: ... continuously change other settings repeat steps 1 to 3 above NOTE At this time the entered data of the selected CODE No has not been saved yet 3 Determine the change Press the button to write the updated data in the memory of the remote controller When the data has completely been written in the memory the CODE No setting change mode is exited CODE No Item Data Factory setting Setting range 01 Re...

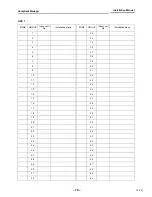
Page 19: ...oor unit No Installation place ZONE GROUP Indoor unit No Installation place 1 33 2 34 3 35 4 36 5 37 6 38 7 39 8 40 9 41 10 42 11 43 12 44 13 45 14 46 15 47 16 48 17 49 18 50 19 51 20 52 21 53 22 54 23 55 24 56 25 57 26 58 27 59 28 60 29 61 30 62 31 63 32 64 18 EN ...

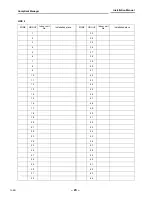
Page 20: ...oor unit No Installation place ZONE GROUP Indoor unit No Installation place 1 33 2 34 3 35 4 36 5 37 6 38 7 39 8 40 9 41 10 42 11 43 12 44 13 45 14 46 15 47 16 48 17 49 18 50 19 51 20 52 21 53 22 54 23 55 24 56 25 57 26 58 27 59 28 60 29 61 30 62 31 63 32 64 19 EN ...

Page 21: ...sses again according to Central Control Address Group Number Setting Also make sure that there is no incorrect wiring Conducting a Test Run for Air Conditioners 1 Press the button for at least 4 seconds The TEST indication lights in the test run mode 2 Press the button and button Temperature cannot be set during a test run 3 When the test run is completed press the button to exit the test run mode...

Page 22: ... 22 MEMO 21 EN ...

Page 23: ... 23 22 EN ...

Page 24: ...DH84309201 ...

Reviews: