background image

35

Ref

er

ence

Intr

oduction

Connecting

y

our T

V

Using the

Remote Contr

ol

Setting up

y

our T

V

Using the T

V

’s

F

eatur

es

Appendix

Index

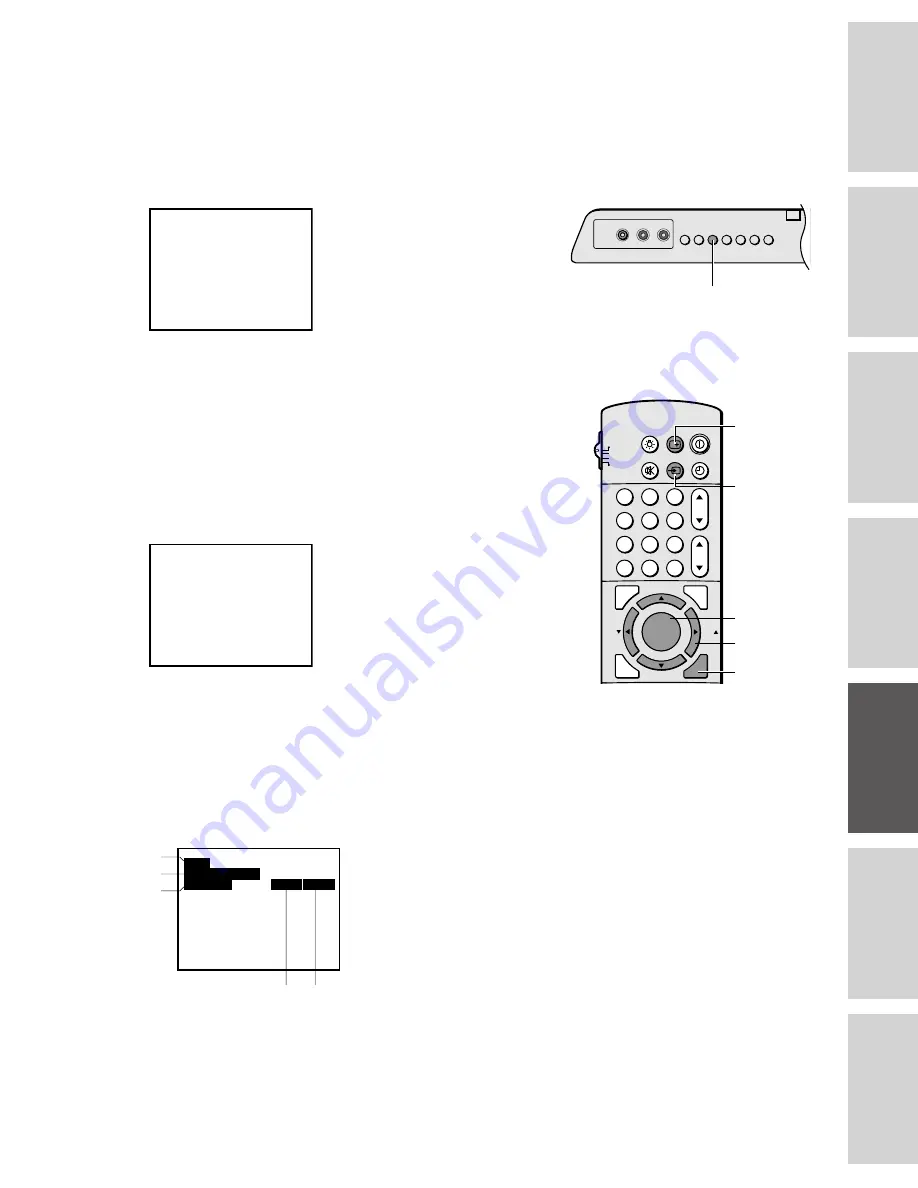
Watching video input

You can use the TV/VIDEO button on the remote or ANT/VIDEO
button (page 18) on the TV to view a signal coming from other
devices, such as VCRs or video disc players that may be connected to
your TV. Select VIDEO 1, VIDEO 2,  VIDEO 3, or ColorStream
depending on which input jacks are used for connecting the devices.
(See “Connecting your TV” on page 5.)

TO  SELECT  PUSH  TV / V I DEO

COLORSTREAM

V I DEO  2
V I DEO  3

V I DEO  1

TV

Displaying on-screen information

Press RECALL to display the following on-screen information:

• Antenna mode (when in TV mode)
• Channel number or VIDEO mode selected
• Time (if preset)
• Channel label (if preset)
• Stereo or SAP (second audio program) audio status
• V-CHIP rating status

ANT  1

ABCD

4

CABLE

9 : 25

STEREO
SAP
TV–PG

V

L

Displaying XDS information

1. Select the desired program.
2. Press MENU, then press 

x

 or 

 until the CLOSED CAPTION

menu appears.

3. Press 

y

 or 

z

 to highlight XDS.

4. Press 

x

 or 

 to display the following XDS (extended Data

Service) information for about 30 seconds.


XDS  ON

00 : 4 5

00 : 1 2

EDUCATION

SESAME STREET

PBS

Note:

When ColorStream is selected, the video OUT
signal will not have color.

To receive a color video OUT signal, a video
or S-video IN jack must be used instead of
the ColorStream connection.

ANT/VIDEO

1

2

3

4

5

6

7

8

9

ENT

100

0

CH

VOL

POWER

TIMER

RECALL

TV/VIDEO

MUTE

CH RTN

STROBE

EXIT

LIGHT

STOP SOURCE

ADV/

PIP CH

ADV/

PIP CH

FAV

FAV

PLAY PIP

REC

TV/VCR

REW

FF

STILL

LOCATE SWAP

FAVORITE

MENU/

PREVIEW

ENTER

TV

CABLE

VCR
AUX

TV/VIDEO

RECALL

MENU

EXIT

yzx


1. Network name
2. Program name
3. Program type
4. Program length
5. Elapsed time in show

Some of the above information may not be displayed.

To close the XDS display:

Press EXIT.

Note:

If the TV program you are watching does not
include XDS information, only XDS ON will be
displayed for about 4 seconds when you
select the XDS mode.

1
2
3

5

4

Summary of Contents for CN36Z71

Page 1: ...ial number are on the back of your TV Record these numbers in the spaces below Refer to these numbers whenever you communicate with your Toshiba dealer about this TV Model number Serial number Reference Introduction Connecting your TV Using the Remote Control Setting up your TV Using the TV s Features Appendix Index ...

Page 2: ...ace should be flat and steady If you install the TV on a soft floor make sure that the floor is not damaged by the weight of the TV This TV set may be used only with Toshiba stand shown on page 42 Use with other stands may result in instability causing possible injury Place the TV far enough away from the walls to allow proper ventilation This will prevent the TV from overheating and avoid possibl...

Page 3: ...icture in picture PIP 24 Switching the main and small pictures 25 Changing the position of the small picture 25 Freezing the small picture 25 Using Multi Window feature 25 Using the preview function 26 Using the favorite function 26 Using the strobe function 26 Using V CHIP control 27 Selecting the V CHIP menu 27 Adjusting the V CHIP menu 28 ENABLE BLOCKING 28 SET RATING Setting the movie or TV ra...

Page 4: ...reference Exploring your new TV You can operate your TV by using the buttons on the front panel or the remote control The back panel and front panel behind the door provide all the terminal connections you will need to connect other equipment to your TV 1 2 3 4 5 6 7 8 9 ENT 100 0 CH VOL POWER TIMER RECALL TV VIDEO MUTE TV CABLE VCR AUX CH RTN S T R O B E E X I T LIGHT STOP SOURCE ADV PIP CH ADV P...

Page 5: ... and provide the best picture performance ColorStream cables can only be used with ColorStream compatible components Connecting a VCR This connection allows you to watch local channels and video programs play or record on the VCR while watching TV and to record from one channel while watching another channel You will need one coaxial cable one pair of audio cables only one cable for a mono VCR one...

Page 6: ...g the remote control such as programming your favorite channels labeling channels and blocking channels Caution If you want to record one channel while watching another channel a splitter not included must be added between the cable and ANT 1 One output of the splitter goes to ANT 1 and the second output is connected to IN on the cable converter box If you have a mono VCR connect L Mono to VCR Aud...

Page 7: ...picture quality and performance You will need one coaxial cable three pairs of audio cables only one cable for a mono VCR two video cables one set of ColorStream video cables Caution You can use a video cable instead of the S video cable but the picture quality will decrease If you use a S video cable between the TV and DVD satellite receiver make the audio connections only and remove the video co...

Page 8: ...tions and remove the video cable Do not connect the video cable and the S video cable to Video 1 simultaneously The unauthorized recording of television programs video tapes and other materials may infringe upon the provisions of copyright laws Note To dub edit VCR 2 must select Line IN and the TV must select Video 1 Connecting two VCRs This connection allows you to record dub edit from one VCR to...

Page 9: ...plifier to adjust the audio level This also allows you to use external speakers To control the audio turn on the TV and the stereo amplifier then turn off the built in speakers See Turning off the built in speakers on page 40 You will need one pair of audio cables LINE IN L R CHANNEL IN ON OFF OUT R L VAR AUDIO OUT VIDEO L MONO ANT 75 ANT 1 OUT ANT 2 AUDIO CENTER IN DVD IN L R CB CR Y L MONO AUDIO...

Page 10: ...EO 2 COLOR STREAM AUDIO R INPUT ON OFF Caution Make sure the TV is turned off before connecting or disconnecting an audio cable to the Audio Center Channel IN jack The speaker may be damaged Note Refer to the instructions furnished with the connected A V receiver for detailed surround system When the Audio Center Channel ON OFF switch is in the ON position the TV speakers will function only as the...

Page 11: ...VCR Set the TV CABLE VCR AUX switch to the VCR position The buttons shown to the right will then control the VCR The rest of the buttons will operate the TV as usual If you own different brands of VCRs program the remote control to recognize the brand of your VCR See Programming the remote control for use with a VCR or a cable TV converter on page 12 Note This remote control s functions may or may...

Page 12: ...he remote control to VCR cable converter set the TV CABLE VCR AUX switch on the remote control to CABLE 3 Hold down the RECALL button while using the Channel Number buttons to enter the three digit code number of your brand of VCR or converter The program indicator LIGHT button lights up for 1 second when the programming is completed When an operation error has occurred the indicator blinks Press ...

Page 13: ...sushita 054 MEI 054 Memorex 019 054 056 058 065 066 067 123 259 MGA 062 080 MGN Technology 259 Minolta 061 124 Mitsubishi 062 080 086 192 233 261 Motorola 054 067 MTC 019 259 Multitech 019 091 NEC 057 059 060 069 086 Nikko 056 Noblex 259 Olympus 054 Optimus 056 067 123 Optonica 081 Orion 498 Panasonic 054 096 181 244 Penney 054 056 057 059 061 073 259 Pentax 061 084 124 Philco 054 Philips 054 081 ...

Page 14: ...Jasco 172 Jerrold 022 030 031 033 034 043 295 Macom 052 Magnavox 046 Memorex 019 Movie Time 175 NSC 089 175 Oak 026 038 Panasonic 019 040 Paragon 019 Philips 044 046 047 048 049 050 172 Pioneer 163 Popular Mechanics 419 Pulsar 019 RCA 040 Recoton 419 Regal 039 278 292 Regency 021 Rembrandt 030 089 Runco 019 Samsung 059 163 Scientific Atlanta 025 027 036 296 Signal 034 059 Signature 030 SL Marx 059...

Page 15: ...button other than a Learning button the indicator will blink The button you pressed is not a Learning button 5 Hold down the button of the function to be learned on the other remote controller for about 3 seconds until the learning indicator starts blinking Note If the learning indicator blinks rapidly the supplied remote control cannot learn the operating code or an error has occurred Try steps 4...

Page 16: ... FAV zy cycles through favorite channels page 21 EXIT exits programming menus page 17 PIP Functions allow access to PIP functions pages 24 25 VCR Functions allow access to VCR functions page 11 STOP press to stop a videotape REC press to start recording a videotape PLAY press to play a videotape FF press to fast forward a videotape REW press to rewind a videotape TV VCR toggles between TV and VCR ...

Page 17: ... BASS SET UP C CAPTION AUDIO PREMIUM CYCLONE To end push EXIT PICTURE MTS PREFERENCE STR On CH PROGRAM ADD ERASE ANT1 2 TV CABLE SET UP C CAPTION AUDIO PREMIUM CYCLONE To end push EXIT PICTURE LANGUAGE PREFERENCE ANT2 English TV START PUSH Add T IMER CLOCK START PUSH CH LABEL FAVOR I TE CH1 SET UP C CAPTION AUDIO PREMIUM CYCLONE To end push EXIT PICTURE PREFERENCE START PUSH START PUSH START PUSH ...

Page 18: ... your desired language Selecting the antenna input You can connect to two different signal sources by choosing the antenna input ANT 1 or ANT 2 To select the antenna input 1 Press MENU then use x or to highlight the SET UP menu 2 Press z or y to highlight ANT 1 2 CH PROGRAM ADD ERASE ANT1 2 TV CABLE SET UP C CAPTION AUDIO PREMIUM CYCLONE To end push EXIT PICTURE LANGUAGE PREFERENCE ANT1 English TV...

Page 19: ...avorite channels If you use both ANT 1 and ANT 2 terminals you must program channels for each input source To add channels 1 Press MENU then press x or until the SET UP menu appears 2 Press z or y until the TV CABLE is highlighted 3 Press x or to highlight either TV or CABLE depending on which you use START PUSH CH PROGRAM ADD ERASE ANT1 2 TV CABLE SET UP C CAPTION AUDIO PREMIUM To end push EXIT P...

Page 20: ...2 Press MENU then press x or until the SET UP menu appears 3 Press z or y to highlight ADD ERASE START PUSH CH PROGRAM ADD ERASE ANT1 2 TV CABLE SET UP C CAPTION AUDIO PREMIUM To end push EXIT PICTURE LANGUAGE PREFERENCE ANT1 English Cable START PUSH Add Erase T IMER CLOCK CYCLONE 4 Press x or to select Add or Erase whichever function you want to perform 5 Repeat steps 1 4 for other channels you w...

Page 21: ...not normally watch You can still use Channel y z to scan through all the channels you programmed in the TV s memory To program your favorite channels 1 Press MENU then press x or until the SET UP menu appears 2 Press y or z to highlight FAVORITE CH1 or FAVORITE CH2 FAVOR I TE CH1 FAVOR I TE CH2 V CH I P SET UP C CAPTION AUDIO PREMIUM To end push EXIT PICTURE PREFERENCE CH LABEL START PUSH START PU...

Page 22: ...ave programmed SET UP C CAPTION AUDIO PREMIUM PICTURE PREFERENCE Set Clear CH INPUT FAVOR I TE CH2 SET CLEAR SET UP CH TV CABLE 0 0 0 0 0 0 0 0 0 CH To enter push 0 9 To set push ENTER To end push EXIT CYCLONE Labeling channels Channel labels will appear over the channel number display each time you turn on the TV select a channel or press the RECALL button You can choose any four characters to id...

Page 23: ...LEAR LABEL CH INPUT 04 CH A To enter push To clear push ENTER To end push EXIT CYCLONE 8 Repeat step 7 to enter the rest of the characters If you would like a blank space in the label name you must choose an empty space from the list of characters Otherwise a dash will appear in that space 9 Repeat steps 4 through 8 for other channels You can assign up to 32 labels To erase channel labels 1 Press ...

Page 24: ...al source as a small picture 1 Make sure you have connected the external source equipment properly For more information see the Connecting your TV on page 5 2 Turn on the TV and select the program you want to watch 3 Press PIP once to display a small picture A window 1 9 the size of the screen will appear Press PIP a second time to display a 1 16 size window 4 Press SOURCE repeatedly to select the...

Page 25: ...The small picture will become a still picture To return to the moving picture press STILL again Using Multi Window feature The Multi Window feature provides two channel search modes One is the PREVIEW that scans the channels programmed in the TV memory by the CH PROGRAM function 6 picture multi search and the other is the FAVORITE that scans the channels pro grammed in the TV memory by the FAVORIT...

Page 26: ...der FAVORITE CH1 FAVORITE CH2 off 2 Press y z x to select a channel you want to see with a moving picture 3 Press ENTER to display the channel you have selected at step2 with a normal picture 7 6 12 18 42 97 106 7 33 9 X To cancel the favorite function Press FAVORITE again Using the strobe function Press STROBE to start the strobe function 9 picture multi strobe starts for the present main picture...

Page 27: ...UP C CAPTION AUDIO PREMIUM PICTURE PREFERENCE V CH I P BLOCK I NG RESET To enter push 0 9 To set push ENTER To end push EXIT 1110 CYCLONE P I N CODE SET UP C CAPTION AUDIO PREMIUM PICTURE PREFERENCE V CH I P BLOCK I NG ACT I VE To enter push 0 9 To set push ENTER To end push EXIT 1234 CYCLONE If a wrong pin code has been entered the message Incorrect will appear Try to enter the correct code again...

Page 28: ...age 7 and above Note For those programs where fantasy violence may be more intense or more combative than other programs in this category such programs will be designated TV Y7 FV G General Audience Most parents would find this program suitable for all ages PG Parental Guidance Suggested This program contains material that parents may find unsuitable for younger children D Some suggestive dialog L...

Page 29: ...push EXIT PICTURE PREFERENCE MPAA UNRATED PUSH START V CH I P NOTES ENABL I NG TH I S OPT I ON MAY BLOCK EMERGENCY MESSAGES On Off On V CHIP MENU Press x or to return to the V CHIP menu NEW PIN CODE Changing Pin Code 1 Press x or to display the NEW PIN CODE menu 2 Press the Number buttons 0 9 to enter a 4 digit code The numbers you enter will replace the dashes in the display SET UP C CAPTION AUDI...

Page 30: ... correct the block mode will be released and the normal picture will appear All blocking is disabled until the TV is turned off It will be enabled when the power is reapplied If a wrong pin code is entered the message Incorrect appears Enter the correct code again Blocking Channels With the BLOCK CHANNEL feature you can block specific channels The TV will not be able to tune these channels with th...

Page 31: ... BLOCK CHANNEL menu 4 Press x or to highlight Clear SET UP C CAPTION AUDIO PREMIUM PICTURE PREFERENCE CH Set Clear SET CLEAR CH INPUT V CH I P BLOCK CHANNEL LOCKED CH TV 15 8 6 4 0 0 0 0 To enter push 0 9 To set push ENTER To end push EXIT CABLE CYCLONE 5 Press ENTER until 0 replaces the channel numbers you have blocked SET UP C CAPTION AUDIO PREMIUM PICTURE PREFERENCE CH Set Clear SET CLEAR CH IN...

Page 32: ...item you want to adjust is highlighted COLOR T I NT SHARPNESS BR I GHTNESS SET UP C CAPTION AUDIO PREMIUM To end push EXIT PICTURE PREFERENCE CONTRAST CYCLONE 3 Press x or to adjust the level SET UP C CAPTION AUDIO PREMIUM To end push EXIT PICTURE CONTRAST PREFERENCE 83 CYCLONE The PICTURE items you have adjusted will be stored in the TV s memory automatically You can keep these settings or choose...

Page 33: ...he different preferences see Adjusting the picture quality on page 32 Using the 3D Y C separation feature 3D Y C means 3 Dimensional luminance signal Y chrominance signal C separation circuit It separates Y and C signals to prevent them from interfering with one another thereby improving picture especially color quality Select On for optimum picture quality To turn on the 3D Y C separation 1 Press...

Page 34: ...eduction feature Choose Off in step 3 above Resetting your adjustments to the factory settings 1 Press MENU then press x or until the SET UP menu appears 2 Press y or z to highlight RESET CH LABEL FAVOR I TE CH1 V CH I P SET UP C CAPTION AUDIO PREMIUM To end push EXIT PICTURE PREFERENCE START PUSH START PUSH START PUSH FAVOR I TE CH2 RESET START PUSH START PUSH CYCLONE 3 Press x or The RESET funct...

Page 35: ...DS information 1 Select the desired program 2 Press MENU then press x or until the CLOSED CAPTION menu appears 3 Press y or z to highlight XDS 4 Press x or to display the following XDS extended Data Service information for about 30 seconds XDS ON 00 45 00 12 EDUCATION SESAME STREET PBS Note When ColorStream is selected the video OUT signal will not have color To receive a color video OUT signal a ...

Page 36: ...ERENCE C1 C4 T3 C2 T1 T4 C3 T2 Off XDS 4 Press x or to select the closed caption mode Select C1 C2 C3 or C4 to view captions Select C1 for translation of the primary language in your area Giant pandas eat leaves Select T1 T2 T3 or T4 to view Text WORLD WEATHER Temps Current F C Weather LONDON 51 11 MOSCOW PARIS ROME TOKYO 57 14 53 12 66 19 65 18 Cloudy Clear Cloudy Rain Clear To turn off the close...

Page 37: ...s 0 9 to enter the correct time Enter the numbers after the number position starts to blink The clock operates on a 12 hour cycle TO SET HOUR AND MI NUTE 09 25 CLOCK PUSH 0 9 PUSH T IMER TO START 3 Press TIMER to start the clock The display color will change from purple to blue then turn off To monitor the time Press RECALL Note The timer can also be set through the SET UP menu If you want to see ...

Page 38: ...he MTS feature is not available while in the VIDEO mode To listen to stereo sound 1 Press MENU then press x or until the AUDIO menu appears TREBLE BALANCE SPEAKERS BASS SET UP C CAPTION AUDIO PREMIUM To end push EXIT PICTURE MTS PREFERENCE On MONO CYCLONE 2 Press z or y to highlight MTS 3 Press x or to highlight STR TREBLE BALANCE SPEAKERS BASS SET UP C CAPTION AUDIO PREMIUM CYCLONE To end push EX...

Page 39: ...the surround sound feature The surround sound feature expands the audio listening field wider and deeper to create exceptional sound quality from the TV s speakers The feature uses stereo signals from a TV broadcast or video input To turn on the surround sound feature 1 Select the stereo mode following the steps under Selecting stereo SAP broadcasts on page 38 2 Press MENU then press x or until th...

Page 40: ...EVEL SET UP C CAPTION AUDIO PREMIUM To end push EXIT PICTURE PREFERENCE 60 CYCLONE To turn off the CYCLONE woofer Choose Off in step 3 above Turning off the built in speakers Use this feature to turn the TV speaker off when you connect an audio system See page 9 1 Press MENU then press x or until AUDIO menu appears 2 Press y or z to highlight SPEAKERS 3 Press x or to highlight Off TREBLE BALANCE S...

Page 41: ...s DEMO again or press Exit or Recall on the remote Auto power off The TV will automatically turn itself off after approximately 15 minutes if it is tuned to a vacant channel or if a station completes its broadcast for the day and stops broadcasting on that channel This feature however does not work in the VIDEO mode Understanding the last mode memory feature If the power is cut off while you are v...

Page 42: ...ative sync C 0 286 V p p burst signal 75 ohm VIDEO 1 VIDEO 2 VIDEO 3 INPUT VIDEO 1 V p p 75 ohm negative sync AUDIO 150 mV rms 30 modulation equivalent 47 kohm ColorStream component video INPUT Y INPUT 1V p p 75 ohm CR 0 7 V p p 75 ohm CB 0 7 V p p 75 ohm AUDIO 150 mV rms 47 kohm VIDEO AUDIO OUTPUT VIDEO 1 V p p 75 ohm negative sync AUDIO 150 mV rms 30 modulation equivalent 4 7 kohm VARIABLE AUDIO...

Page 43: ...her channel Check the antenna connections If you are using a VCR make sure the TV VCR button is set correctly Cannot receive above channel 13 Make sure TV CABLE is set to TV mode Black box appears on the screen Captioning may be turned on Unable to select a certain channel The channel may be locked out with the BLOCK CHANNEL feature or erased with the ADD ERASE feature Multiple images The station ...

Page 44: ...customer service and improved products Failure to return the Demographic card will not affect your rights under this warranty Your Responsibility The above warranties are subject to the following conditions 1 You must retain your bill of sale or provide other proof of purchase 2 All warranty servicing of this product must be made by an Authorized TACP THI Service Station 3 These warranties are eff...

Page 45: ... your TV 2 clock setting 37 closed caption feature using 36 code table cable TV converter 14 VCR 13 color temperature selecting 32 connecting audio system 9 A V receiver 10 cable converter box 6 cable converter box and a VCR 6 camcorder 9 DVD with ColorStream and a VCR 7 DVD satellite receiver and a VCR 7 TV 5 VCR 5 VCRs two 8 CYCLONE woofer using 40 D demonstration mode viewing 41 displaying on s...

Page 46: ...and a VCR connecting 7 setting clock 37 off timer 37 sound adjusting 38 muting 38 stereo SAP broadcasts selecting 38 sub woofer system CYCLONE 40 surround using 39 speakers turning off 40 specifications 42 stereo sound selecting 38 strobe function using 26 surround sound using 39 switching between two channels 21 switching the main and small pictures PIP 25 T 3D Y C separation 33 troubleshooting 4...

Page 47: ...NTREAL 1643 NORTH SERVICE RD TRANS CANADA HIGHWAY DORVAL QUEBEC H9P 1J1 CANADA TEL 514 856 4100 VANCOUVER 222171 FRASERWOOD WAY RICHMOND B C V6W 1J5 CANADA TEL 604 303 2500 HEAD OFFICE 327 KAMAKEE STREET HONOLULU HAWAII 96814 U S A TEL 808 521 5377 MANUFACTURED BY PRINTED IN USA HEAD OFFICE 82 TOTOWA ROAD WAYNE NEW JERSEY 07470 FACTORY SERVICE CENTER 1420B TOSHIBA DRIVE LEBANON TN 37087 ...

Reviews: