background image

– 14 –

27-EN

28-EN

EN

FR


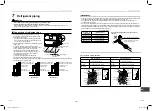
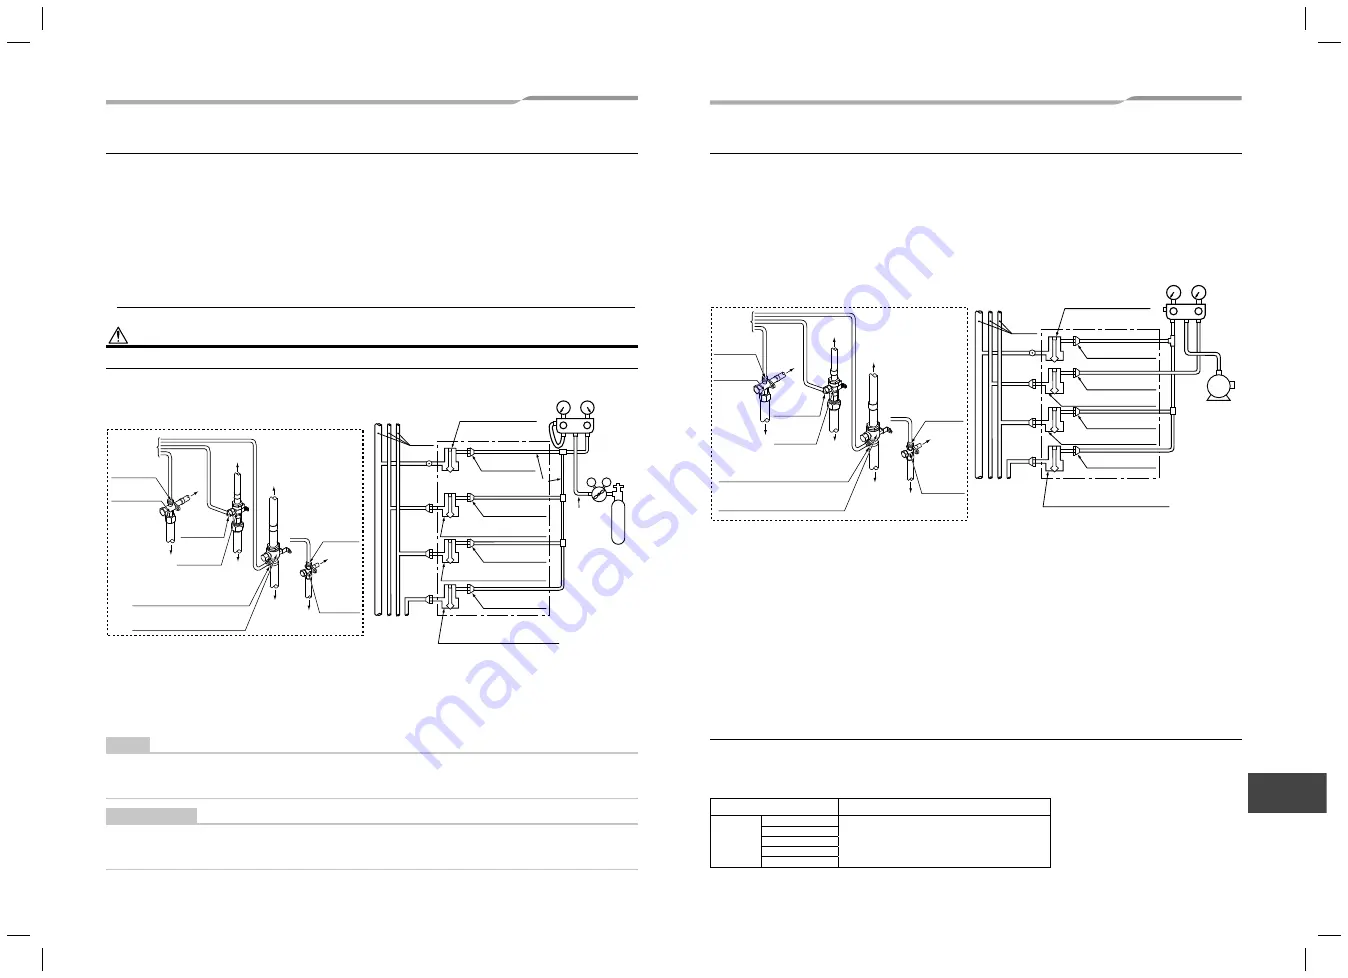
Vacuum drying

•  Be sure to use a vacuum pump equipped with the counter-flow prevention function so that oil in the pump will 

not flow back into piping for air conditioners. (If oil in the vacuum pump enters in the air conditioner with R410A 
refrigerant, a problem may be caused in the refrigerating cycle.)

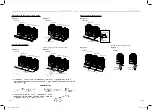
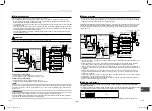
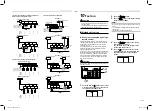
After finishing the airtight test and discharging nitrogen gas, connect the gauge manifold to the service ports of the 
suction gas side, discharge gas side, liquid side and balance pipe side and connect a vacuum pump as shown 
in the figure below. Be sure to perform vacuuming for the suction gas side, discharge gas side, liquid side and 
balance pipe side.

P

V

L

V

H

Packed valve details

To gauge 
manifold

Liquid-side 
service port

Liquid-side 
valve

Piping at site

To
outdoor
unit

Piping 
at site

To outdoor unit

Piping 
at site

Connected to 
other follower 
units

Main 
pipe

Connected to 
indoor unit

Low pressure

gauge

High pressure
gauge

Gauge
manifold

Vacuum 

pump

Balanced pipe side valve fully 
closed

Liquid side valve fully 

closed

Discharge gas side valve 

fully closed

Fully
closed

Fully
closed

Fully
closed

Brazed

Suction gas side valve 
fully closed

Header outdoor unit

Service port

Service port

Service port

Piping 
at site

Ball valve of suction gas side

Service port of suction gas side

Service port 

of discharge 

gas side
Ball valve of

discharge 

gas side

To outdoor 
unit

To
gauge
manifold

Service 

port

of balance

pipe side

Packed 

valve

of balance

pipe side

To 

outdoor 

unit

Service port

•  Use a vacuum pump with a high vacuuming degree [14.6 psi (5Torr, -755mmHg)] and large exhaust gas amount 

(40L/minute or larger).

•  Perform vacuuming for 2 or 3 hours, though the time differs depending on the pipe length. Check that all the 

valves at the suction gas side, discharge gas side, liquid side and balance pipe side are fully closed.

•  If the pressure does not reach 14.6 psi or less even after vacuuming for over 2 hours, continue vacuuming for 1 

hour or more. If the pressure does not reach 14.6 psi after 3 hours of vacuuming, stop vacuuming and check for 
air leakage.

•  If the pressure reaches 14.6 psi or less after vacuuming for 2 hours or more, close the valves VL and VH on 

the gauge manifold fully and stop the vacuum pump. Leave it as it is for 1 hour to con

fi

 rm that the vacuuming 

degree does not change.
If the degree of vacuum loss is large, moisture may remain in the pipes. In that case, inject dry nitrogen gas and 
apply pressure to 7.3 psi and perform vacuuming again.

• After 

fi

 nishing the above procedure of vacuuming, exchange the vacuum pump with a refrigerant canister and 

advance to the additional charging of refrigerant.


Adding refrigerant

After finishing vacuuming, exchange the vacuum pump with a refrigerant canister and start additional 
charging of refrigerant.

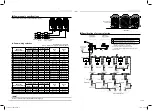
1. Refrigerant charge amount at shipment from the factory does not include the refrigerant for pipes at the local site.

For refrigerant to be charged in pipes at the local site, calculate the amount and charge it additionally.

Model name

Refrigerant amount charged in factory

MMY-MAP

0726FT9P-UL

24.3 lbs

0966FT9P-UL
1206FT9P-UL
1446FT9P-UL
1686FT9P-UL

2. Additional refrigerant charge, please calculate from the calculation of additional refrigerant charge amount.


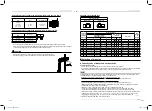
Airtightness test

After the refrigerant piping has been finished, execute an airtight test.
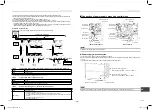
For an airtight test, connect a nitrogen gas canister as shown in the figure on this page and apply pressure.
•  Be sure to apply pressure from the service ports of the packed valves (or ball valves) at the suction gas side, 

discharge gas side, liquid side and balance pipe side.

•  An airtight test can only be performed at the service ports at the suction gas side, discharge gas side, liquid side 

and balance pipe side.

•  Close the valves fully at the suction gas side, discharge gas side, liquid side and balance pipe side. As there is 

a possibility that the nitrogen gas will enter into the cycle of outdoor units, re-tighten the valve rods at the liquid 
side and balance pipe side before applying pressure.

•  For each refrigerant line, apply pressure gradually in steps at the suction gas side, discharge gas side, liquid 

side and balance pipe side.

Be sure to apply pressure at the suction gas side, discharge gas side, liquid side and balance pipe side.

WARNING

Never use oxygen, flammable gases, or noxious gases in an airtight test.

V

L

V

H

Packed valve details

To gauge 
manifold

Liquid-side 
service port

Liquid-side 
valve

Piping at site

To
outdoor
unit

Piping 
at site

To outdoor unit

Piping 
at site

Connected to 
other follower units

Main 
piping

Connected to 
indoor unit

Low pressure

gauge

High pressure
gauge

Gauge
manifold

Reducing
valve

Ø6.4
copper
pipe

Nitrogen
gas

Balanced pipe side valve 
fully closed

Liquid side valve fully closed

Discharge gas side valve 

fully closed

Fully
closed

Fully
closed

Fully
closed

Brazed

Suction gas side valve 
fully closed

Header outdoor unit

Ø6.4 copper pipe

Service port

Service port

Service port

Service port

Piping 
at site

Ball valve of suction gas side

Service port of suction gas side

Service port 

of discharge 

gas side

Ball valve of

discharge 

gas side

To outdoor 
unit

To
gauge
manifold

Service 

port

of balance

pipe side

Packed 

valve

of balance

pipe side

To 

outdoor 

unit

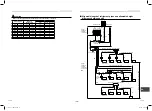
Able to detect a serious leakage

1. Apply pressure 43.5 psi (0.3 MPa) for 5 minutes or more.
2. Apply pressure 217.5 psi (1.5 MPa) for 5 minutes or more.

Available to detect slow leakage

3. Apply pressure 601 psi (4.15 MPa) for approx. 24 hours.
•  If there is no pressure decrease after 24 hours, the test is passed.

NOTE

However, if the environmental temperature changes from the moment of applying pressure to 24 hours after that, 
the pressure will change by about 1.45 psi (0.01 MPa) per 1.8 °F. Consider the pressure change when checking 
the test result.

REQUIREMENT

When pressure decrease is detected in steps 1-3, check the leakage at the connecting points.
Check the leakage using a foaming agent or other measures and seal the leak with re-brazing, flare retightening
or other methods. After sealing, execute an airtight test again.

1122001101_EN FR.indd   14

1122001101_EN FR.indd   14

6/27/16   4:58 PM

6/27/16   4:58 PM

Summary of Contents for Carrier MMY-MAP0726FT9P-UL

Page 1: ...FT9P UL MMY MAP0966FT9P UL MMY MAP1206FT9P UL MMY MAP1446FT9P UL MMY MAP1686FT9P UL 1122001101 English Français Installation Manual 1 Manuel d installation 32 For OUTDOOR USE only Pour une UTILISATION EN EXTÉRIEUR uniquement 1122001101_EN FR indd 1 1122001101_EN FR indd 1 6 27 16 4 59 PM 6 27 16 4 59 PM ...

Page 2: ... and on tags stickers and labels attached to the equipment Follow all safety codes Wear safety glasses and work gloves Use care in handling rigging and setting bulky equipment Read these instructions thoroughly and follow all warnings or cautions included in literature and attached to the unit Consult local building codes and National Electrical Code NEC for special requirements Recognize safety i...

Page 3: ...ted heat proof gloves insulated shoes and other clothing to provide protection from electric shock Otherwise you may receive an electric shock Use wiring that meets the specifications in the Installation Manual NEC and the local codes Check that the product is properly grounded Do not connect the ground line to a gas pipe water pipe lightning conductor or a telephone ground line After completing t...

Page 4: ... As well as the adoption of the new refrigerant the refrigerating oil has been also changed Therefore pay attention so that water dust former refrigerant or refrigerating oil does not enter the refrigerating cycle of the new refrigerant air conditioner during installation To prevent mixing of refrigerant or refrigerating oil the size of the charge port of the main unit or connecting section of the...

Page 5: ...occur Places where discharged air from the outdoor unit blows against the windows of a neighbour s house Places unable to bear the weight of the unit Places with poor ventilation The unit will operate down to an outdoor temperature of 13 F however considerable performance decrease will be expected below 5 F Therefore please consider installation location surroundings and system design when expecte...

Page 6: ...utdoor unit carefully observing the following items To use a forklift or other machinery for loading unloading in transportation insert the fork of the forklift into the rectangular holes for handling as shown below To lift up the unit insert a rope capable of bearing the weight of the unit into the rectangular holes shown below Tie the unit from 4 sides Apply padding in positions where the rope c...

Page 7: ...anchor bolt 4 positions unit 0 8 20 Anchor bolt positions are as shown below A A A B A C B B L L B Continuous hole 0 6 0 8 15 20 long hole L 11 4 290 L 11 4 290 29 7 755 31 1 790 Only MAP144 MAP168 type has holes for additional strength Model type A B C L MAP0726 27 6 700 39 0 990 Recommendation 7 9 200 at least 0 8 20 or more MAP0966 MAP1206 36 2 920 47 6 1210 MAP1446 MAP1686 51 6 1310 63 0 1600 ...

Page 8: ... T shape branch joints for the liquid side there is no restriction for its angle A B Horizontal line Horizontal line A arrow view B arrow view Within 15 degrees Within 15 degrees Do not connect a branch unit vertically 19 7 500mm or more At a level position In case of using the Y shaped branching joint for connecting between outdoor units Discharge gas joint and Suction gas joint please keep the s...

Page 9: ...oes not contaminate the refrigerant Be sure to use two spanners to loosen or tighten the flare nut If a single spanner is used the required level of tightening cannot be obtained Tighten the flare nut with the specified torque If it is hard to loosen or tighten the flare nut of the balance pipe or packed valve of the liquid side with two spanners loosen or tighten the flare nut while holding the v...

Page 10: ... 0 20 or less 0 039 1 00 Ø1 3 8 34 92 1 3 8 0 0012 34 90 0 04 1 38 0 0016 0 0016 35 11 0 04 0 04 0 55 14 0 51 13 0 0098 or less 0 25 or less 0 047 1 20 Ø1 5 8 41 28 1 5 8 0 0012 41 28 0 05 1 63 0 0031 0 0008 42 28 0 08 0 02 0 59 15 0 55 14 0 0110 or less 0 28 or less 0 053 1 35 Selection of pipe size Capacity code of indoor and outdoor units Selection of pipe material For the indoor unit the capac...

Page 11: ...e 21 024 type 24 027 type 27 030 type 30 036 type 36 042 type 42 048 type 48 054 type 54 072 type 72 096 type 96 Table 2 Outdoor unit capacity type Outdoor unit capacity code Maximum number of indoor units 1 Height difference between indoor units 49 ft 15 m or less Over 49 ft 15 m 072 type 72 12 10 096 type 96 16 13 120 type 120 21 16 144 type 144 25 19 168 type 168 30 23 192 type 192 34 26 216 ty...

Page 12: ...FUL RBM HY2043UL For 8 branching Below 134 RBM HY1083FUL RBM HY1083UL 134 to below 240 RBM HY2083FUL RBM HY2083UL 9 Outdoor unit connection piping kit Total capacity code of the outdoor units at downstream side 1 7 Model name Below 247 RBM BT14FUL 247 or more RBM BT24FUL 10 Flow Selector unit 9 Single port type 10 Total capacity code of outdoor units on downstream side from FS unit Model name Belo...

Page 13: ... L The longest piping length from the first branch Li The longest piping length in Flow selector unit group Ln Flow Selector unit Indoor unit Indoor unit Flow Selector unit Multi port type Indoor unit connecting pipe Y shaped branching joint H4 Height difference between indoor units H2 CAUTION Please use the appropriate pipe when the pipe size is Ø3 4 or more Table 3 Outer diameter Minimum wall th...

Page 14: ...single port type Flow Selector unit and a branch of Multi port type Flow Selector unit to the indoor units Maximum equivalent length indoor units in group control by one single port Flow Selector unit Ln 98 L6 L7 L8 o Maximum real length between Flow Selector unit and indoor unit 2 Single port type 49 Ex In case of wiring to the indoor unit m L6 m 49 ft In case of wiring to the indoor unit n L6 L7...

Page 15: ...ate the amount and charge it additionally Model name Refrigerant amount charged in factory MMY MAP 0726FT9P UL 24 3 lbs 0966FT9P UL 1206FT9P UL 1446FT9P UL 1686FT9P UL 2 Additional refrigerant charge please calculate from the calculation of additional refrigerant charge amount Airtightness test After the refrigerant piping has been finished execute an airtight test For an airtight test connect a n...

Page 16: ...rigerant amount indicates minus as the result of calculation use the air conditioner without additional refrigerant Table1 Compensation by capacity of outdoor unit Outdoor unit capacity type Model name Standard Model Compensation by capacity type outdoor unit lbs 072 type MMY MAP0726FT9P UL 4 4 096 type MMY MAP0966FT9P UL 6 6 120 type MMY MAP1206FT9P UL 17 6 144 type MMY MAP1446FT9P UL 24 3 168 ty...

Page 17: ...igerant can added to the system the charging process is finished 4 If the total calculated amount of refrigerant cannot be added to the system close the valve on the refrigerant bottle move the charging hose from the liquid line service port to the suction line service port 5 Open the suction and liquid service valves on the header unit and start the system in cooling mode 6 Slowly open the valve ...

Page 18: ...Standard Model Power Supply Voltage Range MCA A MOCP A Nominal Voltage Phase and frequency Min V Max V MMY MAP0726FT9P UL 208 230 V 3 60 Hz 187 253 23 3 30 MMY MAP0966FT9P UL 208 230 V 3 60 Hz 187 253 34 2 40 MMY MAP1206FT9P UL 208 230 V 3 60 Hz 187 253 45 4 50 MMY MAP1446FT9P UL 208 230 V 3 60 Hz 187 253 52 1 60 MMY MAP1686FT9P UL 208 230 V 3 60 Hz 187 253 66 2 70 MMY AP1926FT9P UL 208 230 V 3 60...

Page 19: ...ory parts of single port Flow selector unit Wire length 20 ft 6 m If the length between indoor unit and Flow selector unit exceeds 16 ft 5 m connect by using the Connection cable kit sold separately RBC CBK15UL Except Multi port FS unit Restriction of control wiring Be sure to keep the rule of below tables about size and length of control wiring L6 L7 L3 L5 L1 L4 L2 A B A B A B L8 U1 U2 A B U3 U4 ...

Page 20: ...e centrally controlled Address setting procedure See procedure 1 See procedure 2 Control wiring diagram Outdoor Indoor Indoor Indoor Indoor Outdoor Central control Remote control Remote control Remote control Central control Outdoor Indoor Indoor Indoor Indoor Outdoor Remote control Remote control Remote control Central control Access cover Electrical control box cover Access cover screw Screw siz...

Page 21: ...es but may takes as long as 10 minutes to complete the auto address setting for 1 refrigerant line 4 The 7 segment display will indicate Auto 1 Auto 2 Auto 3 When the address sequence has covered all the fan coils for a refrigerant line auto the 7 segment display will indicate U 1 flashing When the flashing stops and the display indicates U 1 without flashing the address setting is complete Interf...

Page 22: ...turning energizing the outdoor units confirm that the 7 segment display on the interface P C board of the header outdoor unit indicates U 1 L08 The U 1 will be flashing 5 Press SW15 to start the automatic address setting It normally takes 5 minutes but may take as long as 10 minutes to complete the auto address setting for 1 refrigerant line 6 The 7 segment display will indicate Auto 1 Auto 2 Auto...

Page 23: ...ss 1 Header unit 2 Follower unit 2 Follower unit 2 Follower unit 2 Follower unit Switch setting setting example when controlling 2 or more refrigerant lines centrally Outdoor units setting manually The items in bold font must be set manually Outdoor unit s interface P C board Header unit Follower unit Header unit Follower unit Header unit Factory default SW13 14 See chart on page 20 Line system ad...

Page 24: ...han 4 seconds The LCD display will start flashing To set line system address 2 Push the TEMP buttons repeatedly to set the CODE No to 3 Push the TIME buttons repeatedly to set a system address Match the address with the address on the interface P C board of the header outdoor unit in the same refrigerant line 4 Push SET button This saves the setting To set indoor unit address 5 Push the TEMP butto...

Page 25: ...T CL FILTER RESET TEST TIMER SET CODENo UNIT No SETTING DATA SET R C No 2 7 1 4 6 5 3 1 Simultaneously push and hold the TIME and TEST TEST buttons for more than 4 seconds 2 The LCD will display LINE and CODE No 3 Push the left end of the UNIT LOUVER button and the SWING FIX SWING FIX repeatedly to select a system address 4 Push the SET SET button to confirm the address selection The address of an...

Page 26: ...Cooling prioritized Resetting to factory default address Method 1 Follow steps 1 through 11 by using a direct wired remote control page 22 to reset line system address indoor unit addresses and group addresses to 0099 Method 2 Clearing all the indoor unit addresses on a single refrigerant line and reset all addresses to the factory default settings follow the steps below 1 To turn off the refriger...

Page 27: ...9 ft 15 m Remote control Indoor unit Indoor unit Multi port type FS unit Remote control 0E 1 1 1 FE It is not necessary to set up FD It is not necessary to set up 0E 1 1 1 FE It is not necessary to set up FD It is not necessary to set up Group control Piping Group control In case of connecting two group operations of indoor units Single port type FS unit Piping Control wiring between indoor unit a...

Page 28: ...heck codes are detected as usual TEST 4 Push the ON OFF button to stop running after finishing the trial run The indication on the LCD display returns to the status of procedure 1 5 Push the TEST button to exit the test mode TEST disappears on the LCD display and the status changes to normal stopped mode In case of connecting one group operation of indoor units and two indoor units Single port typ...

Page 29: ...t display A U1 B 2 Set the rotary switches on the interface P C board of the header outdoor unit SW01 to 16 SW02 and SW03 to the address of the indoor unit to be tested SW02 SW03 Indoor unit address 1 to 16 1 1 to 16 Set number of SW02 1 to 16 2 17 to 32 Set number of SW02 16 1 to 16 3 33 to 48 Set number of SW02 32 1 to 16 4 49 to 64 Set number of SW02 48 7 segment display A Address display of th...

Page 30: ...it address External interlock of indoor unit L31 Other compressor troubles 11Troubleshooting In addition to the CODE No on the remote control of an indoor unit you can diagnose failure type of an outdoor unit by checking the 7 segment display on the interface P C board Use the function for various checks Set every DIP switch to OFF after checking 7 Segment display and check code Rotary switch sett...

Page 31: ... circuit E Vdc voltage trouble 1 Position detection circuit trouble 2 Input current sensor trouble 3 Motor lock trouble C Sensor temperature trouble No TH sensor 4 Motor current trouble D Sensor short circuit release trouble No TH sensor 5 Synchronization step out trouble Put in Fan IPDU No in mark Outdoor fan IPDU trouble P26 01 Compressor 1 02 Compressor 2 IPM short protection trouble P29 01 Com...

Page 32: ... with a gas leakage detector in the smallest room where the density limit is exceeded the volume of the next smallest room becomes the object Refrigerant piping Outdoor unit Indoor unit Mechanical ventilation device Gas leak detector Small room Medium room Large room Very small room SMMS wave tool SMMS wave tool is an application software Application for the Android OS smartphone and for those who...

Page 33: ...ER THAILAND CO LTD 144 9 MOO 5 BANGKADI INDUSTRIAL PARK TIVANON ROAD TAMBOL BANGKADI AMPHUR MUANG PATHUMTHANI 12000 THAILAND 1122001101 1122001101_EN FR indd 2 1122001101_EN FR indd 2 6 27 16 4 59 PM 6 27 16 4 59 PM ...

Reviews: