background image

7

INSTALLING YOUR TV

E

n

g

lish

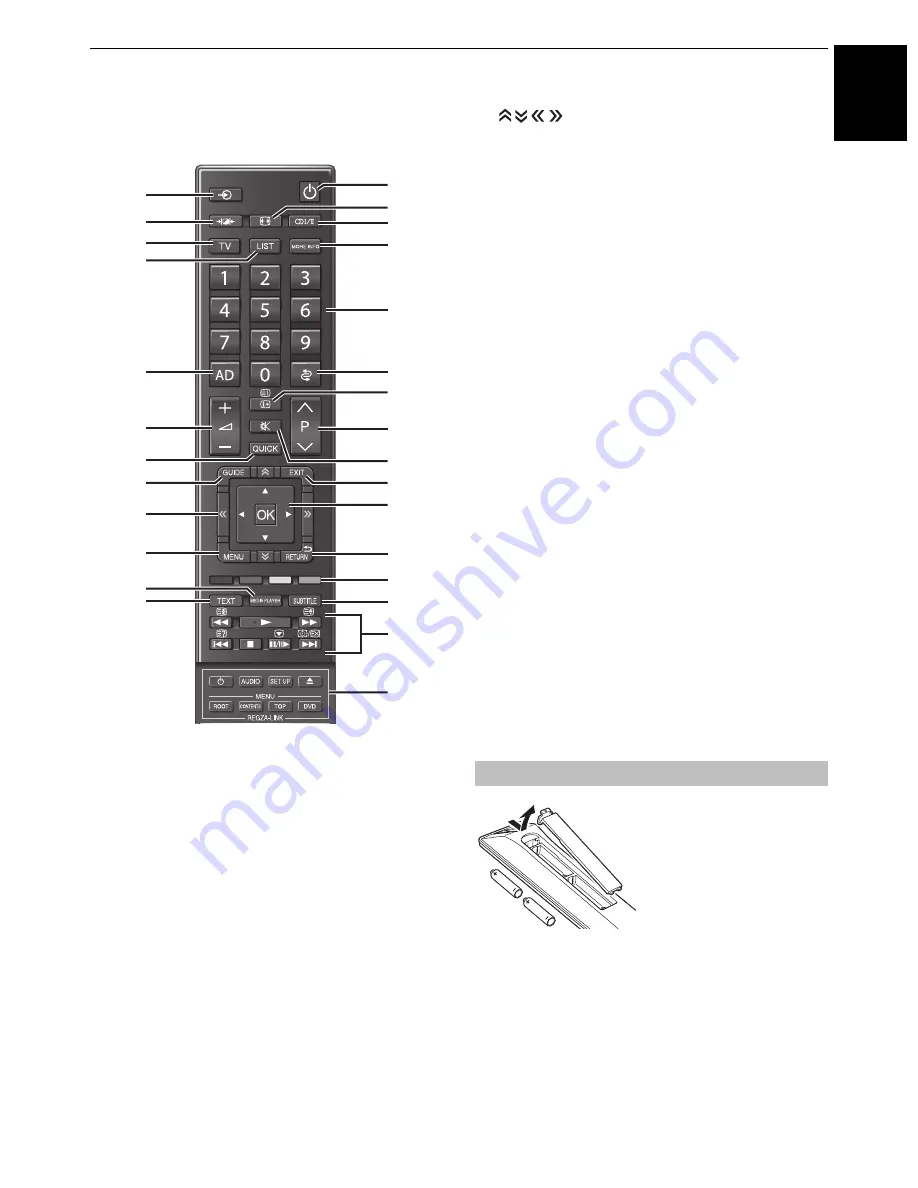
The remote control

Simple at-a-glance reference for your remote 
control.

1

For On/Standby mode

2

To select external input sources

3

Selectable Picture preferences

4

Widescreen viewing

5

s

 Stereo/bilingual transmissions

6

To select TV Mode

7

To access the analogue or digital Channel List

8

To access More Information Menu

9

Number buttons

10

Switch the Audio Description On/Off

11

To return to previous programme position

12

To alter the TV volume

13

To display on-screen information
To access the index page in Text mode

14

To mute the TV sound

15

To access Quick Menu

16

To change programme positions
To change TEXT pages

17

To display the digital on-screen Programme Guide

18

To exit menus

19

 To page up, down, left or right

20

When using menus, the arrows move the cursor on the screen 
up, down, left or right. Press 

OK

 to confirm your selection

21

On-screen Menus

22

To return to previous Menu

23

Colour buttons:

 Text and interactive service control buttons

24

To call up text services

25

To access Media Player Menu

26

Digital Subtitles or Analogue TEXT Subtitle pages if available

28

When using REGZA-LINK:

1

To turn On/Standby

AUDIO

To access 

AUDIO

 Menu

SET UP

To access 

SET UP

 Menu

V

To EJECT

ROOT

To access 

ROOT

 Menu

CONTENTS

To access 

CONTENTS

 Menu

TOP

To access 

TOP

 Menu

DVD

To access 

DVD

 Menu

Remove the back cover to 
reveal the battery compartment 
and make sure the batteries are 
inserted the proper way. 
Suitable battery types for this 
remote are AAA, IEC R03 1.5V.

Do not combine a used, old 
battery with a new one or mix 

battery types. Remove dead batteries immediately to prevent 
acid from leaking into the battery compartment. Dispose of 
them in accordance with instructions on page 74 of this 
manual. 

Warning:

 batteries must not be exposed to excessive 

heat such as sunshine, fire or the like.

The performance of the remote control will deteriorate beyond 
a distance of five metres or outside an angle of 30 degrees 
from the centre of the television. If the operating range 
becomes reduced, the batteries may need replacing.

5

13

4

1

14

16

18

23

20

28

27

11

9

2
3

8

6

10

12

22

21

26

24

19

17

25

15

7

27

When in TV mode:

r

 Picture 

still

D

 Analogue time 

display

When in Text mode:

A

 To 

reveal 

concealed 

text

B


To hold a wanted 
page

C


To enlarge text 
display size

D

 To select a page 

whilst viewing a 
normal picture

When using Programme 
Guide:

Z

  - 24 hours

z

 + 

24 

hours

CC

  - 1 page

cc

  + 1 page

During Playback:

c

To PLAY

v

To STOP

W

/

w

To PAUSE/STEP

Z

To SKIP-BACK

CC

To REWIND

cc

To FAST FORWARD

z

To SKIP-FORWARD

Inserting batteries and effective range

Summary of Contents for 40VL758B

Page 1: ...VL75 Digital Series ...

Page 2: ... 20 DTV Settings 20 Channels 20 Standby Channel Update 21 DVB Character Set 21 Dynamic Scan 21 Location setting 21 Analogue switch off 21 CONTROLS AND FEATURES General controls 22 Quick Menu 22 Selecting positions 22 The Time Display analogue only 22 Stereo and Bilingual transmissions 22 Sound controls 23 Volume controls and mute sound 23 Dual 23 Balance 23 Sound Navi 23 Surround Settings 24 Dolby...

Page 3: ...ocking channels 58 Digital settings other settings 59 Subtitles 59 Audio languages 59 Common Interface 59 Software Upgrade and Licences 60 Auto Upgrade 60 Searching for New Software 60 Network Upgrade 60 Software Licences 60 System Information and Reset TV 61 System Information 61 Reset TV 61 PC Settings 61 Horizontal and Vertical Position 61 Clock Phase 61 Sampling Clock 62 Reset 62 Input selecti...

Page 4: ...n or safety of your equipment DO be careful with glass panels or doors on equipment DO NOT obstruct the ventilation openings of the equipment with items such as newspapers tablecloths curtains etc Overheating will cause damage and shorten the life of the equipment DO NOT allow electrical equipment to be exposed to dripping or splashing or objects filled with liquids such as vases to be placed on t...

Page 5: ...D TV Two people are required for installation Never use the four screws attached to the TV To install a wall mount from another manufacturer use the SPACERS supplied 1 Unplug and remove any cables and or other component connectors from the rear of the TV 2 Carefully lay the front of the unit face down on a flat cushioned surface such as a quilt or blanket 3 Follow the instructions provided with yo...

Page 6: ...e of other size modes eg Super Live will prevent permanent retention Please take note EXCLUSION CLAUSE Toshiba shall under no circumstances be liable for loss and or damage to the product caused by i fire ii earthquake iii accidental damage iv intentional misuse of the product v use of the product in improper conditions vi loss and or damage caused to the product whilst in the possession of a thir...

Page 7: ... SET UP To access SET UP Menu V To EJECT ROOT To access ROOT Menu CONTENTS To access CONTENTS Menu TOP To access TOP Menu DVD To access DVD Menu Remove the back cover to reveal the battery compartment and make sure the batteries are inserted the proper way Suitable battery types for this remote are AAA IEC R03 1 5V Do not combine a used old battery with a new one or mix battery types Remove dead b...

Page 8: ...ion Multimedia Interface is for use with a DVD decoder or electrical equipment with digital audio and video output For acceptable video or PC signal formats through the HDMI terminals see page 76 NOTE Although this television is able to connect to HDMI equipment it is possible that some equipment may not operate correctly LAN port is used to connect the TV to your home network This TV can play dig...

Page 9: ...9 CONNECTING YOUR TV English Bundling the cables Install the cable clamps and put the cables in these Stand type Wall Mount type Cable Clamps Cable Clamps ...

Page 10: ...roperly with this model HDMI cable transfers both video and audio Separate analogue audio cables are not required see illustration See HDMI 2 Audio on page 64 To view the HDMI device video press the o button to select HDMI 1 HDMI 2 HDMI 3 or HDMI 4 mode Connect an HDMI to DVI adaptor cable HDMI type A connector to the HDMI 2 terminal and audio cables to the PC HDMI 2 AUDIO socket see illustration ...

Page 11: ...s function is available when one PC and one AV amplifier are connected separately However it may not operate properly if the PC is connected via the AV amplifier Before controlling the device s After completing the above connections set the REGZA LINK Setup menu as you desire see page 66 The connected devices must also be set For details see the operation manual for each device The REGZA LINK feat...

Page 12: ... may not be able to pause during multi angle scenes A band may appear at the edges of the screen or parts of the picture may be obscured This is due to scaling of the picture by the set it is not a malfunction When PC input mode is selected some of the television s features will be unavailable e g Colour System in the SETUP menu Some PC models may output unique signals that the television may be u...

Page 13: ...e automatic setup and will have to manually set up the network address See page 37 If you use a router with built in DHCP functionality use the automatic setup Manual setup may not work If you connect the TV and PC directly use a crossover LAN cable 1 Coaxial or telephone cable depending on your modem type 2 Standard LAN cable 3 Do NOT connect a phone jack directly to the TV s LAN port Please refe...

Page 14: ...a USB 1 USB 2 provides access to photos only NOTE The USB socket has limited functionality and Toshiba can take no responsibility for damage to other connected equipment The USB 2 socket has to be used with the TOSHIBA Dual Band WLAN Adaptor WLM 10U2 in order to access a wireless network You must use the TOSHIBA Wireless LAN device to ensure correct operation of this feature This feature is availa...

Page 15: ...een appears press B or b to select Antenna or Cable and then press OK to check j Select Next and press OK The Auto Tuning start up screen will appear with the option to select between DTV and ATV DTV or ATV if available Use C or c to select the appropriate mode k Press B or b to highlight Start Scan and then press OK The television will start to search for available DTV and or ATV channels The pro...

Page 16: ...put state is chosen a system default value will be shown However if a channel is currently tuned when the item is accessed the value of the current channel will be displayed DTV Scan Type This item determines whether a Quick Scan or a Full Scan will be executed The Quick Scan is a simplified version of the Full Scan that is designed to complete in less time DTV Start Frequency This sets the freque...

Page 17: ... Tuning For example you might use the feature if the television cannot be connected to a media recorder decoder with a SCART lead or when you want to tune in a station on another System Use C and c to move across the screen and select any of the ATV Manual Tuning options Then use B or b to adjust the settings 1 Position The number to be pressed on the remote control to tune the channel 2 System Sp...

Page 18: ...tion Use B b C and c to put in the required characters e g VCR i Press OK to save j Repeat for each position you want to tune or press RETURN to return to the list of channels and select the next number to tune k Press EXIT when you have finished Different Channel numbers may be displayed SETUP Menu Language English Country Ant Cable In Auto Tuning ATV Manual Tuning DTV Settings DTV Manual Tuning ...

Page 19: ...e controls on the television but can still be accessed by the number buttons on the remote control Channels may be moved and saved to the position of your choice a Select ATV Manual Tuning from the SETUP menu b With the list of channels showing use B or b to highlight the channel you want to move and press c c Use B or b to move through the list to your preferred position As you do so the other ch...

Page 20: ...el order may be changed to suit your personal preference a Select DTV Settings from the SETUP menu and press OK b Select Channels and press OK c For your convenience you can jump to specific places in the list by one of two methods Line Number Jump Use the number buttons 0 9 to input the line number you want to select and then press OK Station Letter Jump Press CC or cc to jump to the next station...

Page 21: ...ct DVB Character Set and use C or c to select Standard West or Latin alphabet 9 If the broadcast information has changed in your DVB T receiving area the TV screen will display the message Broadcast information has changed Would you like to rescan now Please follow the message If you do not wish for the TV to detect changes and prompt you to rescan you should set this feature to Off a Select DTV S...

Page 22: ...are transmitted the word Dual will be displayed Choose the required programme number and if the word Dual appears press s to select Dual 1 Dual 2 or Mono For DTV programmes For stereo or dual mono broadcasts press s and use C or c to select settings For multi audio track broadcasts press s repeatedly to change the audio language see Audio language on page 59 Quick Menu Mode Quick menu item Descrip...

Page 23: ... with the installation location of the TV Stand or Wall and adjust the equalizer on screen as desired a Select the SOUND menu b Press b to highlight Advanced Sound Settings and then press OK c Press b to highlight Sound Navi and then press OK d Press C or c to select either Stand or Wall depending on how your TV is installed and then press the RED button e Press C or c to select the frequency rang...

Page 24: ...an ATV channel or an external input Using the Audio Level Offset feature reduces these volume differences a Set the volume level usually used when watching a DTV 5 1ch programme b Tune to a channel which is DTV 2ch ATV or an external input c In the SOUND menu press b to highlight Audio Level Offset and press OK d Press b to highlight an option and then use C or c to adjust the volume level NOTE Th...

Page 25: ...t broadcast this setting will raise the picture to ensure that all the text is displayed CINEMA When watching all sides panel format films video tapes this setting will eliminate or reduce the black bars at all sides of the screen by zooming in and selecting the image without distortion WIDE Use this setting when watching a widescreen DVD widescreen video tape or a 16 9 broadcast when available Du...

Page 26: ...g will show the picture without overscan i e WYSIWYG This option is only available when watching a PC signal source via HDMI or PC terminal PC WIDE This setting will show the picture without overscan or side panels This option is only available when watching a PC signal source via HDMI or PC terminal Dot by Dot is a non scaling display Depending on the input signal format the picture is displayed ...

Page 27: ...stomize current picture mode settings as desired For example while selecting Dynamic if you change the following items such as Backlight Contrast Brightness Colour Tint Sharpness and the Advanced Picture Settings items your new settings are saved for Dynamic picture mode a In the PICTURE menu press b to select either Backlight Contrast Brightness Colour Tint or Sharpness and press OK b Press C or ...

Page 28: ...5 to 5 When the Auto Brightness Sensor is activated it will automatically optimise the backlighting levels to suit ambient light conditions a In the Advanced Picture Settings menu press b to select Auto Brightness Sensor Settings and press OK b Press C or c to select On and press OK c Press b to select Backlight Adjustment Pro and press OK d The Backlight Adjustment Pro window will appear Press OK...

Page 29: ...representation of a weak signal to reduce the noise effect a Select DNR from the Noise Reduction menu b Use C or c to select Low Middle High Auto or Off The differences may not always be noticeable for the best result use lower settings as picture quality can be lost if the setting is too high The Resolution feature allows you to adjust the clarity levels for your desired picture settings a In the...

Page 30: ...rt Picture Settings menu press B or b to select RGB Filter and then press OK b Press B or b to select Red Green or Blue to adjust c Press C or c to select On d Press b to select Colour or Tint and then press C or c to adjust e Press EXIT NOTE It is not possible to turn off all three colours simultaneously White Balance Window Display This feature displays a special Window Pattern to be used when a...

Page 31: ...ion receives a true Widescreen picture and Auto format is On it will automatically be displayed in Widescreen format irrespective of the television s previous setting a Press MENU and C or c to select the PREFERENCES menu b Press b to select Display Settings and press OK c Press b to select Auto Format and then press C or c to select On or Off When 4 3 Stretch is activated the size switching syste...

Page 32: ...y settings select Reset in the Picture Position menu and press OK This feature is used to hold a still image on the screen Press r to hold an image on the screen and press r again to cancel When the HDMI Information Display feature is On and you are watching an HDMI input source pressing the button displays the HDMI signal information banner a In the PREFERENCES menu press b to select HDMI Informa...

Page 33: ...ference and other adverse conditions Wireless LAN and your Health Wireless LAN products like other radio devices emit radio frequency electromagnetic energy The level of energy emitted by Wireless LAN devices however is far less than the electromagnetic energy emitted by wireless devices such as mobile phones Because Wireless LAN products operate within the guidelines found in radio frequency safe...

Page 34: ...EFERENCES menu highlight Network Setup and press OK b Press B or b to highlight Wireless Setup and press OK c Press B or b to highlight Easy Setup and press OK d Press C or c to select PBC e Press b to highlight Start Scan and press OK f Following the on screen instructions push the appropriate button on your AP g When a window reporting that the setup is complete appears press OK To cancel search...

Page 35: ...w will appear e Input the Network Name by using the Software Keyboard see page 38 To save your setting press the BLUE button f Press B or b to highlight Authentication and then press C or c to select Open System Shared Key WPA PSK or WPA2 PSK g Press B or b to highlight Encryption and then press C or c to select None WEP TKIP or AES NOTE Certain encryption types are only compatible with specific a...

Page 36: ...er is Off set Auto Setup to Off and set the IP Address manually IP Address Setup Auto Setup a In the PREFERENCES menu highlight Network Setup and press OK b Press B or b to highlight Advanced Network Setup and press OK c Press B or b to highlight IP Address Setup and press OK Item Description Status Connected is displayed when the TV is connected with the AP Disconnected is displayed when the TV i...

Page 37: ...nually set the DNS address es Your internet service provider should have provided these to you Auto setup a In the PREFERENCES menu highlight Network Setup and press OK b Press B or b to highlight Advanced Network Setup and press OK c Press B or b to highlight DNS Setup and press OK d Highlight Auto Setup and then press C or c to select On NOTE Other items will be grayed out when Auto Setup is set...

Page 38: ... The Software Keyboard window will appear when you press OK on a field that accepts character input To enter text using the software keyboard a Highlight the desired character on the on screen software keyboard b Press OK c Repeat steps 1 and 2 until you have entered all desired text d Press the BLUE button to close the software keyboard and return to the previous screen NOTE If RETURN is pressed ...

Page 39: ...ton NOTE The Web Password can be up to 15 characters long i Highlight Done and then press OK j If you want to limit access from unexpected DMCs press C or c to select On and then press OK k If you want to proceed with registration of DMCs press C or c to select Yes and then press OK l Press B or b to highlight the item you want to accept and press OK A check will appear in the box To remove the ch...

Page 40: ... TV a In the Media Renderer Setup menu highlight Media Controller Setup and press OK b Press B or b to highlight Access Control and then press C or c to select On c Press B or b to highlight Select Media Controller and press OK d Press B or b to highlight the item you want to accept and press OK A check will appear in the box To remove the check press OK again e Press c to highlight Done and then ...

Page 41: ...home network before using this feature see page 13 If Network Lock is set to On it will be necessary to enter your four digit PIN code in order to access network features see page 57 a In the APPLICATIONS menu highlight YouTube and press OK b Press B b C or c to select the file you want to view and press OK To close YouTube a Press EXIT NOTE This TV may not be able to perform all of the same opera...

Page 42: ...frame a From the Function menu press C or c to select Menu and then press OK b Press C or c to select Page Tasks c Highlight Switch Frames and press OK Setting the view feature a From the Function menu press C or c to select Menu and then press OK b Press C or c to select View c Press B or b to select the desired item and press OK d Press B or b to select the desired setting and press OK Using the...

Page 43: ...non display of images Table Sets effect non effect of tables CSS Sets effect non effect of CSS Pop up window Sets effect non effect of pop up windows Animation Sets display non display of animations JavaScript Sets effect non effect of JavaScript Word wrap Sets effect non effect of Word Wrap If Word Wrap is enabled a word not finished at the end of a line is shifted to the next line Rapid Render S...

Page 44: ...a USB hub connection File system FAT12 FAT16 and FAT32 NTFS Maximum memory size Unlimited DLNA CERTIFIED Server Your PC for example Using Media Player with USB When Auto Start is enabled you will be asked if you want to start the Media Player whenever a USB device is inserted If Auto Start is disabled or if you want to connect to a DMS on the network you must manually start the Media Player from t...

Page 45: ...o the previous layer To close the Media Player a Press EXIT To display the device information a Press QUICK to open the Quick Menu in list mode or Multi View mode b Press B or b to select Device Information Setting DLNA CERTIFIED Server waking up You only need to complete the Media Server Setup if you wish to use the Wake on LAN feature a In the APPLICATIONS menu highlight Media Player and then pr...

Page 46: ...ed directory will be displayed This view allows you to change the photo content manually When moving from Multi View to Single View the currently selected photo will be displayed a Press c to view the next photo Press C to view the previous photo b Press B to rotate the image 90 clockwise Press b to rotate the image 90 counterclockwise c Press to display file status information file number photo t...

Page 47: ...een When OK is pressed it is played in full screen mode Depending on the file size it may take some time to start playback d Press v to stop playback NOTE If playback finishes before v is pressed the screen will return to the list of available file Depending on the file size it may take some time for playback to begin About the AVCHD folder structure If a PRIVATE folder exists directly under the r...

Page 48: ...When the TV is used as a DMR this feature is not available To sort the folders and files a Press QUICK to open the Quick Menu in list mode b Press B or b to select Sort c Press C or c to select Title File Name New or Old to set the sorting rule NOTE Sorting may not be supported by some DMSs To display the device information a Press QUICK to open the Quick Menu in list mode b Press B or b to select...

Page 49: ...his code to complete the registration process and learn more about DivX VOD You can listen to music from a list of available files a Press B b to select a file or folder PU Pu buttons can be used to page up down the music list when there are more files than will fit onto one screen b When you select a folder press OK to move to the next layer Press RETURN to move back to the previous layer c With ...

Page 50: ...Press during playback The information will be displayed on the bottom of the screen b Press again to remove the information NOTE The information may not be correctly displayed depending on the content DMC or DMS To close the Music Player a Press EXIT File Compatibility USB device See page 77 Content on DLNA CERTIFIED Server File format Linear PCM MP3 Sampling frequency 32 kHz 44 1 kHz 48 kHz Bit r...

Page 51: ... Menu a Press QUICK to open the Quick Menu b Press B or b to select Photo Frame and then press OK to open Photo Frame To close Photo Frame a Press EXIT In the preview screen you can set various settings for Photo Frame Photo Select a In the Photo Frame Setup menu press B or b to select Photo Select and then press OK b If the device selection screen appears press B or b to select the appropriate de...

Page 52: ...Left or Right Auto Power Off Press C or c to select Off 00 30 01 00 02 00 04 00 06 00 or 12 00 If the Photo Frame window is left open the TV will automatically turn off after the set length of time maximum 12 hours d Press RETURN e Select Start and then press OK NOTE The clock display will only appear when time from a digital broadcast is available The photo and clock displays are moved by 4 dots ...

Page 53: ...using the number buttons and C and c to make selections e When all of the details have been entered highlight Set Timer and press OK to save the timer The ORANGE RED programme timer indicator on the front of the television will be lit see page 72 for details PLEASE NOTE When a timed programme is about to start an information screen will appear offering the option of watching or cancelling the prog...

Page 54: ...1 HDMI 2 HDMI 3 HDMI 4 or PC Channel Set the channel that will be tuned when the television turns on NOTE When an external input is selected in the Input field a channel cannot be selected Volume Set the volume that will be applied when the television turns on Time until Power On only for DTV Clock Off mode Set the amount of time from now until the TV turns on using the number buttons maximum of 1...

Page 55: ... want to change and press C or c to select On or Off NOTE Default setting is all On A warning message will appear 1 minute before turning off Digital on screen information and Programme Guide When viewing in digital mode the on screen information and programme guide provide access to programme details for all available channels a Press the information screen will appear giving details of the chann...

Page 56: ...ogrammes d For information on a highlighted programme press e To set the timer for that programme press the BLUE button to bring up the Programme Timers menu NOTE In order for the recording operation to work properly the media recorder must be set to the same time as the TV Regarding the process for recording please refer to the owner s manual of the recording equipment f Press Pu to advance to th...

Page 57: ... then press OK c Press b to highlight PIN Setting and then press OK d Using the number buttons enter a four digit number Once entered you will be prompted to confirm by entering again The PIN number is now set If the PIN code has been set when Auto Tuning and Reset TV are executed entering the PIN will be necessary Genre selection searching RETURN Genre Colour Setup Movies Colour Setup Back 34 AB1...

Page 58: ...s Favourite Channels creates a list of the digital channels that are watched most Four lists can be created these can be a mixture of television radio and text channels a Select a channel you want to add to your favourite list b Press QUICK to open the Quick Menu c Press b to select Channel Options and press OK d Press c repeatedly to select the favourite list Fav 1 4 e Press OK to select the ones...

Page 59: ...ted the PIN must be entered before they can be accessed Digital settings other settings In digital mode this feature will show subtitles on the screen in the selected language provided they are being broadcast a In the DTV Settings menu press b to select Subtitle and Audio and press OK b Press b to select Subtitle Display and use C or c to select On or Off c Press b to select Primary Subtitle Lang...

Page 60: ...not guaranteed except for Canal Ready DTT services on suffix FC models Software Upgrade and Licences When Auto Upgrade is set to On the television will automatically upgrade while in standby if new software is available a From the SETUP menu press B or b to select Software Upgrade and press OK b Press B or b to select Over the air Upgrade and press OK c Press B or b to select Auto Upgrade d Use C ...

Page 61: ...alled When in DTV mode it includes additional diagnostic information such as signal strength signal quality centre frequency modulation etc a In the SETUP menu press B or b until System Information is highlighted b Press OK to display the System Information c For information about the signal quality of a particular multiplex press B or b to select that multiplex d Press OK for a screen showing det...

Page 62: ...djusting the Sampling Clock alters the number of pulses per scan this will clear vertical lines on the screen a In the Display Settings menu press b until PC Settings is highlighted b Press OK to select and then b to highlight Sampling Clock c Use C or c to adjust until the picture clears Use Reset to return all items to the original factory settings a In the Display Settings menu press b until PC...

Page 63: ... menu press b to highlight AV Connection b Press OK to display the AV Connection menu c Press B or b to highlight Input Labeling and press OK d Press B or b to select the input you want to skip and then press the RED button to turn on the skip e To turn off the skip press the RED button again The input set to Skip is greyed out in the Input Selection window and is skipped over when you press o on ...

Page 64: ...the back of the television as shown in the Connecting a computer section and then use the PC HDMI 2 Audio setting a In the PREFERENCES menu press b to highlight AV Connection and press OK b Press B or b to highlight PC HDMI 2 Audio and then press C or c to select the PC option NOTE Selecting the PC option will force HDMI 2 Audio to Digital mode If the connected HDMI source does not support digital...

Page 65: ...nnection is capable of 1080p and or your television is capable of refresh rates greater than 50Hz or supports Deep Colour you will need a Category 2 cable Conventional HDMI DVI cables may not work properly with this mode All of the above HDMI settings need proper HDMI source devices If the HDMI source products do not support these features the television may not work properly by activating these f...

Page 66: ...r Preference feature to become available a In the REGZA LINK Setup menu press b to highlight Amplifier Control b Press C or c to select On or Off This feature allows the audio output preference to be set to the TV speakers or AV amplifier speakers The AV Amplifier option lets the television s remote control adjust or mute the volume of the audio a In the REGZA LINK Setup menu press b to highlight ...

Page 67: ... Even if the equipment is showing a menu the television may automatically show the input source This feature depends on the connected equipment and television state If the television is turned off standby mode the television will send a message to turn off standby mode all of the REGZA LINK devices connected to the television These functions can be enabled or disabled from the REGZA LINK Setup see...

Page 68: ...our of the numbers will change indicating that these pages have been loaded These sub pages will remain available to view until another page is chosen or in normal TV mode the channel is changed If Fastext is available four coloured titles will appear at the base of the screen To access one of the four given subjects press the relevant coloured button on the remote control For further information ...

Page 69: ...B will appear in the top left of the screen The page will be held on screen until the button is pressed again C To enlarge the text display size Press C once to enlarge the top half of the page press again to enlarge the bottom half of the page Press again to revert to normal size D To select a page whilst viewing normal picture Enter the page number then press D normal picture will be displayed T...

Page 70: ...ct input by pressing o Q Why is there a picture but no sound A Check all lead connections No sound or unacceptable format sound may be received Check the volume has not been turned down or that sound mute has not been selected Check shared audio settings Country UK Colour System Auto Menu Language English SETUP Q What else can cause a poor picture A Interference or a weak signal Try a different te...

Page 71: ... Go to the main index page of the text service and look for the User Guide This will explain the basic operation of text in some detail If further information is needed on how to use text see the text section Q Why is a page number visible at the top of the screen but no text A Text has been selected but Teletext information is currently unavailable on the current source Q Why are the colours wron...

Page 72: ... is NOT set Programme Timer is active OFF OFF Green Solid Power ON On Timer is NOT set Programme Timer is NOT set Orange Solid Green Solid Red Solid Power OFF Standby On Timer is set Programme Timer is set LED indication Condition Solution LED 3 LED 2 LED 1 Red Solid Green Solid Red Solid Power ON Standby On Timer is set Programme Timer is active OFF Green Solid Red Solid Power OFF Standby On Time...

Page 73: ...Manufactured under license from Audyssey Laboratories U S and foreign patents pending Audyssey EQ is a registered trademark of Audyssey Laboratories Audyssey EQ is based on the award winning Audyssey MultEQ technology It is the first ever room equalization solution that can achieve optimum sound for a large listening area and it is featured in many high end home theater products Audyssey EQ is use...

Page 74: ...ment and human health For more detailed information about the collection and recycling programmes available in your country please contact your local city office or the shop where you purchased the product Disposal of batteries and or accumulators The crossed out wheeled dust bin symbol indicates that batteries and or accumulators must be collected and disposed of separately from household waste I...

Page 75: ...or output format on your PC to conform to a signal in the table below Pin No Signal name Pin No Signal name Pin No Signal name 1 R 6 Ground 11 NC 2 G 7 Ground 12 NC 3 B 8 Ground 13 H sync 4 NC 9 NC 14 V sync 5 Ground 10 Ground 15 NC Format Resolution V Frequency H Frequency Pixel Clock Frequency VESA Standard DMT VGA 640 480 59 940Hz 31 469kHz 25 175MHz 72 809Hz 37 861kHz 31 500MHz 75 000Hz 37 500...

Page 76: ...500kHz 27 000 27 027MHz 576p 720 576p 50 000Hz 31 250kHz 27 000MHz 1080i 1920 1080i 59 940 60 000Hz 33 716 33 750kHz 74 176 74 250MHz 1080i 1920 1080i 50 000Hz 28 125kHz 74 250MHz 720p 1280 720p 59 940 60 000Hz 44 955 45 000kHz 74 176 74 250MHz 720p 1280 720p 50 000Hz 37 500kHz 74 250MHz 1080p 1920 1080p 59 940 60 000Hz 67 433 67 500kHz 148 352 148 500MHz 1080p 1920 1080p 50 000Hz 56 250kHz 148 50...

Page 77: ...xmum number of files 1000 folder Music Maxmum file size Unlimited Maxmum number of files 1000 folder NOTE Playback in all file formats listed above can not be guaranteed Extension Format jpg jpeg JPEG Extension System Video Codecs Audio Codecs mts m2ts AVCHD MPEG 2 TS MPEG 4 AVC H 264 Dolby Digital AC 3 PCM divx div avi DivX DivX 3 4 5 6 PCM ADPCM MPEG 1 2 Layer2 MP2 MPEG 1 2 Layer3 MP3 Dolby Digi...

Page 78: ...y Terms and Conditions available at http www toshiba co uk tv dvd support Stereo Nicam 2 carrier system Visible Screen Size approx Model 40 46 102cm 117cm Display 16 9 Sound output at 10 distortion Main 10W 10W Woofer 10W Power consumption approx 40VL758 134W 46VL758 142W Annual power consumption approx 40VL758 157 0kWh 46VL758 180 3kWh On mode power consumption approx 40VL758 106W 46VL758 122W St...

Reviews: