63
CONTROLS AND FEATURES
E
n
g
lish
Input selection and AV
connections
See page 8 for a detailed image showing
recommended connections.
Most media recorders and decoders send a signal through the
SCART lead to switch the television to the correct
Input
socket.
Alternatively, press the external source selection button
o
until the picture from connected equipment is shown.
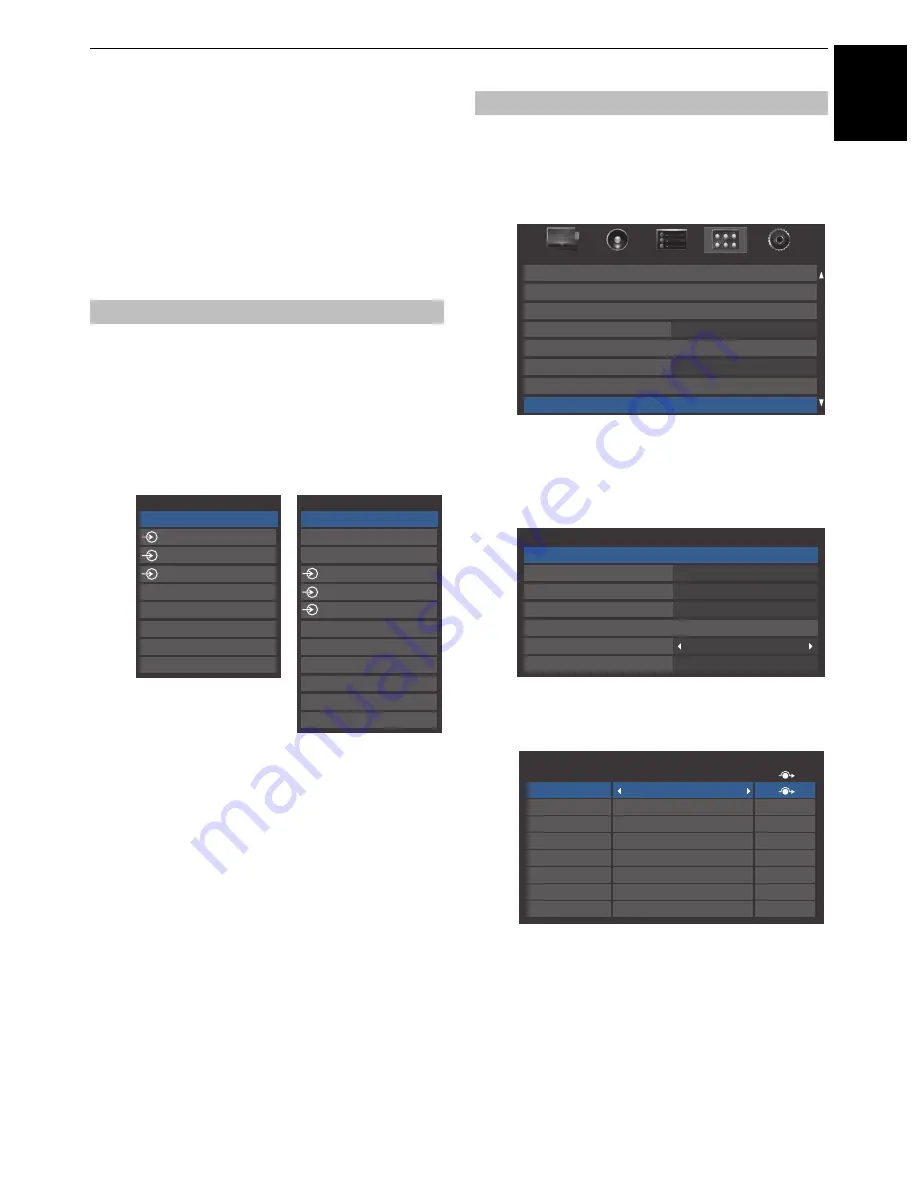
Use the Input Selection window if the television does not switch
over automatically.
a
By pressing
o
on the remote control or TV, a list will
appear on screen showing all inputs and external
equipment.
HDMI
®
displays equipment connected to
Input HDMI
on the back or side of the television.
PC displays a computer connected to
Input RGB
/
PC
on
the back of the television.
This feature is designed to make input selection more
convenient by allowing you to skip unused inputs.
a
In the
PREFERENCES
menu, press
b
to highlight
AV
Connection
.
b
Press
OK
to display the
AV Connection
menu.
c
Press
B
or
b
to highlight
Input Labeling
and press
OK
.
d
Press
B
or
b
to select the input you want to skip, and
then press the
RED
button to turn on the skip.
e
To turn off the skip, press the
RED
button again.
The input set to Skip is greyed out in the Input
Selection window and is skipped over when you press
o
on the remote control.
Input selection
Inputs
TV
1
2
3
HDMI 2
HDMI 1
PC
HDMI 3
HDMI 4
Inputs
DTV TV
DTV RADIO *
DTV TEXT *
1
2
3
HDMI 3
HDMI 2
ATV
HDMI 4
PC
HDMI 1
Pressing
o
on the
remote control
Pressing
o
on the TV
* If radio or text channels
are currently available for
DTV.
External input skip
Network Setup
Media Renderer Setup
Display Settings
Network Lock
AV Connection
Photo Frame Setup
Teletext
Auto
Panel Lock
Off
PREFERENCES
AV Connection
Input Labeling
PC/HDMI 2 Audio
PC
HDMI 2 Audio
Digital
HDMI Settings
Colour Decoding
Auto
Side Shared Audio
EXT 2
Digital Audio Output
Auto
Input
Label
--
--
--
--
--
--
--
--
Input Labeling
EXT 1
EXT 2
EXT 3
HDMI 1
HDMI 2
HDMI 3
HDMI 4
PC
Summary of Contents for 40VL758B
Page 1: ...VL75 Digital Series ...


