background image


English

   - 6 -

English

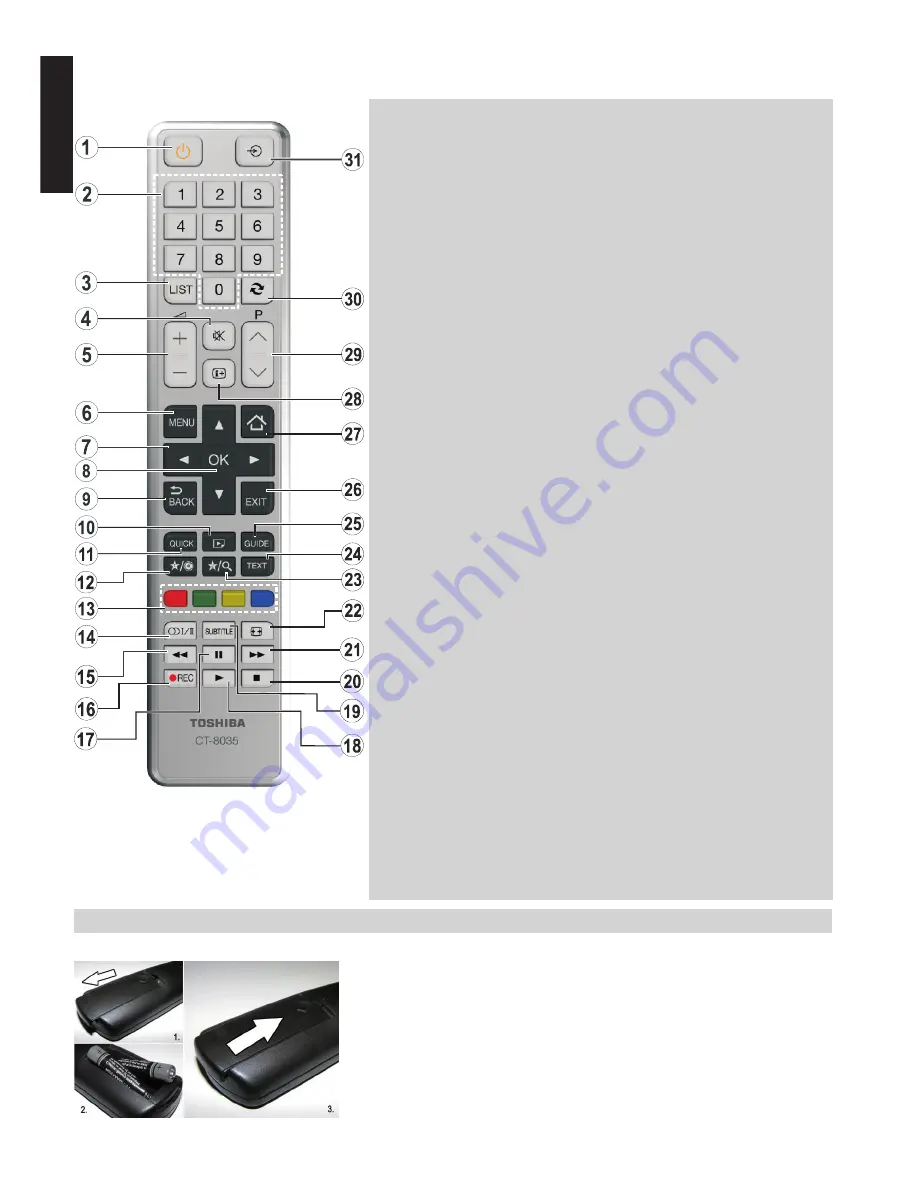
The Remote Control (TV - DVD)

Simple at-a-glance reference of your remote control.

Inserting Batteries and Effective Range of the Remote Control

Remove the back cover to reveal the battery compartment and make sure the 

batteries are inserted the right way round. Suitable battery types for this remote 

are  AAA, IEC R03 1.5V.
Do not combine a used, old battery with a new one or mix battery types. Remove 

exhausted

 batteries immediately to prevent acid from leaking into the battery 

compartment. Dispose of them in a designated disposal area.

Warning

: Batteries must not be exposed to excessive heat such as sunshine, 

fire or the like.
The performance of the remote control will deteriorate beyond a distance of five 

metres or outside an angle of 30 degrees from the IR receiver. If the operating 

range becomes reduced the batteries may need replacing.

(*) MY BUTTON 1 & MY BUTTON 2

These buttons may have default functions depending on the  model. 

However you can set a special function to these buttons by pressing 

on them for five seconds when on a desired source, channel or link. A 

confirmation message will be displayed on the screen. Now the selected 

MY BUTTON is associated with the selected function.
Note that if you perform first time installation, MY BUTTON 1&2 will return 

to their default function.

1. 

Standby 

Standby

2. 

Numeric buttons 

Numeric buttons

3. 

TV-AV / Channel list / Switches 

among broadcast types

4. 

Mute 

Mute

5. 

Volume Up / Down 

Volume Up / Down

6. 

Menu on-off 

Menu

7. 

Navigation buttons  

(Up/Down/Left/Right) 

Navigation buttons

8. 

Okay (Confirm) / Hold (in TXT 

mode) / Channel List 

OK

9. 

Return / Index page (in TXT 

mode)

10. 

Media Browser 

Angle

11. 

Quick Menu

12. 

My button 1

(*) 

Display time / DVD menu

13. 

Coloured buttons 

Red button - Zoom 

Green button - Repeat 

Yellow button - Root 

Blue button - Title

14. 

Mono/Stereo - Dual I-II / 

Current  Language  

 (in DVB channels) 

Language selection

15. 

Rapid reverse 

Search forward

16. 

No function

17. 

Pause 

Pause

18. 

Play 

Play

19. 

Subtitle on-off (in Media 

Browser mode and in DVB 

channels)  

Subtitle

20. 

Stop 

Stop

21. 

Rapid advance 

Search forward

22. 

Image size 

Image size

23. 

My button 2

(*) 

Search Mode

24. 

Teletext / Mix (in TXT mode) 

25. 

Electronic programme guide(in 

DVB channels)

26. 

Exit 

Exit

27. 

Internet portal

28. 

Info / Reveal (in TXT mode) 

Time

29. 

Programme Down /  

Page up -  

Programme Up / Page down

30. 

Previous programme

31. 

AV / Source selection 

Source selection

Note:

 The references in Bold 

are for models with and in DVD 

operation.

Summary of Contents for 32L344 DG

Page 1: ...ment are limited due to local legislation and may not be available in all countries If you wish to view the advanced manual for this Toshiba TV you can do so by visiting www toshiba om net Register your TV online at www toshiba europe com registration Toshiba estimates that the initiative of making the advanced functions available online will save over 100 000 trees per year 6 5 Million kg Co2 If ...

Page 2: ...SB Memory 9 To Connect a USB Flash Drive 9 Connecting a Computer 9 Connecting a home network 10 Controlling the TV 11 Switching on 11 Using the Remote Control 11 Using the Controls on the TV 11 Initial Installation 12 Network Settings Portal and YouTube 14 Configuring Network Settings 14 Using the Toshiba Portal 14 Using YouTubeTM 14 Pages 15 to 20 apply to Models with DVD loader only DVD Mode 15 ...

Page 3: ...draw the mains plug before making or changing connections DO consult your dealer if you are ever in doubt about the installation operation or safety of your equipment DO be careful with any glass panels or doors on equipment Do not DON T remove any fixed cover as this may expose dangerous voltages DON T obstruct the ventilation openings of the equipment with items such as newspapers tablecloths cu...

Page 4: ...LCD TV and is not covered under the manufacturer s warranty Regular use of other size modes will prevent permanent retention Exclusion Clause Toshiba shall under no circumstances be liable for loss and or damage to the product caused by i fire ii earthquake iii accidental damage iv intentional misuse of the product v use of the product in improper conditions vi loss and or damage caused to the pro...

Page 5: ... disconnecting the unit from the socket outlet Do not pull on flex The flex can become damaged and cause a short circuit Use a soft dry cloth to clean the unit Set up unit so that no one will trip over the flex If you intend to wall mount the unit contact the shop where you purchased the unit for advice and leave the installation work to professionals Improper installation can cause damage and or ...

Page 6: ...e sure the appropriate bracket s are attached to the wall and the back of the TV as described in the instructions provided with the wall bracket 4 Always use the screws supplied or recommended by the wall mount manufacturer Removing the pedestal stand 1 Carefully lay the front of the unit face down on a flat cushioned surface with the stand hanging over the edge 2 Remove the screws 3 After the scr...

Page 7: ...be displayed on the screen Now the selected MY BUTTON is associated with the selected function Note that if you perform first time installation MY BUTTON 1 2 will return to their default function 1 Standby Standby 2 Numeric buttons Numeric buttons 3 TV AV Channel list Switches among broadcast types 4 Mute Mute 5 Volume Up Down Volume Up Down 6 Menu on off Menu 7 Navigation buttons Up Down Left Rig...

Page 8: ...signals but will also accept and display VGA 480i 480p 576i 576p and 720p signals PC format signals will also be displayed NOTE Although this TV is able to connect to HDMI equipment it is possible that some equipment may not operate correctly When connecting a device via the Side AV input you must use the supplied connection cable to enable connection When connecting a device via YPbPr input you m...

Page 9: ...0Hz you will need a Category 2 cable Conventional HDMI DVI cable may not work properly with this mode HDMI cable transfers both video and audio Separate analogue audio cables are not required see illustration To view the HDMI device video press SOURCE button to select the appropriate HDMI input To Connect a DVI Device Connect an HDMI to DVI cable HDMI type A connector to the HDMI input socket and ...

Page 10: ... YPbPr video connection cable for enabling connection First plug the single jack of the cable to the TV s YPbPr socket side Afterwards insert your YPbPr cable s not supplied connectors into the plural part of the supplied YPbPr video connection cable see illustration below Colours of the connected jacks should match To enable audio connection use the supplied SideAV connection cable First plug sin...

Page 11: ...Wireless USB LAN adaptor can be purchased from the retail outlet or Toshiba service company You can find the phone numbers of the local services on the back cover of this manual Wireless connection for models with integrated WIFI IF your TV has a built in WLAN system you don t need additional devices to connect to your network wirelessly Note Performance depends on many factors conditions and vari...

Page 12: ...ess of the screen will reduce energyuse Energyefficiencycutsenergy consumption and thus saves money NOTE Putting the TV into standby mode will reduce energy consumption but will still draw some power Using the Remote Control Press the MENU button on the remote control to see the menus The main menu appears as a group of icons each for a menu option Press the Left or Right button to select a topic ...

Page 13: ... are digital only analog TV only and full 4 When set Down button to select Teletext Language Use Left or Right button to select desired Teletext Language 5 Press OK button on the remote control to continue and the following message will be displayed on the screen 6 Select Yes button by using Left or Right button and press OK button to continue Afterwards the following OSD will be displayed on the ...

Page 14: ...cable If you have multiple receivers and a unicable system select this antenna type Press OK to continue Configure settings by following instructions on the screen Press OK to scan for services DiSEqC switch If you have multiple satellite dishes and a DiSEqC switch select this antenna type After selecting DiSEqC switch another menu screen will be displayed You can set four DiSEqC options if availa...

Page 15: ...itional bandwidth dedicated to this product Third party internet services may change be discontinued or restricted at any time Use of third party internet services may require registration by a computer and if needed payment of charges and membership Toshiba makes no warranties about the content availability or functionality of third party content or services Network Settings Portal and YouTube Us...

Page 16: ...g to disc content LPCM audio via coaxial and optical digital audio outputs optional Multi Audio up to 8 support according to disc content Multi Subtitle up to 32 support according to disc content Multi Angle up to 9 support according to disc content 8 level parental control Fast forward and rewind 5 different speeds 2x 4x 8x 16x 32x Slow motion playback 4 different speeds 1 2x 1 4x 1 8x 1 16x forw...

Page 17: ...ring stop mode X X Displays disc information X X Audio language X X X MENU Displays main menu OK Enter View Play GREEN BUTTON Displays repeat options RETURN Returns back to the previous menu if available YELLOW BUTTON Goes back to the root folder if available X JUMP Direct selection of scenes time or file track number SUBTITLE Subtitle on off Press repeatedly to switch between subtitle options if ...

Page 18: ... selected item starts to play Notes on DVD Playback a No sound will be heard during Rapid advance or Rapid reverse b No sound will be heard during Slow motion play c Reverse Slow motion play is not available d In some cases the subtitle language will not be changed immediately to the selected one e When the preferred language will not select even after pressing the button several times it means th...

Page 19: ...l audio output of the TV is used SURROUND Surround sound output STEREO Two channels stereo PARENTAL Playing some DVDs can be limited depending on the age of users The Parental Control function allows playback limitation level to be set by the parent Parental Level can be adjusted to one of the eight levels Level 8ADULT adjustment let you watch all of the DVD titles ignoring the DVD disc s parental...

Page 20: ... Data Wrong OSD language 1 Select the language in the setup menu 2 The language for the sound or subtitles on a DVD disc cannot be changed 3 Multilingual sound and or subtitles are not recorded on the DVD disc 4 Try to change the sound or subtitles using DVD s title menu Some DVD s do not allow the user to change these settings without using the disc s menu Angle Zoom etc functions do not work 1 T...

Page 21: ...MP3 quality MP3 is recorded as a digital signal with better audio quality less distortion and less deterioration of audio quality over time Video still picture 12cm Depends on JPG quality JPEG is recorded as a digital signal with better picture quality over time Media File Extension Format Supported Maximum resolution Bit rate etc Video Audio Movie mpg dat vob MPEG1 MPEG Layer 1 2 3 MPEG2 MPEG2 av...

Page 22: ... 80 non condensing Supplied Accessories Remote Control 2 batteries AAA IEC R03 1 5V Four screws Side AV cable YPbPr Connection Cable Stand fixing cover P Clip Optional Accessories Wireless USB Adaptor Toshiba WLM 30U2 and is available from the retail outlet or Toshiba service company 32 W 32 L Energy Efficiency Class A A Visible Screen Size approx 80cm 32 80cm 32 On Mode Power Consumption approx 4...

Page 23: ...heeIed dust bin symbol indicates that products must be collected and disposed of separately from household waste Integrated batteries and accumulators can be disposed of with the product They will be separated at the recycling centres The black bar indicates that the product was placed on the market after August 13 2005 By participating in separate collection of products and batteries you will hel...

Page 24: ...USB stick HDD is connected correctly Incorrect operation may occur from a USB Hub connection Check your network setup if using media server Why digital subtitles are not shown on screen when they are selected Subtitles are not currently being transmitted by the broadcaster Why is the digital channel locked Parental control is activated Check parental settings Why are some encrypted digital channel...

Page 25: ...iba herby declares that this product with an integrated Wireless Function is in compliance with the essential requirements and other relevant provisions of Directive 1999 5 EC EU Conformity Statement This product is carrying the CE Mark in accordance with the related European Directives Responsible for CE Marking is TOSHIBA 23 Davy Road Plymouth PL6 8BY UK This product is labeled with the CE Mark ...

Page 26: ...hender Mobilfunktarif moglich Gibralter 200 76334 Ελληνική 210 9554298 Magyar Köztársaság 23 428 870 Ísland 00 45 80 88 93 38 Yisrā el 03 953 5900 Italia 039 609 9301 Latvijas 00 372 69 97 800 Lietuvos 00 372 69 97 800 Luxembourg 00 32 2 391 01 01 Moldova 00380 443 511 317 Nederlanden 00 32 2 391 01 01 Norge 800 573 57 Polska 0 71 796 95 05 Portugal 707 265 265 Republic of Ireland 01 246 7780 Româ...

Reviews: