background image

2460 ADJUSTMENT

1 - 10

September 1997  ©  TOSHIBA CORP.

1.2.3

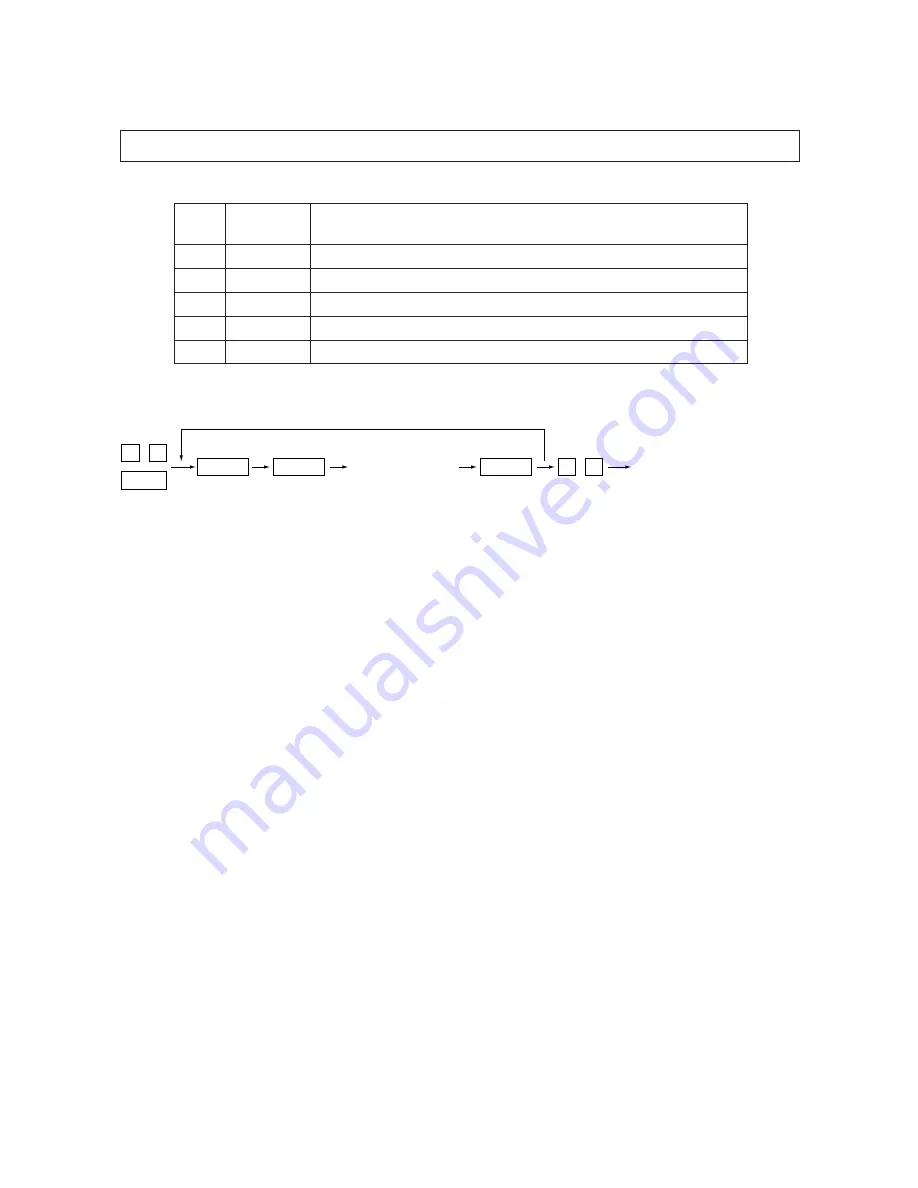
Test Print (Test Mode “04”)

In test mode “04,” you can print the test pattern generated by the following ASIC codes.

<Operation procedure>

Note:

Though errors are displayed when generated, recovery is not carried out. This is remedied by turning the

power OFF then ON again.

Code

ASIC

Test Pattern type

111

SARAH

Primary scanning, 33 gradation (2nd step), error diffusion

113

SARAH

Secondary scanning, 33 gradation (2nd step), error diffusion

142

HPS

2-dot grid pattern (Pitch 10 mm)

183

SARAH

Primary scanning, 33 gradation (2nd step), + dither process, for fax

184

SARAH

Secondary scanning, 33 gradation (2nd step), + dither process, for fax

0

4

0

9

PWR

Operation

(Test print)

Code

START

Warming up

C/S

Summary of Contents for 2460

Page 1: ...isplay bookmarks created for the document Click a bookmark s name to go to the Page marked by that bookmark Click the Thumbnails and Page button to open the overview area and display thumbnail images of each document page Click a thumbnail to go to the page marked by that thumbnail Copyright TOSHIBA CORPORATION 1998 ALL RIGHTS RESERVED AUTOMATIC DUPLEXING UNIT 2460 MD 5004 ...

Page 2: ...vide proper ventilation as the copier emits a slight amount of ozone To insure adequate working space for the copying operation keep a minimum clearance of 80 cm 32 on the left 80 cm 32 on the right and 10 cm 4 in the rear Secure the lifting handles with the fixing plates and screws after the installation is finished 3 Service of Machines Basically be sure to turn the main switch off and unplug th...

Page 3: ...parts and packing mate rials it is recommended to follow the relevant local regulations or rules 7 When parts are disassembled reassembly is basically the reverse of disassembly unless otherwise noted in this manual or other related documents Be careful not to reassemble small parts such as screws washers pins E rings toothed washers in the wrong places 8 Basically the machine should not be operat...

Page 4: ...feeding jam at the ADU Manual feeding jam 1st cassette Upper cassette feeding jam 2nd cassette Lower cassette feeding jam 3rd cassette PFP upper cassette feeding jam 4th cassette PFP middle cassette feeding jam 5th cassette PFP lower cassette feeding jam LCF feeding jam Paper jam at the LCF Paper jam inside the copier Paper jam near the aligning roller PFP emergency stop Paper jam at the PFP Copie...

Page 5: ... cassette tray operation abnormal Copier lower cassette tray operation abnormal PFP upper cassette tray operation abnormal PFP middle cassette tray operation abnormal PFP lower cassette tray operation abnormal LCF tray operation abnormal Carriage initialization error Exposure lamp disconnection detected or exposure peak detection error Easy setup has failed Abnormal thermistor or heater disconnect...

Page 6: ...atest 8 error data Copy mode A Paper feed cassette 0 Non select 1 SFB 2 LCF 3 PFP U 4 PFP M 5 PFP L 6 ADU 7 Copier U 8 Copier L B Paper size code 0 A5 1 A5 R 2 ST R 3 LT 4 A4 5 B5 R 6 LT R 7 A4 R 8 OTHER UNIV 9 B5 A FOL COM B LG C B4 D LD E A3 C Sort mode 0 Non select 1 Group 2 Sort 6 Staple Sort D DF mode 0 Not used 1 AUTO FEED SADF 2 STACK FEED E APS AMS mode 0 Non select 1 APS 2 AMS F Deplex mo...

Page 7: ...ter etc C S 09 09 09 09 09 09 AGING MODE 100 TEST MODE 100 TEST PRINT MODE 100 TEST MODE 100 AGING MODE 2 100 TEST MODE 100 Note To access the desired diagnostic mode turn on the power switch while pressing the appropriate keys Procedure All LEDs lit mode 01 Aging mode 02 or 07 Test mode 03 Refer to 1 2 1 and 1 2 2 Test print mode 04 Refer to 1 2 3 Test print mode Adjustment mode 05 Refer to 1 2 4...

Page 8: ... copier is in the adjustment mode which you entered by turning on the power switch while pressing keys 0 and 5 simultaneously pressing keys 0 and 9 simultaneously will make the copier exit into the standby mode In this standby mode only can the adjustment mode be accessed repeatedly by simply entering 0 and 5 2 While all the displays on the control panel are lit 01 mode copying is disenabled When ...

Page 9: ... Paper exit SW detected paper FNCNT 0 Finisher unconnected APSR APS sensor input R Door sensor open SIZCL 2 SYZPF2 2 SSIZE 2 Front cover open PMTLK 0 POL MOT abnormal rotation ADCNT 0 ADF unconnected MMPLL MAIN MOT abnormal rotation APSC APS sensor input C Exit Reverse sensor SIZCL 1 SYZPF2 1 SSIZE 1 HTRDY 0 Heater lamp OFF CTRIN 0 Key counter unconnected PSTPR Paper feeding status signal DEVCNT 0...

Page 10: ...lifted up TDWNLC LCF tray lifted down TUPPF1 PFP upper tray lifted up TUPPF3 PFP lower tray lifted up PJAM1AD ADU Jam SW ON HTRTH 2 DRMTH 2 HTRDY2 2 PEMPCU Copier upper paper empty TUPLC LCF tray lifted up PEMPPF1 PFP upper paper empty PEMPPF3 PFP lower paper empty HTRTH 1 DRMTH 1 HTRDY2 1 PSTPCU Copier upper paper stopped PEMPLC LCF paper empty PSTPPF1 PFP upper paper stopped PSTPPF3 PFP lower pa...

Page 11: ...nsporting clutch ON OFF 3 PFP transporting clutch 204 Manual feed clutch ON OFF 3 222 ADU feed clutch ON OFF 3 223 ADU stack clutch ON OFF 3 225 PFP transporting clutch ON OFF 3 226 PFP upper cassette feed clutch ON OFF 3 227 PFP middle cassette feed clutch ON OFF 3 228 PFP lower cassette feed clutch ON OFF 3 241 Total counter count up count up only 2 242 Copier upper cassette tray motor lift UP 2...

Page 12: ...2 276 PFP middle cassette tray motor lift UP 2 277 PFP lower cassette tray motor lift UP 2 281 ADF pick up roller rotation ON OFF 3 282 ADF aligning roller rotation ON OFF 3 283 ADF transport belt CW rotation ON OFF 3 284 ADF transport belt CCW rotation ON OFF 3 401 Memory size of the PM board is checked 2 402 Reading Writing operation of the PM board is checked 2 Operation procedure group Group 1...

Page 13: ... This is remedied by turning the power OFF then ON again Code ASIC Test Pattern type 111 SARAH Primary scanning 33 gradation 2nd step error diffusion 113 SARAH Secondary scanning 33 gradation 2nd step error diffusion 142 HPS 2 dot grid pattern Pitch 10 mm 183 SARAH Primary scanning 33 gradation 2nd step dither process for fax 184 SARAH Secondary scanning 33 gradation 2nd step dither process for fa...

Page 14: ...ment ALL 58 0 255 2 304 Scanner secondary scanning reproduction ratio Standard PPC 128 0 255 If the value is increased by 1 1 the reproduction ratio of the paper feeding direction is en larged by approx 0 1522 305 Scanner secondary scanning deviation ALL 135 85 171 If the value is increased by 1 1 the image shifts approx 0 1213 mm to the trailing edge of the paper 306 CCD primary scanning deviatio...

Page 15: ...the primary scan ning direction 412 Laser starting position 400dpi GDI 96 0 255 If the value is increased by 1 5 the effective image data writing area on the drum is shifted by 0 0635 mm to the primary scan ning direction 421 Secondary scanning reproduction ratio main PPC 140 1 255 If the value is increased by 1 5 motor speed fine adjustment the reproduction ratio of the paper feeding direction is...

Page 16: ...r value PPC Photo 128 0 255 ter of the exposure indicator 502 Manual exposure fine adjustment Center value Standard 128 0 255 PPC Text 503 Reserved 504 Reserved 505 Manual exposure fine adjustment PPC 23 0 255 If the value is increased the 1 Light side step value Photo Text image is further lightened on 506 Manual exposure fine adjustment PPC 20 0 255 the light side of the exposure Light side step...

Page 17: ... 1 Photo Text 2nd digit 0 Use default value 621 HPF intensity setting PPC Photo 0 0 90 1 9 Change the intensity 622 HPF intensity setting PPC Text 0 0 90 If the value is increased sharpness is increased Initial Operation Code Adjustment Mode value Allowance Contents procedure group Note 3 Refer to 1 6 Note 4 Standard PPC Basic specification PPC Extended PPC Extended specification PPC brought by th...

Page 18: ...t Manual Adjustment Test copying is not available using the E S key in the duplex copy mode In this case the adjustment mode must be cleared by inputting 09 then duplex copying can be performed in the normal way Group 4 START PWR Code START Initializing Automatic adjustment Exit Ends in 2 seconds If it is not change 0 5 0 9 Group 5 PWR Code START FAX ADJUST INT When the output pattern selection is...

Page 19: ...tic power save ALL 0 0 15 0 Not functional 1 5 Setting value x 30 sec 6 3 min 7 4 min 8 5 min 9 7 min 10 10 min 11 15 min 12 20 min 13 30 min 14 45 min 15 60 min 206 Automatic power off ALL EUR 20 0 20 0 3 min 1 5 min 2 10 min 3 15 min UC 9 4 20 min 5 25 min 6 30 min 7 40 min 8 50 min 9 60 min 10 70 min 11 80 min 12 90 min 13 100 min 14 110 min 15 120 min 16 150 min 17 180 min 18 210 min 19 240 mi...

Page 20: ...unt at long size 404 Developer material counter ALL 0 0 999999 Synchronizes with the total counter Double count at long size 405 Drum potential control ALL 7 0 7 0 bit Grid potential temperature correction Counter correction 1 bit Grid potential life correction 2 bit Laser output drum life correction 406 Pre running starting time ALL 0 0 7 0 Not functional 1 30 sec 2 35 sec 3 40 sec 4 45 sec 5 50 ...

Page 21: ...C 128 0 255 Photo 460 ADF switchback ALL 0 0 1 0 Not functional 1 Functional 480 Cassette selection priority ALL 0 0 6 0 A4 LT 1 LCF 2 Copier upper cassette 3 Copier lower cassette 4 PFP upper cassette 5 PFP middle cassette 6 PFP lower cassette 483 Polygonal motor pre running ALL 0 0 1 0 Pre running 1 Deactivate 484 Polygonal motor stops at the autoclear ALL 0 0 1 0 Activate 1 Deactivate 501 Image...

Page 22: ...c sorting mode Extended 2 0 3 0 Not functional 1 Staple PPC 2 Sort 3 Group 642 Sorter mode priority selection Extended 0 0 3 0 NON SORT 1 STAPLE 2 SORT 3 GROUP PPC 645 Reproduction ratio adjustment in Extended 10 0 10 0 90 1 91 2 92 3 93 4 94 5 95 editing mode PPC 6 96 7 97 8 98 9 99 10 100 646 Arrangement of the page connection Extended 0 0 1 0 Cornering 1 Centering PPC 649 Magazine sort Extended...

Page 23: ...codes registered is keyed in Preparation to enter the access control mode Procedure to register ID codes Procedure to change ID codes START INT PWR START E S To correct PWR displayed Memorizing 0525 000000 displayed START Up to 40 ID codes can be registered displayed START 0525 001960 displayed E S displayed Memorizing E S PWR To skip To clear 0525 001960 Next ID code displayed Key in 000000 To ca...

Page 24: ...e above display indicates an output voltage of 2 30V C Indicates the latest adjustment value The drum developer unit etc are operating at this time 4 After approximately two minutes the B displays on the message display will automatically begin to change Procedure Use code 200 in the 05 mode 1 Install the process unit to the copier main blade contacts with drum 2 Press the keys 0 and 5 at the same...

Page 25: ...o adjust the numerical values manually to within the range of 235 245 Note The relationship between the ZOOM keys and the numerical values in A and B is as shown below Key used A value B value ZOOM up key Increase Increase ZOOM down key Decrease Decrease 8 Press the INTERRUPT key The drum developer unit etc will stop operating and the following display will appear 9 Turn off the power switch Insta...

Page 26: ... suit the user s preferences while comparing the image obtained in the test copy and the currently entered allowable values Keys used in operation Display messages PWR Digital keys Enter code START Digital keys Enter adjustment value used to correct value INTERRUPT ENERGY SAVER Test copy Return to 1 to repeat adjustment Adjustment mode canceled Code becomes xxx according to the entered code Code N...

Page 27: ...ition 600 dpi PPC 410 c Secondary scanning reproduction ratio Main motor speed fine adjustment 421 d Secondary scanning position Registration 441 440 442 445 3 Scanner unit adjustment a Primary scanning reproduction ratio Polygonal motor 600 dpi PPC 400 b Primary scanning position CCD primary scanning deviation 306 c Secondary scanning reproduction ratio Scanner secondary scanning reproduction rat...

Page 28: ...e of single sided originals can be made with the ENERGY SAVER key Keys used in operation Display message PWR Digital keys Enter code START Digital keys Enter adjustment value used to correct value INTERRUPT ENERGY SAVER test print If the test print does not satisfy the specifi cations return to 1 and repeat the adjustment Adjustment mode canceled Code becomes xxx according to the entered code Code...

Page 29: ...re can be used Void 50 100 mm New value Notes 1 When frequent paper jams occur near the aligning roller caused by using special thin paper other than that specified the aligning value can be changed reduced as a measure However when the aligning value is reduced excessively this may possibly cause the registration to be shifted Therefore make sure that no registration shifting occurs while adjusti...

Page 30: ...ART Set the value INT Print movement direction PWR 15 5 A 1 1 FAX 2 Measure the distance A which is the distance between the 5th line and 15th line from the bottom end of the test print paper against the direction of the paper movement 0 5 1 Notes 1 An increase in the value lengthen the distance A 2 In order to make a test print make sure the message indicates 100 A after the INT key is pressed 3 ...

Page 31: ... print paper to the 6th line 3 In order to set the distance B to 52 mm adjust as follows 1 Notes 1 An increase in the value makes the distance B longer 0 0423 mm step 2 In order to make a test print make sure the message indicates 100 A after the INT key is pressed 3 Adjustment value is able to be input within the range of 0 255 The default adjustment value is 80 FAX Set the value INT 1 START Prin...

Page 32: ...ine and 15th line from the leading edge of the test print paper 0 5 1 3 In order to set the distance C to 100 mm adjust as follows 1 Notes 1 An increase in the value lengthen the distance C 0 0315 step 2 In order to make a test print make sure the message indicates 100 A after the INT key is pressed 3 Adjustment value is able to be input within the range of 1 255 The default adjustment value is 14...

Page 33: ...tep 2 In order to make a test print make sure the message indicates 100 A after the INT key is pressed 3 Adjustment value is able to be input within the range of 0 15 Default adjustment value is 8 In case of the lower cassette feeding Code 441 adjustment value is within the range of 0 40 Default adjustment value is 13 4 Since the lower cassette adjustment value becomes a standard for all adjustmen...

Page 34: ...ale 3 In order to correct the copied image to the scale adjust as follows Notes 1 An increase in the value corresponds to an increase in the division of the scale 0 225 step 2 In order to make a test copy make sure the message indicates 100 A after the INT key is pressed 3 Adjustment value is effective within the range of 114 142 The default adjustment value is 128 Copy movement direction START Se...

Page 35: ...the distance E which should be 100 mm from the position copied to the bottom of the paper adjust as follows Notes 1 An increase in the value makes the image shift to the paper edge 0 0423 mm step 2 In order to make a test copy make sure the message indicates 100 A after the INT key is pressed 3 Adjustment value is able to be input within the range of 5 251 The default adjustment value is 85 E 100 ...

Page 36: ...er to adjust the divisions of the scale do as follows Notes 1 An increase in the value corresponds to an increase in the division of scale 0 1522 step 2 In order to make a test copy make sure the message indicates 100 A after the INT key is pressed 3 Adjustment value is able to be input within the range of 0 255 The default adjustment value is 128 START Set the value INT 0 5 3 1 3 PWR START INT In...

Page 37: ...istance F which should be 42 0 5 mm from the leading edge of the paper adjust as follows Notes 1 An increase in the value makes the image move to the trailing edge 0 1213 mm step 2 In order to make a test copy make sure the message indicates 100 A after the INT key is pressed 3 Adjustment value is able to be input within the range of 85 171 The default adjustment value is 135 Copy movement directi...

Page 38: ...for 2 mm from the leading edge of the paper adjust as follows Notes 1 An increase in the value makes the image move to the leading edge of the paper 0 1213 mm step 2 In order to make a test copy make sure the message indicates 100 A after the INT key is pressed 3 Adjustment value is able to be input within the range of 128 255 The default adjustment value is 128 5 10 Copy movement direction 0 5 3 ...

Page 39: ...owing procedure Notes 1 An increase in the value corresponds to an increase in the blank image 0 0423 mm step 2 In order to make a test copy make sure the message indicates 100 A after the INT key is pressed 3 Adjustment value is able to be input within the range of 94 255 The default adjustment value is 0 4 In order to input a minus value use the key ex if the value is 15 key in 1 5 Copy movement...

Page 40: ...following procedure Notes 1 An increase in the value corresponds to an increase in the blank image 0 0423 mm step 2 In order to make a test copy make sure the message indicates 100 A after the INT key is pressed 3 Adjustment value is able to be input within the range of 94 255 The default adjustment value is 0 4 In order to input a minus value use the key ex if the value is 15 key in 1 5 Copy move...

Page 41: ... paper for the output paper size 3 Press the 2 key and then FAX key One copy of the 33 gradation pattern is outputted 4 Confirm that there is no blank or line on the gradation pattern outputted in the above step 3 and the density changes gradually If there is any problem in the gradation pattern repeat the step 3 to output a gradation pattern again 5 Face the dense side of the output gradation pat...

Page 42: ...Digital keys START Select the casette Prints out the 33 gradation pattern Place the original Input the code Starts the adjustment Ends the adjustment Clear the adjustment error Return to 1 to repeat adjust ment Exit the adjustment mode TEST MODE WAIT WARMING UP COPYING TEST MODE WAIT TEST MODE TEST MODE ERROR Abnormal Clear using C S key Normal Warming up ...

Page 43: ...djustment value Values zzz are stored in BC RAM in place of YYY Notes 1 Only one copy of single sided originals can be made 2 Duplex copying and memory copying cannot be carried out Make test copies in these modes after canceling the adjustment mode TEST MODE TEST MODE TEST MODE COPYING 1 7 Sharpness HPF Adjustment If the user wants to change the image sharpness to softer or harder adjust the HPF ...

Page 44: ...5 590 591 592 Standard PPC Gamma slope correction 593 594 595 Extended PPC Gamma slope correction Code Image mode Adjustment item Remarks Photo Text Photo Text If the value is increased the image is darkened Center value is 5 If the value is increased the image is darkened Center value is 5 Input procedure of the adjustment value is same as the 1 4 image density adjustment ...

Page 45: ...red cable of Current measuring jig Connect to the white cable of the current measuring Jig frame grounding DC AC 1 000 V 2V Use a digital tester having an input resistance of 10 MΩ RMS value or more Developer Bias Main Charger Transfer Separation Use the door switch jig Remove from the copier Not use Mount on the machine with a current measuring jig NOTES 1 Connect the green code of the current me...

Page 46: ...cale Remarks Use door switching jig How to turn the power ON Pre cleaning Discharge Machine frame frame grounding Red White e terminal d terminal Shaft jig Cleaner Bracket Digital Tester Current measuring jig Current measuring jig Shaft fastening jig Refer to 1 9 3 for detailed mounting method Jig detection connector Brown Dev unit connector of the copier Jig detection connector ...

Page 47: ...ctor of the shaft jig and the connector of the developer unit on the machine are not connected high voltage adjustment codes are not accepted except the developer bias adjustment When the developer bias is to be measured nothing should be connected to the connector of the developer unit on the machine 4 The measurement value of the developer bias varies according to the input resistance of the dig...

Page 48: ...INT Value YYY after adjustment is stored to BC RAM To switch to other adjustment modes return to 1 Adjustment mode canceled Main Developer Transfer charger bias High Center Low Code 210 205 220 221 222 Adjustment Input 100MΩ 642 5V 450 5V 409 67mV 298 64mV 150 60 37mV value resistance 10MΩ 642 5V 420 5V 409 67mV 298 64mV 150 60 37mV Code No Current entried adjustment value 1 Separation Pre cleanin...

Page 49: ...e drum Is the developer unit rotating during copying Is the toner density low Is the copy paper bending as it is being fed in Is the copy paper abnormally moist Is the aligning roller rotating normally Is the transfer guide bias outputing Is the separation output deviating from the set value Is the developer bias an appropriate value Is the transfer separation charger case earthed Is the photosens...

Page 50: ... Is the transfer separation charger case earthed Is the transfer separation transformer earthed Caution during Adjustment 1When defective separation occurs Increase the separation output value under the following conditions However note that if the sepa ration output value is raised too far pockmarks will occur and separation performance will be re duced Adjustment code 230 If defective separation...

Page 51: ...to the machine frame Notes 1 Move the current measuring jig to the center of the cleaner unit 2 Use care to prevent damage to the edge of the separation claws 3 High voltage adjustment is rejected if the jig detection connector is not connected except the developer bias adjustment 1 Attach the bracket and the round terminal of the brown cord from the jig detection connector in common 1 screw to th...

Page 52: ... pressing carriage 2 against the exit side frame both A B tighten the carriage 2 fix ing screws front side 4 Also while pressing carriages 1 and 2 against the exit side frame C D tighten the car riage 1 fixing screws 1 10 1 Wire tension adjustment 1 For this model it is unnecessary to adjust the carriage drive wire tension Carriage 2 Carriage 1 Rear side view Tension spring Pulley D C B A Belt Wir...

Page 53: ...p 2 Wind the wire to the each front and rear side pulleys Winding turns are 6 turns on the opposite to the boss side out side of the pulley 1 turn on the boss side inside After wind ing secure the wire with the wire holder jig Spherical terminal 6 t u r n s Hook Front side 1 t u r n Pulley Front Pulley Rear 1 t u r n 6 t u r n s Spherical terminal Rear side Hook Spherical terminals Front Rear Wire...

Page 54: ... leave any gap between the wraps 2 When the wire holder jig is installed do not slide or loosen the wound wire 3 The wire holder jigs are the same for the front and rear sides Be careful when installing the jig The jigs will not installed if its installation di rection is wrong it is floating on the pulley In full contact Example Front side Spherical terminal Installation phase Pulley Wire holder ...

Page 55: ... paper movement Direction of the copy paper movement A B Image A B If inclination of the image occurs even though the edge of the original is properly aligned with the scale adjust by moving the original scale In case of A Move the original scale in the direction indicated by In case of B Move the original scale in the direction indicated by ...

Page 56: ... the original glass Adjustment order step 1 step 2 Step 1 In case of A Tighten the mirror 2 adjustment screw CW Go to C In case of B Loosen the mirror 2 adjustment screw CCW Go to D Image A B D Mirror 2 Direction of the copy paper movement Direction of the copy paper movement Step 1 Step 2 C ...

Page 57: ...2460 ADJUSTMENT 1 54 September 1997 TOSHIBA CORP Step 2 In case of C Tighten the mirror 1 adjustment screw CW Normal image In case of D Loosen the mirror 1 adjustment screw CCW Normal image Mirror 1 ...

Page 58: ...It is impossible to adjust the lens unit Replace the entire unit with a new one Notes 1 Do not touch the screws H paint lock 7pcs when replacing the lens unit 2 Take sufficient care when handling the unit not to hold the adjustment portion Front side Rear side Lens ...

Page 59: ...w of the adjustment plate and move the plate according to the stamped mark on the plate as a guide line to make adjust ment As this is already adjusted with a special jig at the time of shipping from the factory do not loosen the screw unnecessarily When loosening the screw for disassembly etc remember the position of the adjustment plate and reinstall it where it was During the replacement of the...

Page 60: ...that step 0 40 can move smoothly in the front and rear direction in the gap between the sleeve and leveler while step 0 50 can not be inserted 5 Reassemble the upper cover of developer unit Notes 1 Align the position of sleeve marking with that of the leveler when checking or adjusting the gap between the sleeve and the leveler 2 When assembling the upper cover fasten the hooks with a screw after ...

Page 61: ... make adjustment as follows After stacking sheets of paper on the stack guide check that the gap between the side stopper and the edge of the sheet is 1 5 1 mm To adjust the gap loosen the side switch bracket fixing screw Move the bracket according to the scale After moving the bracket initialize the ADU Check the gap between the side guide and the paper Stacked sheets Side guide 1 5 1 mm Side gui...

Page 62: ...If the center of the image is shifted toward the rear side move the ADU front cover to the rear side the same distance as the image is shifted and tighten the screw 3 If the center of the image is shifted toward the front side move the ADU front cover to the front side the same distance as the image is shifted and tighten the screw Front left side Front right side 1 17 Adjusting Cassette Side Devi...

Page 63: ...to those made previously 2 2 Inspection and Overhaul every 240 000 Copies 1 Replace all the consumables 2 Check to see if there is any damage to the parts of driving section gear pulley timing belt etc Replace parts on principle if damaged 3 Check to see if there is any damage or peeling of adhered parts tape Mylar sheet etc Replace any affected parts 4 Check to see if all the switches and sensors...

Page 64: ...Mirror 3 Z 15 Reflector Z Optical 16 Lens Z system 17 Exposure lamp Z 18 Copy area indicator Z 19 APS Z Z 20 Slider sheet front rear Z or A 21 Air filter Z 6 22 Case Z 7 Charger 23 Charger wire 80 Z 7 24 Terminal contact Z 25 Grid Z 160 8 26 Overall unit Z Develop 27 Developer material 80 9 er unit 28 Front shield Z 10 29 Guide roller Z or A Laser op 30 Slit glass Z tical unit 31 Pick up roller A ...

Page 65: ... Scraper for P R Z or P 49 Heat roller cleaning blade A 15 50 H R drive gear S tooth faces and idler shafts 51 GCB bushing L Drive including main motor section system paper feed section and fuser unit 52 Main motor drive unit gears W 16 53 Toner cartridge drive W gear shaft ADU Item to check Area Remarks Clean at Lubricate Replace Check 80 000 copies x 1 000 while on 71 Pick up roller 80 72 Feed r...

Page 66: ... 2 4 September 1997 TOSHIBA CORP Front sectional view 12 15 17 18 20 19 13 9 14 33 32 39 10 16 22 23 24 25 26 2 4 6 38 71 76 78 75 79 49 22 23 24 43 44 41 46 47 45 48 40 42 7 8 36 37 35 3 77 27 30 28 29 53 31 72 73 74 ...

Page 67: ...September 1997 TOSHIBA CORP 2 5 2460 MAINTENANCE Rear side view 21 50 52 34 34 ...

Page 68: ...nal glass at the same time If the shading board is stained a white band may occurr on the copy movement direction Do not touch the surface of the shading board with your bare hand after cleaning 6 Air filter If the air filter is dirty replace it 7 Charger wire and case Clean the inner surface of the charger case and the charger wire with a cloth which should be soaked in water and then squeezed ti...

Page 69: ...BA CORP 2 7 2460 MAINTENANCE 15 Heat roller cleaning blade Refer to section 3 6 Checking and Cleaning Heat Roller Cleaning Blade of this Service Handbook 16 Apply white grease to the main motor drive unit gears shown arrow ...

Page 70: ...s that in the Periodic Inspection Check List Note Do not apply oil to the rollers belt and belt pulley 2 5 Replacement Schedule of Disposable Parts and Supplies The number is the same as that in the Periodic Inspection Check List Replacement Cycle Number of copies x 1000 Number Part Name Code 2 Main cleaning blade BL 2460 80 22 4 3 Toner bag TB 2460 20 24 3 6 Drum separation claw 80 22 33 8 Drum O...

Page 71: ...ENANCE 2 6 Jig List Name Door switch jig 101 1 Developer nozzle jig 101 7 Grid cleaning pad 101 6 Wire holder jig 101 3 Doctor sleeve jig 101 4 Developer unit cap jig 101 2 Current measuring jig 101 10 Drum shaft jig 101 5 Parts List Page Item ...

Page 72: ...torage bag During wet or winter seasons where the temperature varies much from high to low due to room heating etc or where the humidity is high pull out the cassette from the machine and put it together with the paper inside in a storage bag upon the completion of copying for the day Also instruct the users to do the same 3 2 Inspection and Cleaning OPC Drum A Precautions for Handling 1 Use of gl...

Page 73: ...s or nails Also remove your ring and wristwatch before starting cleaning work to prevent accidental damage to the drum Be sure not to use alcohol selenium refresher and other organic solvents or silicone oil as they will have an undesirable effect on the drum 5 Scratches on OPC Drum Surface If a scratch exists on the surface through which the aluminum substrate can be seen no copy image will be pr...

Page 74: ...aluminum substrate is easily damaged and if damaged will result in poor drum cleaning B Lower Pressure Roller 1 Do not leave oil fingerprints etc on the roller surface 2 Checking 1 Check for staining and damage to the heat roller and clean or replace if necessary 2 Clean the separation claws and check for chipped claws 3 Check for cleaning condition of cleaning felt roller 4 Check the thermistor f...

Page 75: ...nd Cleaning Heat Roller Cleaning Blade 1 Precautions for Handling Do not allow a hard object to hit on or rub against the blade edge 2 Checking When the blade edge becomes dirty clean it with a cloth soaked in alcohol If the cleaning blade is damaged replace it ...

Reviews: