English
Connecting your TV
The HDMI input is designed for best
performance with 1080i (0/60 Hz) and 1080p
(50/60 Hz) high-definition video signals, but will
also accept and display 6i/ p, 0p (0Hz);
80i/p, 0p (60 Hz: except for E-EDID) signals.
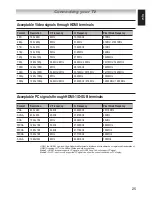
Please see “Acceptable Video signals through
HDMI terminals“ on page .
HDMI:
High-Definition Multimedia Interface
DVI:
Digital Visual Interface
HDCP:
High-bandwidth Digital Content
Protection
CEA-861-D
compliance covers the
transmission of uncompressed digital
video with high-bandwidth digital content
protection, which is being standardized for
reception of high-definition video signals.
Because this is an evolving technology,
it is possible that some devices may not
operate properly with the TV.
E-EDID:
Enhanced-Extended Display
Identification
Acceptable PC signal format:
please see
“Acceptable PC signals through HDMI-1/D-
SUB terminals“ on page .
However, these signal formats are converted to
match the number of pixels of the LCD panel.
Therefore, the TV may not display small text
properly.
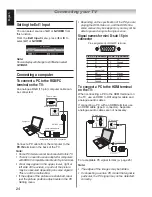
If you connect this unit to your PC, the
compressed image is displayed in S-XGA
mode, therefore the picture quality may
deteriorate and characters may not be read.
•
•
•
•
•
•
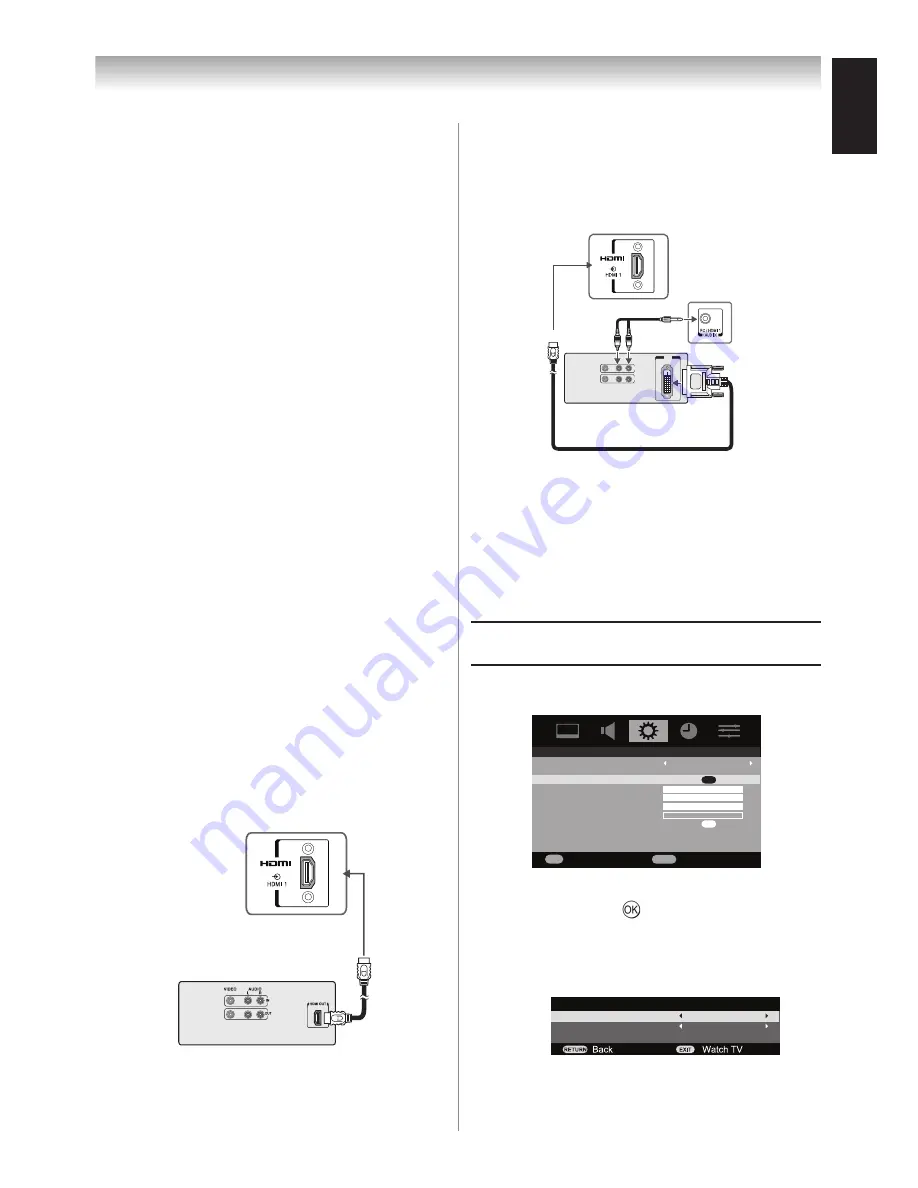
Connecting.an.HDMI.device
One HDMI cable (type A connector)
TV back view
HDMI device
For proper operation, it is recommended that
you use a short HDMI cable.
HDMI cable transfers both video and audio.
Connecting.a.DVI.device
One HDMI (type A connector)-to-DVI adapter
cable and an audio cable.
VIDEO
AUDIO
L
R
IN
OUT
DVI
OUT
TV back view
TV back view
HDMI (type A connector)-to-DVI adapter cable
For proper operation, the length of an HDMI-to-
DVI adapter cable should not exceed m. The
recommended length is m.
Standard analogue audio cables
An HDMI-to-DVI adapter cable transfers only video.
Separate analogue audio cables are required.
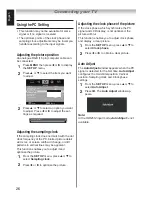
Setting.the.HDMI1.audio.mode
1
Press
MENU
then press
t
or
u
to display
the
SET UP
menu.
SET UP
Language
Automatic Power Down
AV connection
Horizontal position
Vertical position
Sampling clock
Clock phase
Auto Adjust
100
100
100
0
English
Off
OK
OK
RETURN
Back
OK
Enter
2
Press
p
or
q
to select
AV connection
,
and then press to display the
AV con-
nection
menu.
3
Press
t
or
u
to select
Auto
,
Digital
or
Analogue
.
AV connection
HDMI1 audio
EXT1 input
Auto
AV


