background image

TV operation

30

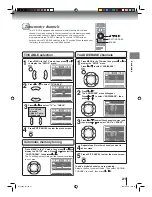
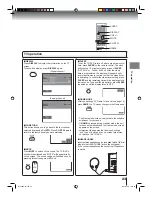
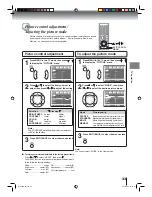
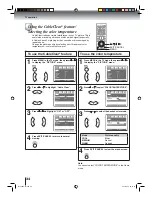
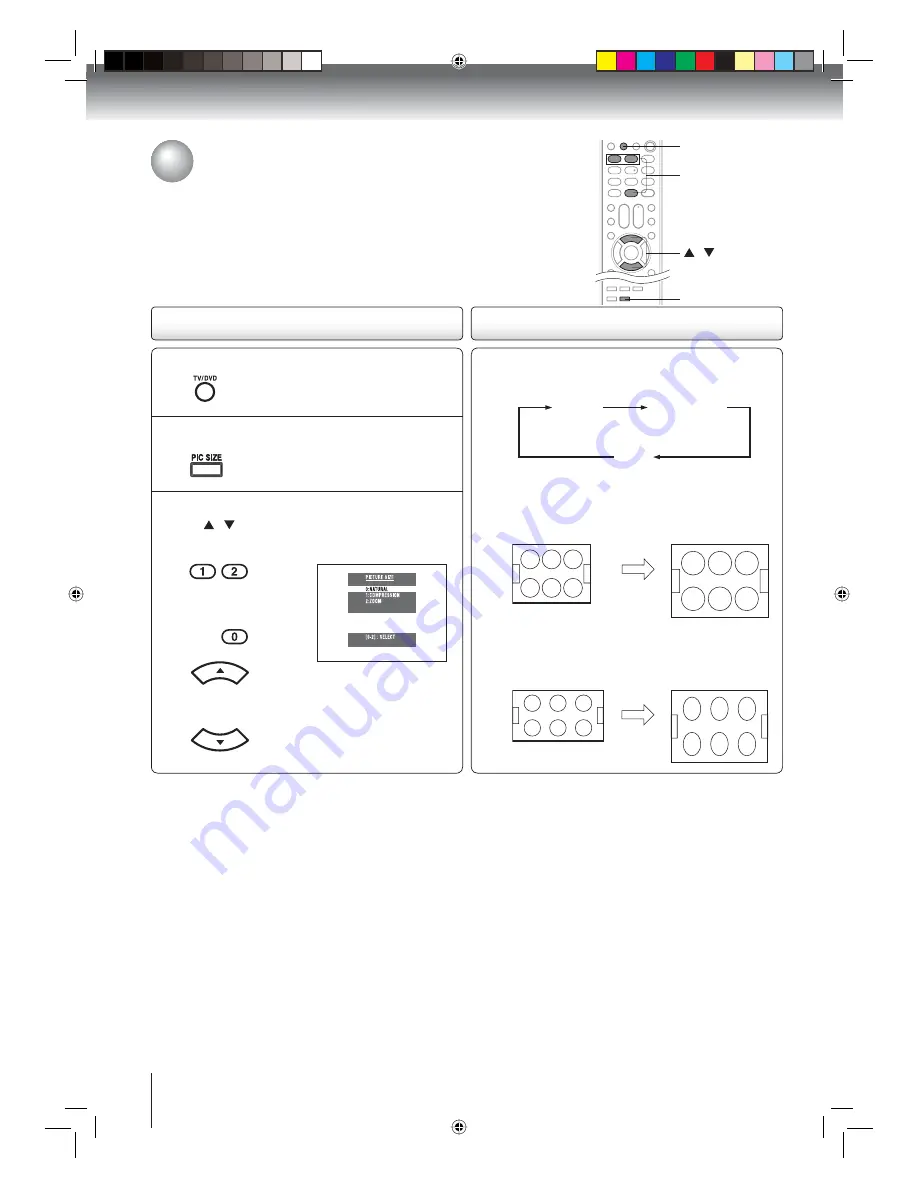
Press the corresponding number button (0-2) 
or   /   button to select the desired picture 
size, as described on the right and on page 31.

1

3

Press TV/DVD to select the TV mode.

Press PIC SIZE repeatedly on the remote control 
to cycle among the three picture sizes, as 
described below.

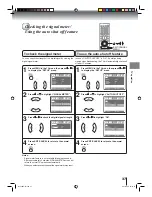
To select the picture size

Press PIC SIZE on the remote control.

2

Viewing the wide-screen picture formats

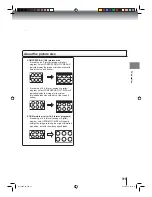
You can view programs in a variety of picture sizes—NATURAL (4:3), 
COMPRESSION (16:9), ZOOM. The way the image displays in any of the 
picture sizes will vary depending on the format of the program you are viewing. 
Select the picture size that displays the current program the way that looks 
best to you.

About the picture size

TV/DVD

PIC SIZE

 / 

0-2

NATURAL (4:3) picture size

•  If receiving a 4:3 format (analog or digital) program, 
 select 

NATURAL PIC SIZE will typically display the  

 image 

in its original formatted proportion.

•  If receiving a 16:9 format (analog or digital)    
  program, select NATURAL PIC SIZE will typically
  display the image stretched taller (squeezed.)

NATURAL

COMPRESSION

ZOOM

Book 5Z0-01.indb   30

Book 5Z0-01.indb   30

9/11/2549   16:15:10

9/11/2549   16:15:10

Summary of Contents for 15DLV77 - 15" LCD TV

Page 1: ...ck Advanced playback Function setup 61 Others 22 TV operation 2007 Toshiba Corporation Before operating the unit please read this manual thoroughly 15 inch Diagonal LCD TV DVD COMBINATION Screen size is approximate Book 5Z0 01 indb 1 Book 5Z0 01 indb 1 9 11 2549 16 14 50 9 11 2549 16 14 50 ...

Page 2: ...n If this equipment does cause harmful interference to radio or television reception which can be determined by turning the equipment off and on the user is encouraged to try to correct the interference by one or more of the following measures Reorient or relocate the receiving antenna Increase the distance between the equipment and receiver Connect the equipment into an outlet on a circuit differ...

Page 3: ... plug A polarized plug has two blades with one wider than the other A grounding type plug has two blades and a third grounding prong The wide blade or the third prong are provided for your safety If the provided plug does not fit into your outlet consult an electrician for replacement of the obsolete outlet 10 Protect the power cord from being walked on or pinched particularly at plugs convenience...

Page 4: ... leave the TV unattended or unused for long periods of time 32 During normal use the TV may make occasional snap ping or popping sounds This is normal especially when the unit is being turned on or off If these sounds become frequent or continuous unplug the power cord and contact a Toshiba Authorized Service Center SAFETY INSTRUCTIONS Continued Care cont from previous column 33 Keep your fingers ...

Page 5: ...re not an indication of malfunction therefore Toshiba is not responsible for perceived defects resulting from these symptoms 1 An after image ghost may appear on the screen if a fixed non moving image is displayed for a long period of time The after image is not permanent and will disappear in a short period of time 2 The LCD panel contained in this TV is manufactured using an extremely high level...

Page 6: ...umber which is called title number chapter number or track number respectively There may be discs that do not have these numbers Example of moisture condensation Optical pick up lens Notes on moisture condensation Moisture condensation damages the unit Please read the following carefully Moisture condensation occurs for example when you pour a cold drink into a glass on a warm day and drops of wat...

Page 7: ...isplay a message on screen Some DVDs that have no region code label may still be subject to area restrictions and therefore not playable On Video CDs This unit supports Video CDs equipped with the PBC Version 2 0 function PBC is the abbreviation of Playback Control You can enjoy two playback variations depending on types of discs Video CD not equipped with PBC function Version 1 1 Sound and movie ...

Page 8: ...djustment 35 Stereo and Second Audio Program SAP 35 Selecting the audio languages 36 Selecting the digital output 36 Checking the signal meter 37 Using the auto shut off feature 37 Basic playback Playing a disc 38 Advanced playback Zooming 41 Locating desired scene 41 Marking desired scenes 42 Repeat playback 43 A B Repeat playback 43 Program playback 44 Random playback 44 Changing angles 45 Title...

Page 9: ...Introduction 9 Top Identification of controls Speaker Front POWER indicator Remote sensor Book 5Z0 01 indb 9 Book 5Z0 01 indb 9 9 11 2549 16 15 01 9 11 2549 16 15 01 ...

Page 10: ...t Side Right Side Antenna jack AUDIO IN L R LINE 2 IN jacks VIDEO IN LINE 2 IN jack Disc slot Approx 10 S VIDEO IN LINE 1 IN jack Rear Approx 3 AUDIO IN L R LINE 1 IN jacks COAXIAL DIGITAL AUDIO OUT jack HEADPHONE jack VIDEO IN LINE 1 IN jack EJECT button PLAY button STOP button CHANNEL buttons VOLUME buttons POWER button ColorStream HD VIDEO IN Y PB PR jacks Book 5Z0 01 indb 10 Book 5Z0 01 indb 1...

Page 11: ...P button 41 22 Direct channel selection button 100 AUDIO SELECT button 46 MUTE button 23 45 EXIT CANCEL button 20 25 SKIP button 40 STOP button 39 40 REPEAT A B button 43 PIC SIZE button DC LWB1 30 ENTER button 20 24 SLEEP button 23 DVD MENU button 22 VOL button 20 SLOW button MARKER button 45 42 ANGLE button CH button FAV button Remote control The instructions in this manual describe the function...

Page 12: ... disposed of with the environment in mind Always dispose of batteries in accordance with applicable laws and regulations If the remote control does not operate correctly or if the operating range becomes reduced replace batteries with new ones When necessary to replace batteries in the remote control always replace both batteries with new ones Never mix battery types or use new and used batteries ...

Page 13: ...ot supplied Connect the VHF 300 ohm twin lead wire to the 300 75 ohm matching transformer notsupplied Attachthetransformertothecombiner then attach the combiner to the antenna jack on the back of the TV DVD Connect the VHF 75 ohm cable and UHF 300 ohm twin lead wire to the combiner not supplied Attach the combiner to the antenna jack on the back of the TV DVD Combination VHF UHF antenna Separate V...

Page 14: ...es the use of a converter descrambler box connect the incoming 75 ohm coaxial cable to the converter descrambler box Using another 75 ohm coaxial cable connect the output jack of the converter descrambler box to the antenna jack on the TV DVD Follow the connections shown below Set the TV DVD to the output channel of the converter descrambler box usually channel 3 or 4 and use the converter descram...

Page 15: ... component s Owner s Manual for additional information Interactive video games that involve shooting a gun type of joystick at on screen target may not work on this TV DVD Signal flow Signal flow Signal flow Using the audio video inputs Press INPUT to view a signal from another device connected to your TV such as a VCR or DVD player You can select ANT VIDEO1 on the left side VIDEO2 on the back pan...

Page 16: ...cture quality and performance Select the ColorStream HD by pressing INPUT repeatedly Rear lower right of the TV Ex DVD player with Component video Audio cable not supplied Component video cable not supplied To Audio L R OUT To Component Video OUT To AUDIO L R IN To ColorStream HD Y PB PR IN When using the Component video cable an Audio cable must be connected to AUDIO IN L R LINE 2 IN jacks Notes ...

Page 17: ...f Dolby Laboratories Amplifier equipped with a Dolby Digital decoder To COAXIAL type digital audio input Connecting to an amplifier equipped with a DTS decoder Digital Theater Systems DTS DTS is a high quality surround technology used in theaters and now available for home use on DVD video discs or audio CDs If you have a DTS decoder or processor you can obtain the full benefit of 5 1 channel DTS ...

Page 18: ...ic range Be sure to adjust the receiver s volume to a moderate listening level Otherwise the speakers and your hearing may be damaged by a sudden high volume sound Turn off the amplifier before you connect or disconnect the TV DVD s power cord If you leave the amplifier s power on the speakers may be damaged Amplifier equipped with an MPEG2 audio decoder To COAXIAL type digital audio input 75 Ω co...

Page 19: ...elect START then press ENTER Press or to select TV or CABLE then press ENTER If you select CANCEL and press ENTER the STARTING SETUP stops and changes to the TV screen After the starting setup is completed the TV channel appears on the screen Notes The starting setup function will work only when you press POWER for the first time The process of CH PROGRAM may take 15 to 30 minutes to complete depe...

Page 20: ...ction also has its own menu 54 Press MENU in the TV mode then press or to display the SETUP menu 2 Press EXIT CANCEL to clear the menu screen 3 Setting the language This TV DVD can display the on screen language in English Spanish or French in the TV mode Select the language you prefer first then proceed with the other menu options Setting the language Basic setup 1 MENU EXIT CANCEL ENTER Book 5Z0...

Page 21: ... in the CABLE position To ADD ERASE channels Press MENU in the TV mode then press or to display the SETUP menu Press or to select the CH PROGRAM then press or The TV will begin memorizing all the channels available in your area Automatic memory tuning Press or The ADD ERASE menu will appear Press or to select ADD ERASE then press or 2 Press or to select the channel you want and then press or to se...

Page 22: ... Example to select channel 120 press 120 TO SELECT DIGITAL CHANNELS Press the first 3 digits then press the 100 button followed by the remaining 3 digits Example to select channel 015 001 press 015 001 4 Notes If a channel with no broadcast is selected the sound will automatically be muted Digital channels may be represented by channel numbers that include a dash e g 85 002 These digital channel n...

Page 23: ...ep timer is operating To confirm the sleep timer setting press SLEEP and the remaining time will be displayed for a few seconds To cancel the sleep timer press SLEEP repeatedly until the display turns to OFF GAME MODE After connecting a TV Game to the unit see page 15 press GAME The TV screen changes to the Game mode The Game mode screen is adjusted to the suitable brightness for your eyes If GAME...

Page 24: ...Repeat steps 1 5 for up to 12 channels 5 5 Note Repeat steps 1 6 for the other channels TV operation 0 9 100 To select your favorite channels Press the FAV buttons on the remote control to select your favorite channels The FAV buttons will not work until you have programmed you favorite channels Press or to highlight SET and press ENTER Press EXIT CANCEL to return to normal viewing 3 Press or to d...

Page 25: ...f the primary language in your area Note If the program or video you selected is not closed captioned no captions will display on screen To view text select T1 or T2 2 Press or to highlight DIGITAL CAPTION 3 Press or to select the desired Closed Caption mode 4 Press EXIT CANCEL to return to normal viewing Important Note If text is not available in your viewing area a black rectangle may appear on ...

Page 26: ...mong the following items and parameters TEXT SIZE AUTO SMALL STANDARD LARGE TEXT TYPE AUTO DEFAULT MONO W SERIF PROP W SERIF MONO W O SERIF PROP W O SERIF CASUAL CURSIVE SMALL CAPITALS TEXT COLOR AUTO BLACK WHITE RED GREEN BLUE YELLOW MAGENTA CYAN TEXT EDGE AUTO NONE RAISED DEPRESSED UNIFORM LEFT DROP SHADOW RIGHT DROP SHADOW BACKGROUND COLOR AUTO BLACK WHITE RED GREEN BLUE YELLOW MAGENTA CYAN Pre...

Page 27: ...eat steps 1 3 in To register password on left then press or to select NEW PASSWORD then press or 1 Enter the same password again using Number buttons 0 9 for safety then press ENTER 3 Press EXIT CANCEL to clear the menu screen 4 Note The V Chip feature is available only for the U S V Chip system The Canadian V Chip system is not supported Press or New password entering screen appears Enter the pas...

Page 28: ... ON MOVIE RATING is set OFF MOVIE RATING is not set G All ages PG Parental guidance PG 13 Parental guidance less than 13 years old R Under 17 years old Parental guidance suggested NC 17 17 years old and above X Adult only Press or to highlight ON Now your settings are set into the memory 7 8 To use after the TV is protected When you try to view a program with a ratings block a message will appear ...

Page 29: ... Chip rating information and system are not determined or controlled by the TV or Toshiba The standard V Chip rating system is available whether your TV is receiving a digital signal or not and will block both analog and digital programs To set program blocking using the standard V Chip rating system select V CHIP SET in step 1 above see page 28 for details The downloadable V Chip rating system is...

Page 30: ... 16 9 ZOOM The way the image displays in any of the picture sizes will vary depending on the format of the program you are viewing Select the picture size that displays the current program the way that looks best to you About the picture size TV DVD PIC SIZE 0 2 NATURAL 4 3 picture size If receiving a 4 3 format analog or digital program select NATURAL PIC SIZE will typically display the image in ...

Page 31: ...analog or digital program select COMPRESSION PIC SIZE will typically display the image in its original formatted proportion with bars at the top and bottom ZOOM picture size for 16 9 format programs If receiving a 16 9 format analog or digital program select ZOOM PIC SIZE will typically enlarge the image retaining the original formatted proportion but with the sides edges hidden Book 5Z0 01 indb 3...

Page 32: ...onent video inputs on the TV DVD the CINEMA MODE feature may not work This is not a malfunction Selecting the cinema mode To set the CINEMA MODE 1 2 3 4 Press or to select FILM or VIDEO Press MENU in the TV mode then press or to display the SETUP menu Press or to highlight CINEMA MODE Press EXIT CANCEL to return to normal viewing MENU EXIT CANCEL Book 5Z0 01 indb 32 Book 5Z0 01 indb 32 9 11 2549 1...

Page 33: ...rol adjustment To adjust the picture mode Press MENU in the TV mode then press or to display the PICTURE menu 1 2 Note You cannot select MODE in the Game mode Press EXIT CANCEL to clear the menu screen Press EXIT CANCEL to clear the menu screen Note The CONTRAST default setting is set to maximum 50 at the factory MENU EXIT CANCEL Selection Pressing BRIGHTNESS CONTRAST COLOR TINT SHARPNESS darker l...

Page 34: ...COOL MEDIUM WARM Bluish Neutral Reddish MENU EXIT CANCEL Press MENU in the TV mode then press or to display the PICTURE menu Press or to highlight Cable Clear Press or to highlight ON or OFF 4 Press EXIT CANCEL to return to normal viewing CableClear reduces visible interference in your TV picture This is useful when receiving a broadcast with a weak signal especially a Cable channel or playing a v...

Page 35: ...lect STR STEREO SAP or MONO BASS Press or to adjust the bass sound TREBLE Press or to adjust the treble sound BALANCE Press or to obtain an equal sound level from both speakers STABLE SOUND Press or to select ON or OFF ON The StableSound feature limits the highest volume level to prevent extreme changes in volume when the signal source is changed OFF Normal sound SURROUND Press or to select ON or ...

Page 36: ...r more audio languages are included in a digital signal you can select one of the audio language 2 Press or to select AUDIO LANGUAGE then press 4 Press EXIT CANCEL to clear the menu screen Use this feature to select the digital audio output format when you connect a Dolby Digital decoder or other digital audio system to the coaxial digital audio output on the TV Note Audio language feature is not ...

Page 37: ...Press or to highlight AUTO SHUT OFF Press or to highlight ON Press EXIT CANCEL to return to the normal screen You can check the strength of the digital signal by viewing the digital signal meter In case of AUTO SHUT OFF is ON if a station being viewed stops broadcasting the TV will automatically shut itself off after 15 minutes Notes Signal meter feature is not available for analog channels After ...

Page 38: ...c slot Basic playback Load the disc in the disc slot with the label side facing forward If the disc has a label Hold the disc without touching either of its surfaces align it with the guides and place it in position A menu screen will appear on the TV screen if the disc has a menu feature Press or on the remote control to select title then press ENTER Title is selected and play commences 6 To star...

Page 39: ...rding to the disc contents the software producers designed some playback features may not be available Also refer to the instructions supplied with the DVDs Do not move the unit during playback Doing so may damage the disc Use the EJECT button to unload and eject the disc Do not put any objects other than discs on the disc slot Doing so may cause the unit to malfunctions There may be a slight dela...

Page 40: ...ant Playback starts from the selected chapter or track Playback starts from the beginning of the current chapter or track When you press twice in quick successions playback starts from the beginning of the preceding chapter or track Note A Prohibition symbol may appear at the upper right of the screen This symbol means either the feature you tried is not available on the disc or the TV DVD cannot ...

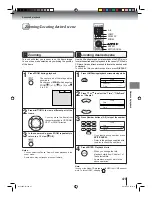
Page 41: ...o check the title chapter track and time press DISPLAY 1 Note In case of the Video CD playback with PBC the JUMP does not work To turn off PBC see page 47 Locating desired scene DVD VCD CD Press Number buttons 0 9 to input the number Notes You can select the Pause Slow or Search playback in the zoom mode Some discs may not respond to zoom feature PressJUMPduringplaybackorresumestopmode Press or to...

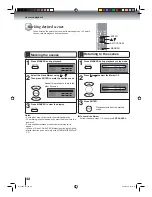
Page 42: ...ar the display 3 Notes Some discs may not work with the marking operation The marking is canceled when you eject the disc or turn the power off Some subtitles recorded around the marker may fail to appear In case of Video CD with PBC Marker function is prohibited Marker function does not work with MP3 WMA JPEG DivX CD Press MARKER during playback or stop mode Press or to select the Marker 1 3 1 2 ...

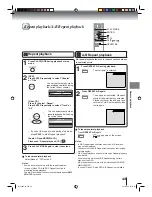
Page 43: ...de subtitles near the A or B locations may not be displayed You cannot set the A B Repeat for the scenes that include multiple angles A B Repeat playback does not work when Repeat playback is activated You may not be able to set A B Repeat during certain scenes of the DVD A B Repeat does not work with an interactive DVD MP3 WMA JPEG CD In case of Video CD with PBC A B Repeat is prohibited To resum...

Page 44: ...annot set Random function during playback Press PLAY MODE during playback or stop mode If you set Random during playback mode Random playback will begin after the track that is currently being played has ended To resume normal playback select Mode Off in step 2 1 2 3 Play Mode Repeat Off Program Playback Mode Off 1 2 3 Play Mode Repeat Off Program Playback Mode Program 1 9 2 3 Play Mode Repeat Off...

Page 45: ...be able to select the title Depending on the DVD a title menu may simply be called a menu or title in the instructions supplied with the disc 2 Press DVD MENU during playback Some DVDs allow you to select the disc contents using the menu When you playback these DVDs you can select the subtitle language and soundtrack language etc using the menu 1 Press ENTER The menu continues to another screen Re...

Page 46: ...ck again If you select DTS in playing DTS encoded disc no sound will be heard from the TV DVD s speakers In case of Video CD playback Audio type changes as follows each time you press AUDIO SELECT When playing back a disc recorded with subtitles you can select the subtitle language or turn the subtitle off To turn off the subtitle press SUBTITLE until Off appears The on screen display will disappe...

Page 47: ...D 00 08 32 00 51 03 Track 3 15 DISC OPERATION ELAPSED TIME TOTAL TIME TRACK NO To turn on the PBC Follow the above steps 1 2 then press ENTER repeatedly until PBC appear Note You can also turn off the PBC by pressing number button 1 and ENTER in the stop mode VCD To turn off the PBC see page 7 Press to select Mode then press ENTER repeatedly until Off appear 1 Press PLAY MODE in the stop mode 2 Pr...

Page 48: ...D R RW that has no music data or non MP3 WMA JPEG DivX files cannot be played back Standard sampling frequency and the bit rate MP3 CD MPEG 1 Audio 32kHz 44 1kHz 48kHz 32kbps 320kbps constant bit rate or variable bit rate The recommend recording setting for a high quality sound is 44 1kHz of sampling frequency and 128kbps of constant bit rate WMA CD WMA version 7 and 8 32kHz 48kbps 44 1kHz 48kbps ...

Page 49: ...1 WMA 2 WMA 3 MP3 2 MP3 JPEG Preview Select Files Repeat Off Mode Off Press STOP to end playback 5 The unit records the stopped point appears on the TV screen Press PLAY to resume playback from the scene point If you press STOP again or unload the disc the unit will clear the stopped point Press ENTER The selected file starts playing back 4 PLAY STOP ENTER In case the current directory includes mo...

Page 50: ...he first file In this case if the first file is a JPEG file the first JPEG file is played back If the first file is a DivX file the first DivX file is played back If the first file is an MP3 WMA file only MP3 WMA files are played back in order If there is no file at a root directory playback does not begin automatically 2 CD CD Picture 01 Picture 02 Picture 03 Picture 04 Picture 05 Picture 06 Pict...

Page 51: ...rotected by DRM Digital Rights Management system This restricts playback of content to specific registered devices If the incorrect DRM file is loaded Authorization Error This player is not authorized to play this video will appear on the TV screen When you attempt to play DivX VOD the number of plays is limited and the right message will appear on the TV screen If you wish to play it select Yes I...

Page 52: ...lly starts repeat playback after finishing the current track Random playback CD To resume normal playback Select Repeat Off in step 2 In the file browser press to select Mode during stop mode Press ENTER to select Random To resume normal playback Select Mode Off in step 2 Notes The repeat or randam function is canceled when you eject the disc or turn the power off In case of Audio CD the function ...

Page 53: ...ess to select Program View then press ENTER Program View shows only the programed files that you have added in step 2 Browser View In the Program View press PLAY The files start to playback in programed order that were added by you To remove file from program list in stop mode In the Edit Mode switch to Program View Select file you want to remove then press ENTER Select Clear Program and press ENT...

Page 54: ...ress ENTER to save the setting Parental Off Set Password Output Interlace DivX R VOD DRC Off QSound On E B L Off TV Screen 4 3 Display On Picture Mode Auto JPEG Interval 5 Seconds Screen Saver On Menu English Subtitle English Audio English Parental Off Set Password Output Interlace DivX R VOD DRC Off QSound On Menu English Subtitle English Audio English TV Screen 4 3 Display 4 3 Picture Mode Auto ...

Page 55: ...atus display on the TV screen Picture Mode To select a preferred picture mode from Video Film or Auto 57 JPEG Interval To select a preferred setting for the slide show playback DRC To select On or Off for DRC Dynamic Range Control 58 Parental To select a preferred parental level for the parental setting 58 Password To change the password 59 DivX R VOD To display your 8 character registration code ...

Page 56: ... bands at the top and bottom of screen 4 3 Pan scan It displays the wide picture on the whole screen with left and right edges automatically cut off Display On screen display can be switched on or off when you press any buttons On On screen displays appear when you press the buttons factory setting Off On screen displays do not appear when you press any buttons Note If the DVD disc is not formatte...

Page 57: ...tures recorded from films at 24 frames per second and video content video signals recorded at 30 frames per second Make this selection according to the type of content being viewed Auto Select this selection normally The DVD player automatically detects source content film or video of playback source and converts that signal in an appropriate method Film The DVD player converts film content pictur...

Page 58: ...ivalent to the following USA movie ratings Level 1 G Level 5 Level 2 Level 6 R Level 3 PG Level 7 NC 17 Level 4 PG 13 Level 8 The parental control levels for other countries area than U S are included for future use Check the appropriate parental control level when you buy a DVD video disc equipped with the parental control feature in the future Depending on the discs the unit cannot limit playbac...

Page 59: ...set Be sure to remember this number If you forget the password 1 Press EJECT to remove the disc 2 While holding 7 down on the remote control and then press STOP on the unit Password Clear appears on the screen Now the password has been returned to the initial value 0000 DivX VOD In order to play DivX VOD Video On Demand content on this unit you first need to register the unit with your DivX VOD co...

Page 60: ...sc Temporary cancel the rating level by DVD disc Depending on the DVD disc the disc may try to temporarily cancel the rating level that you have set It is up to you to decide whether to cancel the rating level or not DVD Load a DVD disc Note This temporary cancellation of rating level will be kept until the disc is ejected When the disc is ejected the original rating level will be set again automa...

Page 61: ...n 1225 Breton 1228 Icelandic 1929 Panjabi 2611 Tigrinya 3019 Bulgarian 1217 Indonesian 1924 Pashto Pushto 2629 Tonga 3025 Burmese 2335 Interlingua 1911 Persian 1611 Turkish 3028 Byelorussian 1215 Irish 1711 Polish 2622 Turkmen 3021 Cambodian 2123 Italian 1930 Portuguese 2630 Twi 3033 Catalan 1311 Japanese 2011 Quechua 2731 Ukrainian 3121 Chinese 3618 Javanese 2033 Rhaeto Romance 2823 Urdu 3128 Cor...

Page 62: ...are set into memory Cable TV company is scrambling signal Check antenna or Cable TV connections reorient antenna 22 21 13 14 No CATV reception Check all Cable TV connections Set TV CABLE selection to the CABLE position Station or Cable TV system problems try another station 14 21 22 Horizontal or diagonal bars on screen Check antenna or Cable TV connections reorient antenna Check for sources of po...

Page 63: ... functioning Turn off the unit and unplug the AC power cord for several minutes then replug it Playback does not start when the title is selected Check the RATING LEVEL setup 58 Audio soundtrack and or subtitle language is not changed when you playback a DVD Multilingual language is not recorded on the DVD disc 46 No subtitle Some discs have no subtitles Subtitles are cleared Press the SUBTITLE bu...

Page 64: ...TERFERENCE RFI Caused by two way radios this type of interference produces moving ripples or diagonal streaks in the picture Some cases may cause a loss of contrast in the picture Changing the direction and position of the antenna or installing an RFI filter may improve the picture CARE AND MAINTENANCE To prevent fire or shock hazard disconnect the TV DVD from the power source before cleaning Use ...

Page 65: ...0W 1 0W DVD CD Player Signal system NTSC Applicable disc 1 DVD 12cm 8cm 2 CD 12cm 8cm Pickup 1 Lens 2 Beams System Input Output S Video input Y 1 0 V p p 75 Ω negative sync Mini DIN 4 pin x 1 C 1 0 V p p 75 Ω ColorStream video input Y 1 0 V p p 75 Ω negative sync pin jack x 1 PB PR 0 7 V p p 75 Ω pin jack x 2 Video input 1 0 V p p 75 Ω negative sync pin jack x 2 Audio input 8dBm 50 kΩ negative syn...

Page 66: ...ter specified by the TACP Consumer Solutions Center 3 The warranties from TACP are effective only if the LCD TV DVD Combination is purchased and operated in the Continental U S A or Puerto Rico 4 Labor service charges for set installation setup adjustment of customer controls and installation or repair of antenna systems are not covered by this warranty Reception problems caused by inadequate ante...

Page 67: ...t TACP s Consumer Solution Center toll free at 1 800 631 3811 2 You must include a copy or original bill of sale or other proof of purchase along with the entire LCD TV DVD Combination to the Depot Warranty Repair Center specified by the TACP Consumer Solutions Center You are responsible for all inbound transportation and insurance charges for the LCD TV DVD Combination to the Depot Warranty Repai...

Page 68: ...mand StableSound are registered trademarks of Toshiba America Consumer Products L L C is a trademark of Toshiba America Consumer Products L L C J5Z00101A SH 06 11 N Book 5Z0 01 indb 68 Book 5Z0 01 indb 68 9 11 2549 16 15 27 9 11 2549 16 15 27 ...

Reviews: