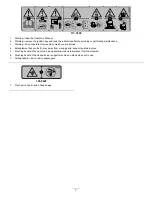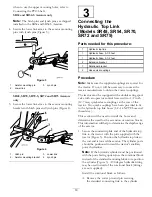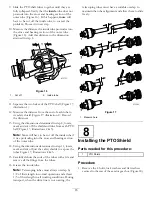
Figure 8
SR75 mounting shown
1.
Link pin
3.
Rod end of cylinder
2.
Aerator bracket
4.
Lynch pin
If the hydraulic cylinder does not reach the aerator
mounting bracket, use an extension block instead of
the standard mounting block to connect the cylinder
to the tractor (Figure 5).
Note:
If an extension block is installed and the
cylinder needs to be retracted to be installed, the
aerator tine heads will get closer to the ground.
Install the extension blocks as follows:
A. Remove the cotter pin and pin securing
the standard connecting link to the cylinder
(Figure 5). Remove the connecting link from the
cylinder.
B. Install the required length extension block to
the cylinder with the pins previously removed
(Figure 5).
4
Connecting the
Tractor Upper Link
(Models SR54–S and SR70–S)
Parts needed for this procedure:
1
Spring loaded top link
3
Link pin
3
Lynch pin
Procedure
1. Mount the spring loaded top link to the aerator
bracket with two link pins and lynch pins (Figure 9)
2. Loosen the lock nut on the tractor upper link. Adjust
the upper link length until it aligns with the clevis on
the spring loaded top link of the aerator (Figure 9).
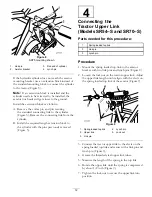
Figure 9
1.
Spring loaded top link
4.
Lynch pin
2.
Upper link
5.
Lock nut
3.
Link pin
3. Connect the tractor upper link to the clevis on the
spring loaded top link and secure with a link pin and
lynch pin (Figure 9).
4. Grease the threaded steel upper link tubes.
5. Measure the length of the spring in the top link.
6. Rotate the upper link until the spring is compressed
by about 1/2 inch (Figure 9).
7. Tighten the lock nut to secure the upper link into
position.
12


