


Checking and Adjusting the Cutting
Unit
The dual knob bedknife-to-reel adjustment system
incorporated in this cutting unit simplifies the adjustment
procedure needed to deliver optimum mowing performance.
The precise adjustment possible with the dual knob/bedbar
design gives the necessary control to provide a continual
self-sharpening action-thus maintaining sharp cutting edges,
ensuring good quality of cut, and greatly reducing the need
for routine backlapping.
Prior to mowing each day, or as required, check each cutting
unit to verify proper bedknife-to-reel contact.
Perform this
procedure even if the quality of cut is acceptable.
1.
Slowly rotate the reel in a reverse direction, listening
for reel-to-bedknife contact.
Note:
The adjustment knobs have detents
corresponding to 0.018 mm (0.0007 inch) bedknife
movement for each indexed position. Refer to
Adjusting the Bedknife to the Reel (page 7)
.
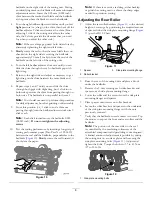
2.
Test the cutting performance by inserting a long strip
of cutting performance paper (Toro Part 125-5610)
between the reel and the bedknife, perpendicular to the
bedknife (
). Slowly rotate the reel forward; it
should cut the paper.
Figure 20
Note:
If excessive contact/reel drag is evident, either
backlap, reface the front of the bedknife, or grind the
cutting unit to achieve the sharp edges needed for
precision cutting; refer to the
Toro Manual for Sharpening
Reel and Rotary Mowers
, Form No. 09168SL.
Important:
Light contact is preferred at all times.
If you do not maintain light contact, the bedknife
and reel edges will not sufficiently self-sharpen
and will dull after a period of operation. If you
maintain excessive contact, the bedknife and reel
will wear quicker, wear unevenly, and the quality
of cut may be adversely affected.
Note:
After extended running, a ridge will eventually
develop at both ends of the bedknife. Round off or
file these notches flush with the cutting edge of the
bedknife to ensure smooth operation.
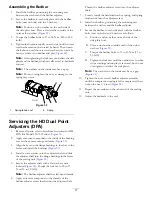
Note:
Over time, you will need to grind the chamfer
), as it is only designed to last 40% of the
bedknife life.
Figure 21
1.
Lead-in chamfer on right
end of bedknife
3.
1.5 mm (0.060 inch)
2.
6 mm (0.25 inch)
Note:
Do not make the lead-in chamfer too large as
it may cause turf tufting.
13
Summary of Contents for 03621
Page 20: ...Notes 20 ...
Page 21: ...Notes 21 ...