background image

7

(4)

(1)

(2)

(3)

(10)

(9)

(8)

(5)

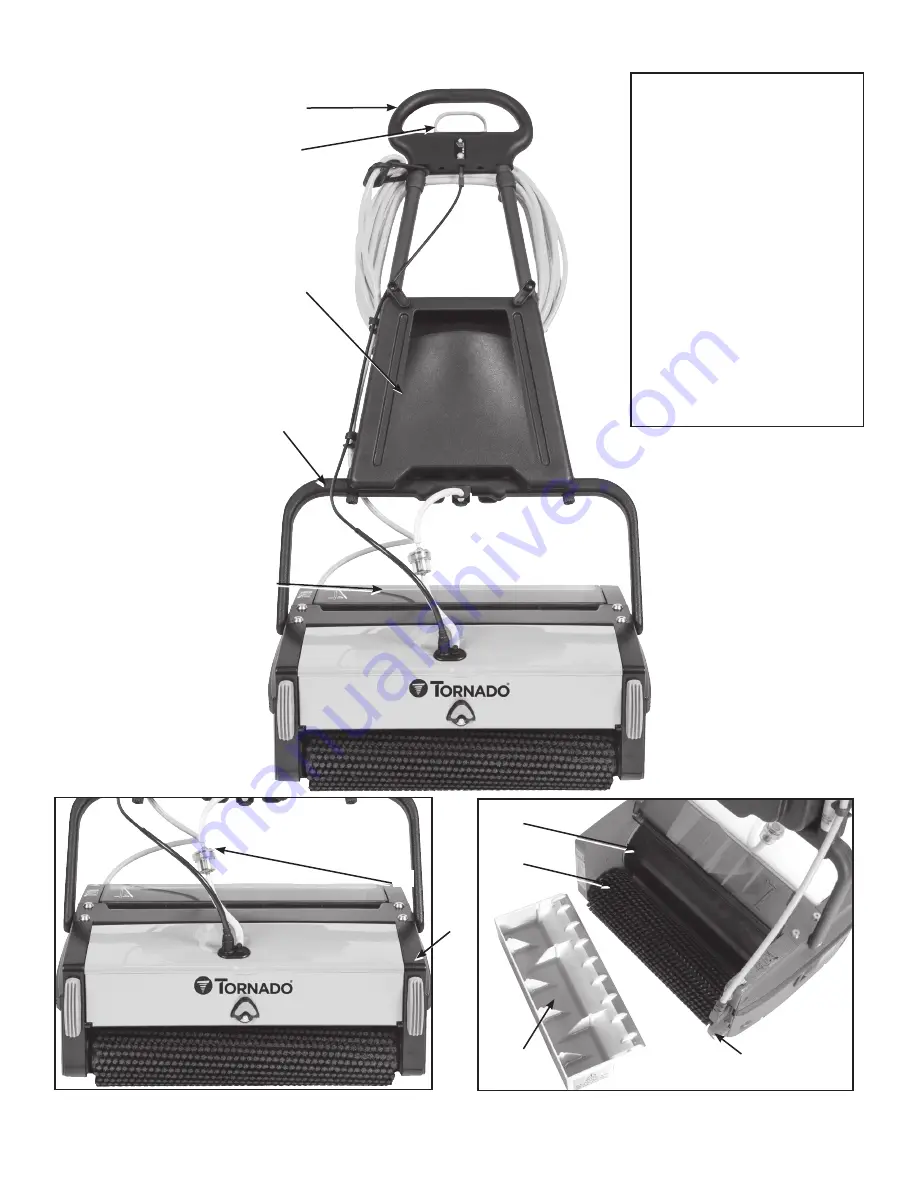
  (1)  Top handle
  (2)  Solution   


 control  handle
  (3)  Solution tank 
  (4)  Bottom handle
  (5)  Dirty water tank
  (6)  Inline solution filter
  (7)  Component housing
  (8)  Conveyor drum
  (9)  Brush
 (10)  Handle  release 


 pedal

(5)

(6)

(7)

Machine Parts

Summary of Contents for 99409

Page 1: ...WORTH TX 76140 PHONE 800 VACUUMS FAX 817 551 0719 WWW TORNADOVAC COM Operations Maintenance Manual For Commercial Use Only Form No L9409 DA 06 20 Tornado Industries LLC All rights reserved BR 9 1 MUL...

Page 2: ...uality control standards prior to assembly Please safeguard the original receipt invoice If you experience any problems with your unit during the warranty period the original receipt invoice will act...

Page 3: ...3 NOTES For warranty information go to www tornadovac com Within 30 days to activate the warranty go to https tornadovac com services warranty registration form aspx...

Page 4: ...orners Do not run machine over cord Keep cord away from heated surfaces Do not unplug by pulling on cord To unplug grasp the plug not the cord Do not handle plug or machine with wet hands Keep hair lo...

Page 5: ...cordance with all local codes and ordinances WARNING Improper connection of the equipment grounding conductor can result in a risk of electric shock Check with a qualified electrician or service perso...

Page 6: ...it is unplugged Regularly inspect the power supply cord If it is damaged it needs to be replaced Be careful when using the machine near the top of stairs Guidelines for the Operator Operators must be...

Page 7: ...0 9 8 5 1 Top handle 2 Solution control handle 3 Solution tank 4 Bottom handle 5 Dirty water tank 6 Inline solution filter 7 Component housing 8 Conveyor drum 9 Brush 10 Handle release pedal 5 6 7 Mac...

Page 8: ...e injury to personnel Unpack 4 1 2 3 5 6 7 8 9 10 11 12 Preparing for Use How it Works How it Works 1 Cleaning liquid in the solution tank is sprayed to the floor The counter rotating brushes scrub th...

Page 9: ...ar handles into the bottom handle and secure them using the knob by tightening lightly Make sure that the handles are assembled according to their marked position and the cable holding hooks are point...

Page 10: ...working BEFORE R E S E T W AI T S E C O N D S 3 0 P R E SS Operating the Machine Before the washing operation starts Warning Pre sweep the floor to remove debris before using the Multiwash i ON 3 2 1...

Page 11: ...h clean water and clean off the steel wiper blade before replacing the tank on the machine IMPORTANT Dispose of dirty water in accordance with all local state and federal hazardous material disposal r...

Page 12: ...rtaking any maintenance operations or adjustments switch off the machine and unplug from the electrical supply viii 3 2 1 ix x xi viii 3 2 1 ix x xi viii 3 2 1 ix x xi Cleaning the Machine Maintenance...

Page 13: ...pped around the bottom handle 4 Now the cart is ready to use The machine can then be maneuvered easily while holding the top handle Accessories Warning Empty all liquid from the machine before using t...

Page 14: ...tor Power W A 400 3 5 Brush Speed rpm 650 Solution Tank Gallon Liter 5 1 9 Cleaning Capacity sqft hr m2 hr 2700 251 Noise Lever 69dB db A 69 Electrical layout Diagrams are made available in the cover...

Page 15: ...15 L9409 DA...

Reviews: