background image

Instruction Manual - TORBAL AGC Series

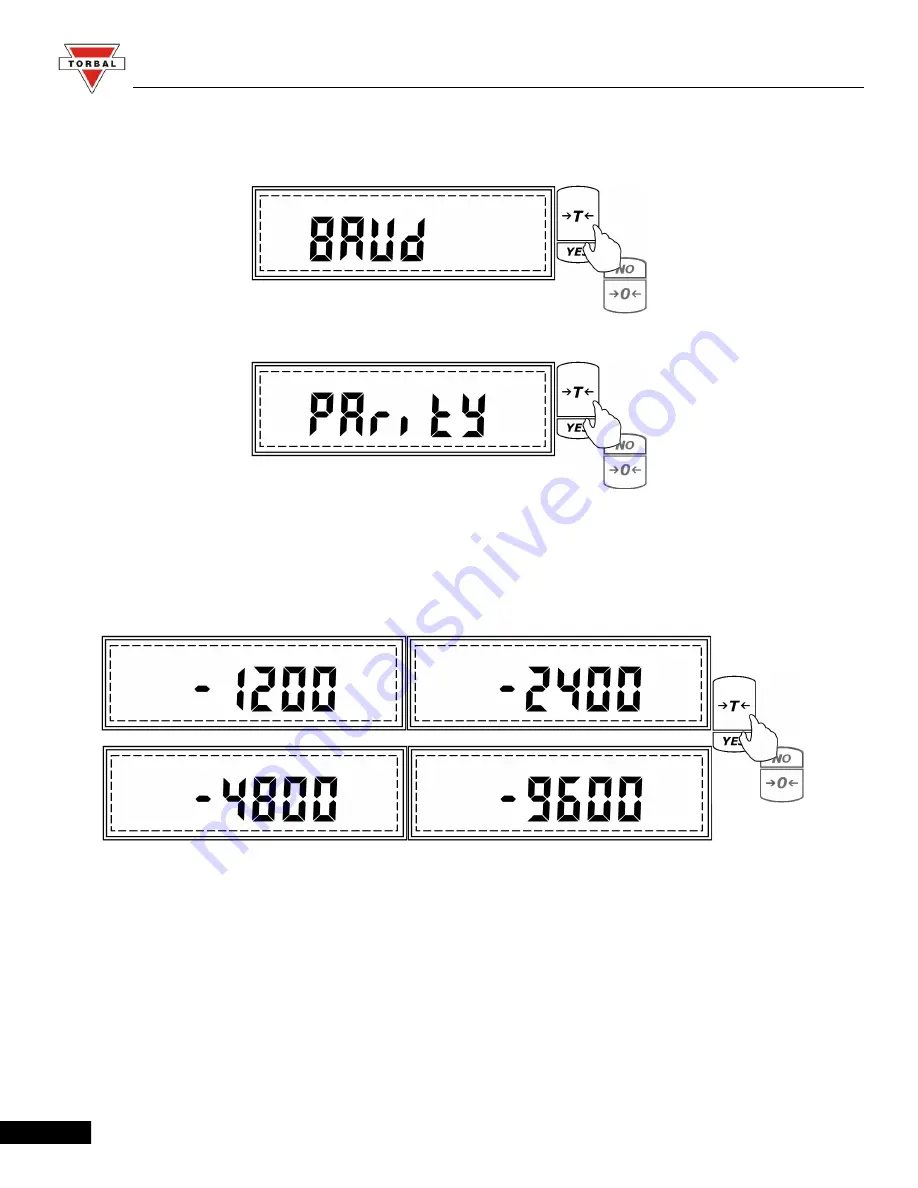
4. To configure the Baud rate settings press the “T” key when 

Baud

 is displayed. To configure the 

Parity setting press “T” key when 

Parity

 is displayed. 

5. After pressing “T” when 

Baud

 is displayed, the scale will  display available baud rates: 1200, 

2400, 4800, and 9600. To make a selection press “T” (Yes) when the desired setting is displayed.


43

Summary of Contents for AGC100

Page 1: ......

Page 2: ...ration 24 A Animal Weighing 25 B Parts Counting 28 C Check Weighing 29 D Display Hold 30 E Percent Weighing 32 F Totalizing 33 7 1 4 Automatic Zero Setting Mechanism AZSM 35 7 1 5 GLP Print and Data C...

Page 3: ...ered under the scale s warranty Never drop or throw any articles onto the scale s pan or onto any other parts of the unit DO NOT let the scale fall or drop from its tabletop surface When moving the sc...

Page 4: ...those mentioned in this manual o Set the scale on a firm stable horizontal surface o Never stand on or lean on this product Equipment may fall or collapse causing breakage and possible injury o Befor...

Page 5: ...rating Temperature 15 C to 30 C RS232 Port Bidirectional Power Supply Input 120VAC 60Hz 15W Output 12VDC 500mA Display Type Seven Segment LCD Display Size 30mm x 100mm Application Modes Weighing Parts...

Page 6: ...Off The scale is turned OFF and in standby mode AUT AZSM Automatic Zero Setting Mechanism AZSM Automatic Zero Setting Mechanism is active and the scale maintains a center of zero condition within 6d...

Page 7: ...command represents the current sample size setting FILL In parts counting begin counting UNDER In check weighing this command represents the under limit and indicates under result OVER In check weighi...

Page 8: ...Instruction Manual TORBAL AGC Series CHAPTER 4 PARTS DESCRIPTION Front View Rear View Pan Pan Base AC Adapter RS232 Serial Port Service Switch Level Indicator AC Adapter Socket 7...

Page 9: ...em on a stable base where the scale will not be affected by any mechanical vibrations or air movements 2 After removing the pan base and the pan from their packaging carefully install the pan base ont...

Page 10: ...the scale plug the AC adapter into the AC adapter socket on the rear of the scale 5 When the AC adapter is plugged into the wall outlet the scale will turn ON automatically initialize itself perform a...

Page 11: ...ors appear on the display 2 When weighing always place the mass in the middle of the pan The weighed result may be taken when the stabilization indicator appears on the display 6 1 1 Zeroing the scale...

Page 12: ...the net weight 2 To tare the weighing container place it in the middle of the pan The container s weight will be shown on the display 3 Once the stabilization indicator appears on the display the con...

Page 13: ...d object along with the net weight from the pan The scale will then display a negative net tare result 2 To clear the tare press the T button 3 The display will show dashed lines indicating the tare i...

Page 14: ...tially To select and enter a desired menu option press the T YES key while that menu option is displayed Note Scrolling through the options may be accelerated by manually pressing the 0 NO key 7 1 1 C...

Page 15: ...brate the scale follow the steps below 1 Press MENU to enter the Main Menu 2 When CALIB is displayed press T YES 3 The scale will display commands Start and Setup sequentially Press T when Start is di...

Page 16: ...es command LOAD C will be displayed followed by C indicating that automatic calibration is in progress 7 Calibration can last from 30 to 50 seconds when it is finished the scale will automatically ret...

Page 17: ...displayed press T YES 3 The scale will display commands Start and Setup sequentially Press T when Setup is displayed 4 Commands CALIB Calibration Adjustment TIME Time Configuration and TEMP Temperatur...

Page 18: ...the T YES key when CALIB is displayed in the calibration setup menu 2 The scale will display CAL indicating that the calibration adjustment mode has been entered 3 Before calibration adjustment can b...

Page 19: ...e LOAD command place a single calibration weight in the middle of the pan 6 Command C will be displayed indicating that the scale is recording a new calibration mass value 7 Once the new calibration v...

Page 20: ...on can be configured to calibrate automatically within a change of time To set a calibration time interval follow the steps below 1 Press the T YES key when TIME is displayed in the calibration setup...

Page 21: ...a calibration time interval press the 0 NO key until the desired setting is displayed 5 When the desired setting is displayed press the Function key to accept and save the selection The scale will re...

Page 22: ...rval calibration press the T YES key when C 0 is displayed To enable temperature calibration press the T YES key when the temperature setting is displayed To Disable To Enable 3 The temperature interv...

Page 23: ...Menu press the C key 7 1 2 Units of Measure Selection TORBAL AGC series scales can operate in nine different units of measure grams g kilograms kg carats ct pounds lb Newton n grains gn ounces oz oun...

Page 24: ...nd UNIT is displayed press the T Yes key 3 The scale will display available units of measure sequentially When the desired unit is displayed press the T Yes key to make the selection Example Selecting...

Page 25: ...the symbol indicating the current unit 7 1 3 Mode configuration TORBAL AGC series scales can operate in seven application modes A Animal Weighing B Parts Counting C Check Weighing D Display Hold E Per...

Page 26: ...pplication modes will now begin to display sequentially Press the T key when the desired application is displayed and follow the configuration steps for that mode Note Scrolling through the options ma...

Page 27: ...d and you wish to disable it press the T Yes key when An OFF is displayed 3 Animal weighing can operate in three different modes automatic semi automatic and manual see Table 7 1 3 A The operating mod...

Page 28: ...erval press the T YES key when the desired time interval is displayed Note Select longer time intervals when weighing very active animals Longer time intervals will allow the scale to take more readin...

Page 29: ...ext weighing Semi Automatic Weighing Initialization Automatic Result Clearing Manual Tare Manual When set to Semi Automatic the scale will automatically begin the animal weighing process Once the anim...

Page 30: ...indicating that the default sample size setting is 10 pieces To accept the sample size press the T YES key To change the sample size press the 0 NO key To Accept To Change The sample size selection c...

Page 31: ...ng that the function has been configured and it is ready to use To use the function follow the directions in Chapter 8 To exit the mode menu use the C key C Check Weighing 1 To enable check weighing p...

Page 32: ...rections in Chapter 8 To exit the mode menu use the C key D Display Hold 1 To enable display hold press the T YES key when Display is displayed 2 Commands Di On and Di OFF will be displayed sequential...

Page 33: ...nabled To select a desired operating mode for display hold press the T YES key while the mode is displayed To enable automatic display hold press T YES while AUTO is displayed 4 After enabling the dis...

Page 34: ...scale will automatically tare and prepare for the next weighing Semi Automatic Display Hold initialization Automatic Result Clearing Manual Tare Manual When Set to Semi Automatic the scale will autom...

Page 35: ...lready enabled and you wish to disable it press the T Yes key when Pe OFF is displayed 3 After enabling percent weighing DONE will be displayed indicating that the function has been enabled and it is...

Page 36: ...n two different operating modes automatic and manual see Table 7 1 3 F The operating modes will scroll once the function is enabled To select a desired operating mode for the totalizing function press...

Page 37: ...nable or disable AZSM follow the steps below 1 Enter the Main Menu by pressing the MENU key 2 When command AUTO is displayed press the T YES key 36 Table 7 1 3 F Totalizing Operating Modes Automatic T...

Page 38: ...GC Series 3 Command AUT On and AUT OFF will flash 4 To enable AZSM press the T YES key when AUT On is displayed To disable AZSM press the T YES key when AUT OFF is displayed 5 Once enabled the AUT ind...

Page 39: ...abled GLP data will appear on every printed transaction receipt The GLP printout includes Model No Unit ID User ID Project No Notes Remarks field and a Signature field To enable and configure GLP data...

Page 40: ...3 Commands Set Model Unit ID User ID and Project ID will begin to scroll 4 To enable or disable GLP press the T YES key when command SET is displayed 5 Commands ON and OFF will be displayed To enable...

Page 41: ...ll begin to scroll on the display Model No Unit ID User ID and Project No 7 Press T YES when the desired option is displayed 8 A minus sign will be displayed indicating you may assign a new ID or proj...

Page 42: ...nd move to the next digit Table 7 1 5 9 Example Setting an ID 54321 Current Display Action to take Key to use Number of depressions Display becomes Increment the digit 0 NO 6 5 5 Accept and go to next...

Page 43: ...RS232 port Data may be printed via a printer or sent to a PC via the TORBAL Communication software 7 1 6 1 Baud and Parity To configure the scale s RS232 port for printing or to create a PC connectio...

Page 44: ...e T key when Baud is displayed To configure the Parity setting press T key when Parity is displayed 5 After pressing T when Baud is displayed the scale will display available baud rates 1200 2400 4800...

Page 45: ...ay available parity settings none even odd 7 To make a selection press T Yes when the desired setting is displayed Note When connecting the scale to a third party software or third party printer make...

Page 46: ...inter use the following settings Scale settings follow steps detailed in Section 9 1 1 Baud Rate 9600 Parity None Printer Settings Follow the steps detailed in the RXP 4 Instruction Manual Baud Rate 9...

Page 47: ...Receipts After completing a weighing transaction result data receipt may be printed To initiate printing wait for the weighing result to stabilize and press the P key Note Examples below include GLP d...

Page 48: ...uction Manual TORBAL AGC Series 7 1 7 Time and Date To set the current time and date follow the steps below 1 Enter the Main Menu by pressing the MENU key 2 When SET td is displayed press the T YES ke...

Page 49: ...the 0 NO key 3 A and P will flash To set AM press the T YES key when A is displayed to set PM press the T YES key when P is displayed 4 After making the selection minutes will scroll When the desired...

Page 50: ...pt and move to the next digit Follow this sequence until the desired date setting is displayed After setting the last digit of the month the date will be automatically saved 7 1 8 Reset restoring defa...

Page 51: ...r to confirm reset initialization 4 To confirm and initialize the reset function press the T YES key To cancel and abort the reset press the 0 NO key To confirm Master Reset To abort Reset Warning Res...

Page 52: ...l Weighing Function Disabled Filtering time t 3 3 seconds Parts Counting Function Disabled Sample Size 10 pieces Check Weighing Function Disabled Under Value 0 000g Over Value 0 000g Display Hold Func...

Page 53: ...unctions will scroll Note Scrolling through the options may be accelerated by manually pressing the 0 NO key 3 When the desired function is displayed press the T YES key A letter corresponding to the...

Page 54: ...on the scale s pan and press T to tare the scale 2 Once the scale has been tared carefully place the animal in the container Automatic and Semi Automatic When set to Automatic or Semi Automatic the s...

Page 55: ...cifications on page 4 Manual When set to manual animal weighing must be initialized manually by pressing the Function key 3 Once the animal weighing process is initialized the scale will count down th...

Page 56: ...t be tared manually by pressing the T key Semi Automatic and Manual When set to Semi Automatic or Manual the weighing result will remain displayed and it must be manually cleared after the animal has...

Page 57: ...ress the T YES key To change the sample size use the 0 NO key To Accept To Change The sample size selection can range from 1 to 100 pieces By applying short single presses to the 0 NO key the sample s...

Page 58: ...out the sample and place it in the counting container located on the pan 5 The weight of the sample will be displayed as it is placed on the pan Note Minimum individual piece weight must be equal to o...

Page 59: ...g The word FILL will flash on the display for approximately 5 seconds At any time during the FILL command add the remaining pieces Note If filling does not begin while the command FILL is displayed af...

Page 60: ...C key Note If too many pieces have been placed into the container remove the excess while the container is still on the scale s pan You may also remove the container from the pan remove the extra piec...

Page 61: ...mmand UNDER and the under limit weight setting are displayed sequentially If this is the first time the function is used the setting will be 0 000g Any new setting will be saved until changed or clear...

Page 62: ...1 20 0 20 0 Increment the digit 0 NO 1 20 1 20 1 Accept and go to next digit T YES 1 20 10 20 10 Increment the digit 0 NO 2 20 12 20 12 Accept and go to next digit T YES 1 20 120 20 120 Increment the...

Page 63: ...esignated range If the weight is less than the lower limit the scale will display the weight of the object and the command UNDER If the weight falls within the range the ACCEPT command will be display...

Page 64: ...function is used to retain a weighing result static on the LCD display after it has stabilized To use the Display Hold function follow the steps below 1 Place an empty container on the pan and press T...

Page 65: ...d To see this limit expressed in grams turn to detailed specifications on page 4 Manual When set to Manual display hold is initialized by pressing the Function key Once the weight is stable press Func...

Page 66: ...n cleared the scale must be tared To tare the scale press the T key To Clear To Tare To exit Display Hold and switch to a different function press C to clear the current function and then press Functi...

Page 67: ...isplay the weight of a previously stored sample If this is the first time the function is used the sample weight will be 0 000g To accept the current sample setting press the T YES key To assign a new...

Page 68: ...must be equal to or greater than 100d Attempting to set a sample lower than 100d will result in a SAPL LO error 6 Once the weight of the sample has stabilized and the stability indicator has been disp...

Page 69: ...tage of the stored sample Note To change the percent sample press C and repeat Steps 1 to 5 If the same sample weight is used the scale can be tared without clearing the function and new objects can b...

Page 70: ...first object on the pan Automatic When set to Automatic the weight of the object will be added automatically Once the weight stabilizes the TOTAL indicator will appear on the display signaling that th...

Page 71: ...e weight to the grand total Upon pressing Function TOTAL will appear on the display signaling the weight has been added to the grand total Note With each added weight the grand total result appears on...

Page 72: ...pressed the command YES NO will be displayed asking to confirm clearing of the function To abort the clearing the function press the 0 NO key To clear the function press the T YES key all data will be...

Page 73: ...Instruction Manual TORBAL AGC Series CHAPTER 9 TECHNICAL INFORMATION 72...

Page 74: ...Err b Pan not cleared on power up The pan was not empty while the scale was initiating at startup Clear the pan and restart the scale Sapl LO Parts Counting Average piece weight is too low The averag...

Page 75: ...sing of your scale Wipe the scale gently Do not allow any liquid to enter into the scale Do not apply extensive pressure to the LCD display Do not use chemicals or benzene when cleaning the surface Co...

Page 76: ...xtended only to the first purchaser This limited warranty will not apply if upon inspection it is found that the product was tampered with misused overloaded or abused mishandled placed in an improper...

Reviews: