background image

3.

TOMEIチタニウムマフラーの取り付け

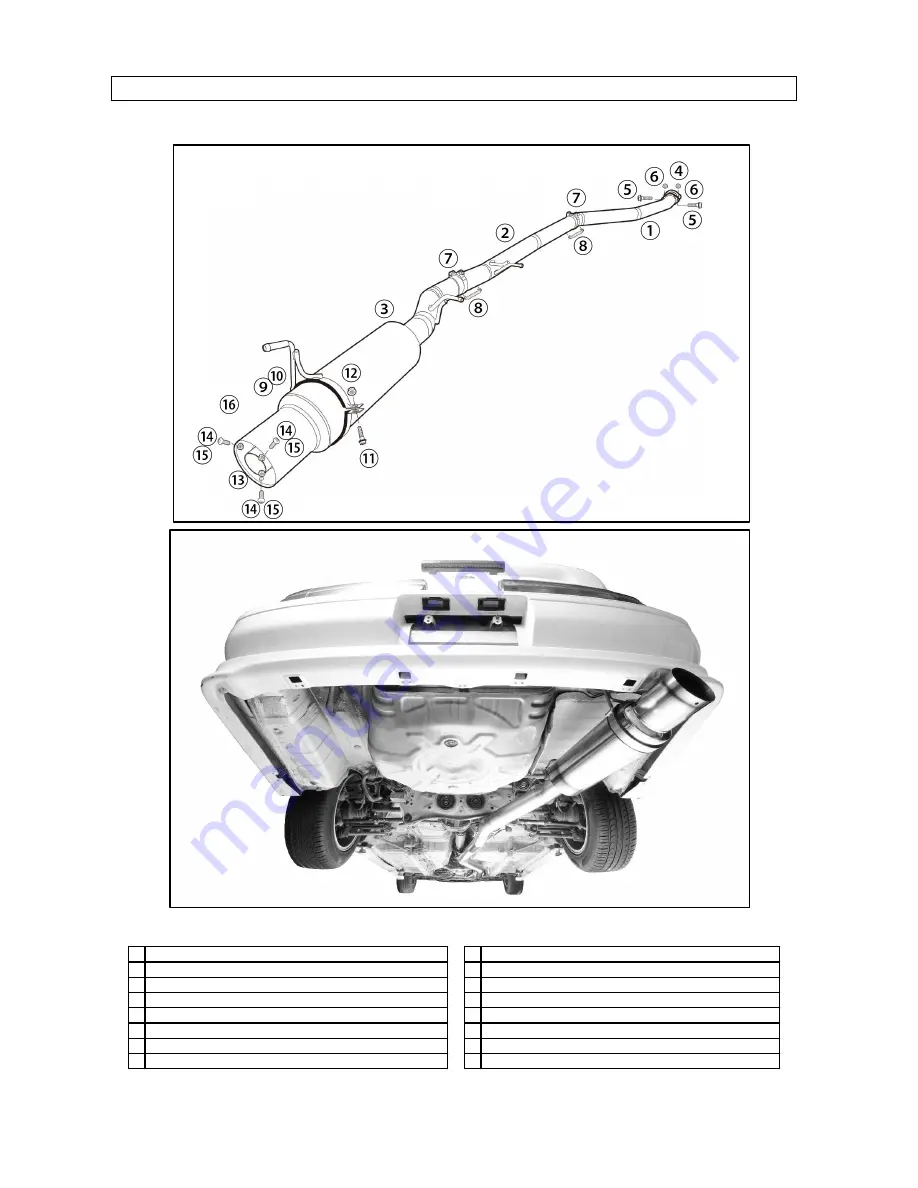
【各部品の装着位置図】

同梱部品の装着箇所は下図の通りです。

<キット同梱部品使用箇所と締付トルク>
① メインパイプA

⑨ サイレンサーバンド

② メインパイプB

⑩ サイレンサーバンドラバー

③ サイレンサー

⑪ フランジボルト M8 L=25mm

④ ガスケット

⑫ フランジナット M8

[19.6~28.4N.m(2.0~2.9kgf-m)]

⑤ フランジボルトM10

⑬ サウンドレデューサー

⑥ フランジナットM10

[34.3~39.2N.m(3.5~4.0kgf-m)]

⑭ ボタンボルト M6

⑦ クランプバンド

[25.0N.m(2.55kgf-m)]

⑮ フランジナット M6

[7.8~11.8N.m(0.8~1.2kgf-m)]

⑧ スプリング

⑯ タイラップ

※ 高温にさらされる部分には焼付きや固着を防止するため、付属のボルトスムースペーストを塗布してください。

7

Summary of Contents for Expreme Ti

Page 1: ...e various warnings cautions contained herein You should also consult the official servicing manual for your vehicle when installing this product Please note that inappropriate installation use of this...

Page 2: ...A B 1 1 TB6090 TY04 01 TB6090 TY04 02 1 1 TB6090 TY04 03 PB6150 FGK32 M10 M10 2 2 PB6150 FBT02 PB6150 FNT02 2 2 PB6150 MCB01 PB609B SPR01 152 1 1 TB6090 TY04 04 PB609B SBR01 2...

Page 3: ...N REDUCER 1 PB609B INS04 02 SUB REDUCER 1 PB6150 BBT01 BUTTON BOLT M6 P1 0 3 PB6150 FNT12 FLANGE NUT M6 P1 0 3 PB6150 FBT13 FLANGE BOLT M6 P1 0 1 1 PB6150 ZIP01 PART HEX KEY EXPREME Ti QTY 1 2 PART No...

Page 4: ...6 5mm 1 1 2 ASSY 3 ASSY 4...

Page 5: ...2 3 STANDARD QUIET MODE 1 QUIET MODE 2 1 MODE 2 MODE 1 1 2 15mm 3 2 4 M6 M6 15mm M6 M6 5...

Page 6: ...15mm 5 6 6 5mm M6 7 M6 M6 8 3 9 10 15mm 6...

Page 7: ...3 TOMEI A B M8 L 25mm M8 19 6 28 4N m 2 0 2 9kgf m M10 M10 34 3 39 2N m 3 5 4 0kgf m M6 25 0N m 2 55kgf m M6 7 8 11 8N m 0 8 1 2kgf m 7...

Page 8: ...1 A M10 M10 A M10 M10 2 B A B 3 B ASSY 4 5 M10 34 3 39 2N m 3 5 4 0kgf m M8 19 6 28 4N m 2 0 2 9kgf m 25 0N m 2 55kgf m 6 A B 7 8 M6 M6 M6 7 8 11 8N m 0 8 1 2kgf m 9 8...

Page 9: ...4 1 2 2500rpm 3 9...

Page 10: ...2 PART SILENCER PART GASKET QTY 1 QTY 1 PART No TB6090 TY04 03 PART No PB6150 FGK32 PART FLANGE BOLT M10 PART FLANGE NUT M10 QTY 2 QTY 2 PART No PB6150 FBT02 PART No PB6150 FNT02 PART CLAMP BAND PART...

Page 11: ...B609B INS05 01 MAIN REDUCER 1 PB609B INS04 02 SUB REDUCER 1 PB6150 BBT01 BUTTON BOLT M6 P1 0 3 PB6150 FNT12 FLANGE NUT M6 P1 0 3 PB6150 FBT13 FLANGE BOLT M6 P1 0 1 PART ZIP TIE QTY 1 PART No PB6150 ZI...

Page 12: ...ngine damage Ensure the appropriate amount of torque is used to remove install the fastenings Do NOT use excessive force as this can damage the product and or the engine Always use the appropriate too...

Page 13: ...e while driving which can be extremely dangerous for vehicles directly behind and or around you This may also result in the exhaust tip becoming warped or damaged CAUTION Use the reference hole as sho...

Page 14: ...bolt hole positioning and repeat the process for the 3rd bolt hole 9 After drilling all the holes be sure to grind down any sharp edges 10 Clean and or remove any remaining debris Sound reducer bolt...

Page 15: ...LENCER BAND RUBBER SILENCER FLANGE BOLT M8 L 25mm GASKET FLANGE NUT M8 19 6 28 4N m 2 0 2 9kgf m FLANGE BOLT M10 SOUND REDUCER FLANGE NUT M10 34 3 39 2N m 3 5 4 0kgf m BUTTON BOLT M6 CLAMP BAND 25 0N...

Page 16: ...CLAMP BAND previous page 25 0N m 2 55kgf m 6 Attach the SPRINGS onto MAIN PIPE A MAIN PIPE B and the SILENCER CAUTION Ensure sufficient clearance and correct fitment has been achieved before complete...

Page 17: ...not only reduce performance but can also be a health hazard and should be addressed immediately If there are any abnormalities whilst using the vehicle stop immediately and check for faults Ensure al...

Page 18: ...18 18...

Page 19: ...19 19...

Page 20: ...20 13 Orchard Suite 107 Lake Forest CA 92630 USA TEL 1 949 855 6577 FAX 1 949 855 6525 OPEN Monday Friday National holidays and public holidays excluded 10 00 19 00 PST http www tomeiusa com 20...

Reviews: