


7.2
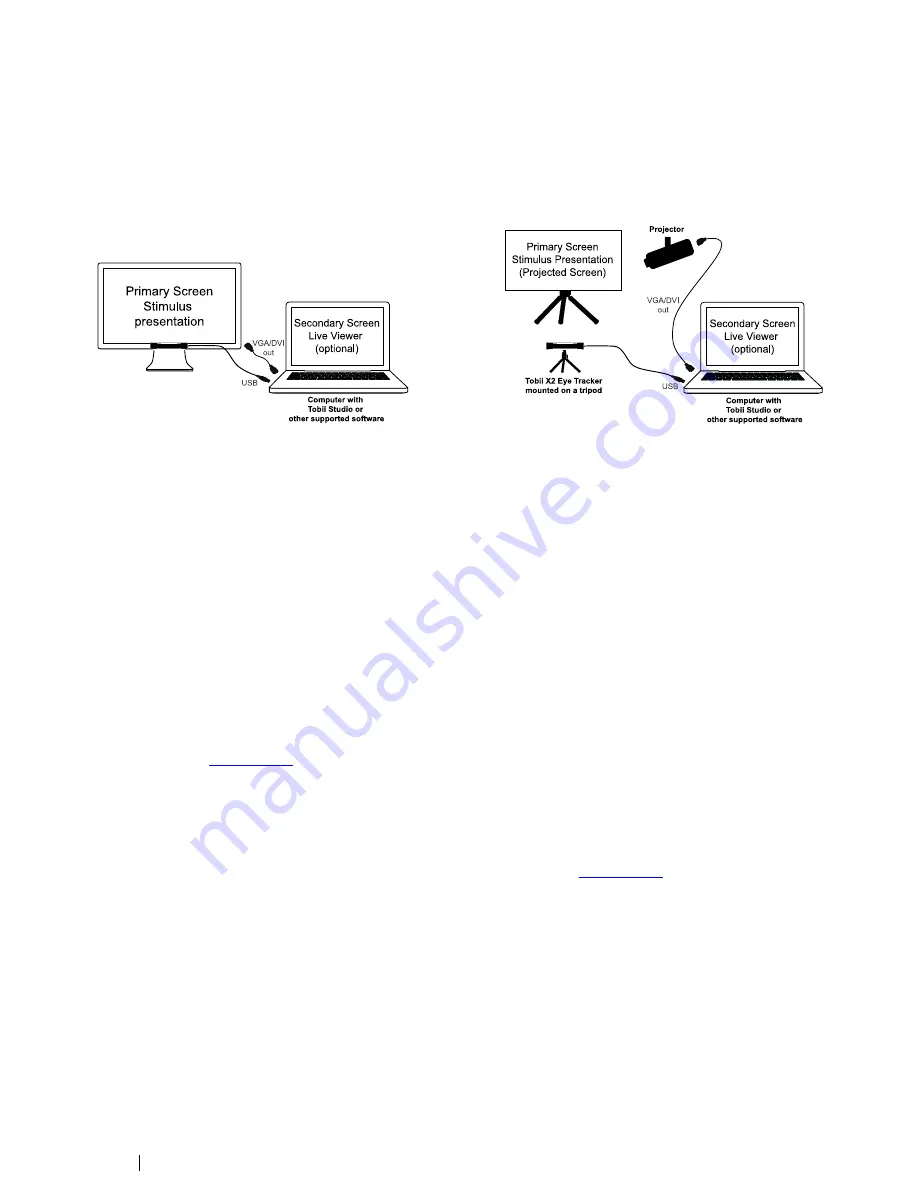
Local Live Viewer Setups
These setups are used when the test is to be supervised from a separate screen where the test leader can see the test partici-
pant
’
s eye movements in real time during testing.
The following image illustrates two typical setups using the Live Viewer.
Primary
Screen
S timulus
prese nta tion
Secon dary Screen
Live Vie we r
(op tiona l)
VGA
/DVI
out
US B
C
o m p u te r with
To b ii S tu d io o r
othe r suppo rted so ftware
Pri
ma ry S cre e n
S timulus P re s e nta tion
(Proj ect ed Screen )
P ro je c to r
To b ii X2 Eye Tra c ke r
mou nted on a t ripod
Co m p u te r with
To b ii S tu d io o r
othe r suppo rted so ftware
U
S B
VGA/DVI
out
Secon
dary Screen
Live Vie we r
(op tiona l)
The above setup is a very simple setup with the eye tracker
mounted on a monitor (where the stimuli will be presented)
connected to a laptop running Tobii Studio that will be used as
a secondary screen by the test leader to see the test partici-
pant
’
s eye movements in real time during the test.
To configure this setup:
1.
Mount the eye tracker below the screen as instructed
in
4.2.1 Mounting the Tobii X2 Eye Tracker to a
Screen, page 5 .
2.
Connect the monitor to the laptop through VGA/DVI.
3.
Run the Tobii Eye Tracker Installer and connect the
Eye Tracker to your computer. For instructions please
read
4.3 Tobii Eye Tracker Installer, page 8.
4.
Run Tobii Studio, configure it for showing live gaze da-
ta and start your test. For details about configuration in
Tobii Studio and further instructions on using Tobii
Studio, please refer to the Tobii Studio documentation
available on
www.tobii.com
.
The above setup is using a projected screen for the stimuli
presentation. You use the laptop to present the stimuli on the
screen via the projector and also as a secondary screen so
that the test leader is able to see the test participant
’
s eye
movements in real time during the test.
To configure this setup:
1.
Mount the eye tracker on a tripod, using the supplied
desk stand as instructed in
4.2.2 Mounting the Tobii
X2 Eye Tracker Using a Desk Stand/Tripod, page 8.
2.
Connect the eye tracker to the laptop via USB.
3.
Connect the projector to the laptop via VGA/DVI.
4.
Position the eye tracker, taking into consideration the
guidelines in
6 Positioning, page 19. Always make sure
the eye tracker is able to track the eyes over the entire
screen by using the correct distance to the screen and
the correct tilt angle of the eye tracker.
5.
Run the X Configuration Tool in order to configure the
eye tracker for your particular setup. Please read
5 The
X Configuration Tool, page 15.
6.
Run Tobii Studio, configure it for showing live gaze da-
ta and start your test. For details about configuration in
Tobii Studio and further instructions on using Tobii
Studio, please refer to the Tobii Studio documentation
available on
www.tobii.com
.
22
7 Typical Setups
Tobii X2-30 Eye Tracker User
’
s manual v.1.0.3 - en-US


