


2
Connecting Your DVR to Your Home Network
23
Connecting Two Series2 DVRs to Each Other Wirelessly
To create a wireless peer-to-peer network between TiVo Series2 DVRs:
1. Connect a wireless network adapter to each DVR. See “Connecting to a
Home Network Using a Wireless Network Adapter” on page 13.
2. Use one DVR to create the wireless peer-to-peer network. See “Creating
a Wireless Peer-to-Peer Network”, below.
3. Connect the other DVR(s) to the peer-to-peer network. See “Wireless
Settings for a Home Network” on page 15.
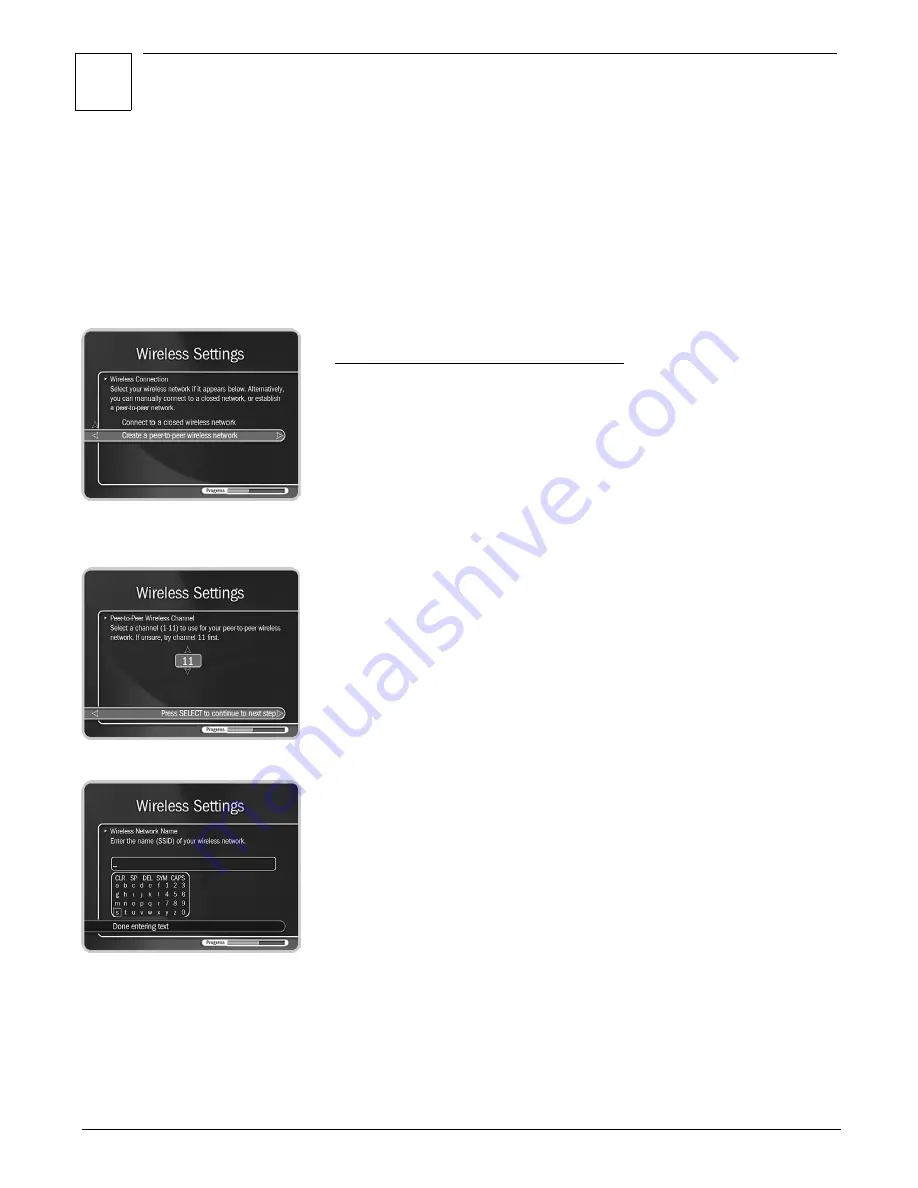
Creating a Wireless Peer-to-Peer Network
To get to Wireless Settings, press the TiVo button on the remote control to
go to TiVo Central. Select Messages & Setup, then Settings, then Phone &
Network Setup, then “Edit phone or network settings,” then Wireless
Settings.
Wireless Checklist.
We will provide the settings you need to create your
peer-to-peer wireless network. As you complete the following screens, you
should write these settings down so they are readily available when you
connect additional DVRs to your network.
Select “Continue to next step.”
Wireless Connection.
Select “Create a peer-to-peer wireless network.”
Peer-to-Peer Wireless Channel.
Wireless networks can broadcast on different
channels. If you have multiple wireless networks in the same area, placing
them on different channels can improve performance by reducing network
congestion.
Select any channel number between 1 to 11. If you are uncertain about
which number to use, try channel 11.
Press SELECT to continue to the next step.
Wireless Network Name.
Enter a name for your peer-to-peer wireless
network. Use the arrow buttons on the remote to highlight a letter. Press
SELECT to enter it.
Write down your network name and be sure to note which letters are upper
case and which are lowercase. You will need the network name to connect
other DVRs to your network. Select “Done entering text” when you are
finished.
Confirm Settings.
Review the settings and select “Accept these settings” if
they are correct. If you have further questions, see “Multi-Room Viewing
Troubleshooting” on page 61.
Change Connection Type.
You see this screen after you have configured your
wireless settings. Select “No, continue to connect via the phone.”
Summary of Contents for Series2 DT
Page 1: ...Premium Features Guide Home Media Option ...
Page 4: ...3 ...
Page 10: ...1 Getting Started 9 ...
Page 26: ...2 Connecting Your DVR to Your Home Network 25 ...
Page 27: ...3 Using Home Media Option 27 Multi Room Viewing 30 Remote Scheduling 33 Music Photos ...
Page 52: ...3 Using Home Media Option 51 ...
Page 64: ...4 Troubleshooting 63 ...
Page 69: ...Index ...


