background image


Simply IP Phone                                                                Customizing Your Phone 


- 14 - 

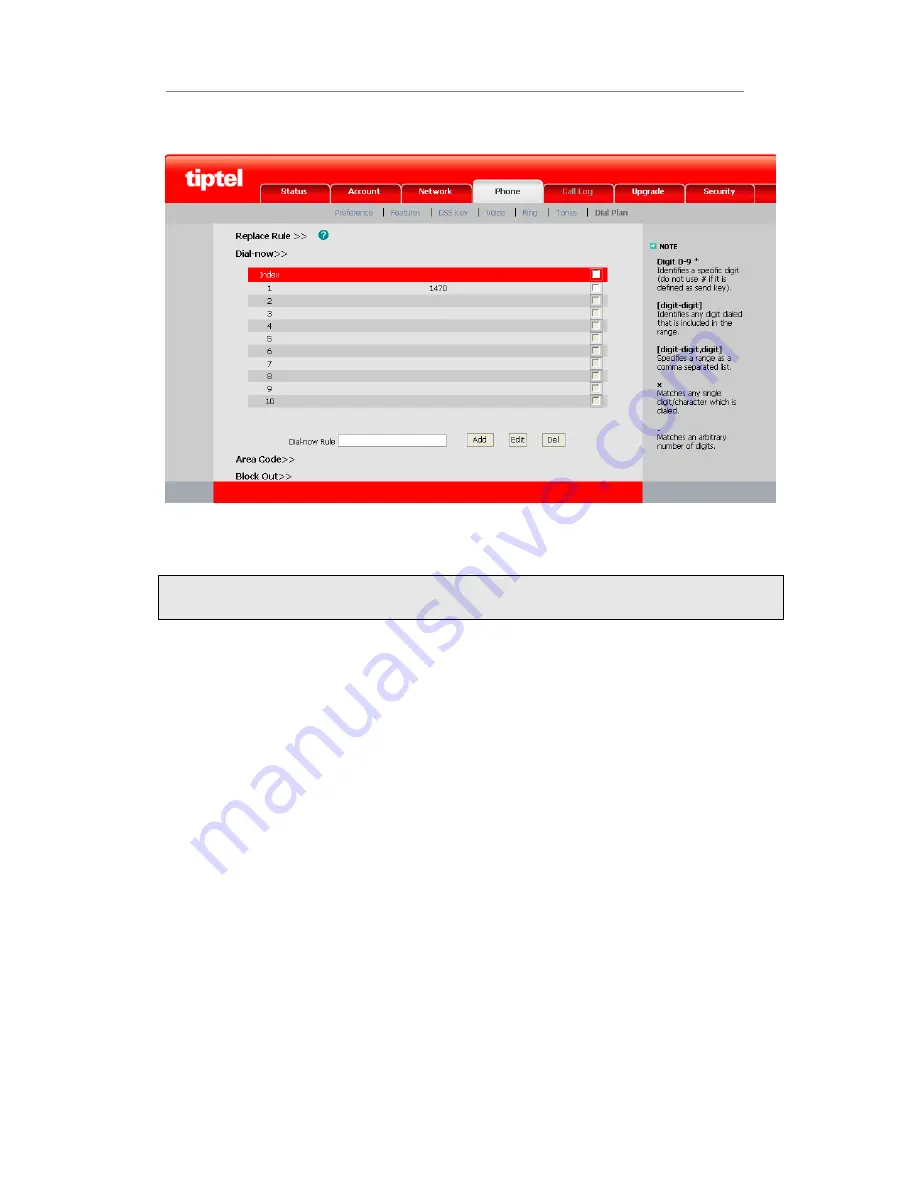
To set a Dial Plan via the Web interface: 

1) 

Choose Phone->Dial Plan->Dial Now. 


2) 

Enter the desired “x/.” 

3) 

Press Add button to save the changes. 

4) 

You can also delete a specific one from the dial plan list by pressing Del button.   

Note: 

“x” represents any one character;    “.” represents string of characters.   


Block Out 

The specific phone numbers can be forbidden to be called out from your IP phone.   

1) 

Choose Phone->Dial Plan->Block Out. 

2) 

Enter the phone number and click Add button to save the changes, or choose the specific one 

in the list, click Del button to delete the record.   

3) 

You can not dial out the number from your IP phone unless it is removed from the forbidden 

List.   


Summary of Contents for 28XS

Page 1: ...11 2010 Versie 1...

Page 2: ...ons broad interoperability with the popular 3 rd party VoIP products fulfilling the VoIP deployment needs In this User Guide you will find everything you need to quickly use your new phone Be sure to...

Page 3: ...g Your Phone 11 General Settings 11 Phone Status 11 Audio Setting 11 Volume 11 Ring Tone 11 Codec Selection 12 Other Settings 12 Key as Send 12 Hot Line 13 Dial Plan 13 Dial Now 13 Block Out 14 Using...

Page 4: ...Tasks 20 Administrator Mode 20 Administrator User Password 20 Reboot 21 Reset to Factory 21 Firmware Update 21 Recovery mode 22 Decryption 22 System Log Export 23 DSS keys Configuration 23 Speed Dial...

Page 5: ...tiptel IP 28xs Getting Started 1 Getting Started Packing List The following components are included in your package tiptel IP 28xs Phone Stand Power Adapter Handset Handset Cord...

Page 6: ...IP 28xs Getting Started 2 Ethernet Cable Quick Installation Guide Check this list before installation to ensure that you have received each item If you are missing any items contact your IP phone res...

Page 7: ...ssembling the Phone This section introduce how to assemble the phone with the components in the packing list Attach the stand Connect Handset Connect Network and Power 1 Attach the Stand as shown belo...

Page 8: ...ministrator you need to do some simple configuration to make the phone work If not please contact with your internet administrator or service provider for more details Network Configuration The networ...

Page 9: ...cate that the configuration is successful If the input gateway is no in conformity with the rules or without it will prompt Invalid setting please re enter after the tone to indicate that the configur...

Page 10: ...ystem administrator for help Network Settings Choose Network Internet Port WAN DHCP By default the phone attempts to contact a DHCP Server in your network in order to obtain its valid network settings...

Page 11: ...ID for authentication provided by ISP User Name User account information provided by VoIP service provider Password It is provided by ISP for registration SIP Server Server for registration provided...

Page 12: ...e s keypad in details Hot Key This IP phone has two DSS keys users can specify corresponding functions through the Web UI DTMF Keypad Use the DTMF hard keys to enter numbers letters and special charac...

Page 13: ...Red There is an incoming call to the device Fast Blinking twice There is a call on hold Table 3 Orange Light LED Status Description Steady Orange Power on Updating Slow Blinking Orange Network unavai...

Page 14: ...work Reset Factory Set AES Key Set admin PWD Voice Upgrade Note The above table only indicates most of phone functions rather than all of them Please refer to the relating parts for more details User...

Page 15: ...atus Audio Setting Volume You can adjust the volume of handset ring tone signal tone To adjust the volume when you are in an active call When Handset mode is activated press the Volume Adjustment Bar...

Page 16: ...e the codecs 1 Choose Account Codecs 2 Use the navigation keys to highlight the desired one in the Enable Disable Codecs list and press the to move to the other list 3 Click Confirm button to save the...

Page 17: ...al 05702000 out the number will be replaced by 00865702000 automatically To set a Dial Plan via the Web interface 1 Choose Phone Dial Plan Replace Rule 2 Enter the desired Prefix and Replace 3 Press A...

Page 18: ...ng Del button Note x represents any one character represents string of characters Block Out The specific phone numbers can be forbidden to be called out from your IP phone 1 Choose Phone Dial Plan Blo...

Page 19: ...o answer it Denying an incoming call Press the button to deny the incoming call directly DND If users enable the DND function all the incoming calls will be rejected automatically In idle status press...

Page 20: ...melody or message to the other party while waiting Other calls can be received and made while having a call on hold To hold resume a call 1 Press the HOLD button to put your active call on hold 2 Duri...

Page 21: ...on hold then A can dial a new number C and press the button to call out 2 While C is ringing A hangs up or presses the R button to complete the transfer 3 A will be disconnected from the call when C...

Page 22: ...or the connecting code Different systems have different codes To retrieve the new voicemail via the Phone interface 1 Pick up the handset and dial the connecting code for example 97 then press key to...

Page 23: ...s back to a particular address and port The default is disabled SIP Session Timer This document defines an extension to the Session Initiation Protocol SIP This extension allows for a periodic refresh...

Page 24: ...both Web and Phone interface User mode can not set the following options Accounts Network Reset to Factory other phone settings Var mode is between the Administrator mode and User mode The permission...

Page 25: ...ding contact list call history account settings etc will be lost you need to export the configuration first if you still want to import the old configurations after reset Or your phone must be configu...

Page 26: ...Administrator Mode Recovery mode When the phone fails to upgrade or in whatever reason you cannot start the phone you can upgrade the firmware through recovery mode 1 Set your PC s network IP Address...

Page 27: ...sis To export the System Log Choose Upgrade Advanced select Export System Log click Export button to export the file to your local computer DSS keys Configuration The phone has 2 DSS keys which are ab...

Page 28: ...s the IP phone will turn to the Always Forward page and you can set the Forward to number then when there is any call to the extension number will be forwarded to the set number automatically To assig...

Page 29: ...set The call park feature is activated by pressing a preprogrammed button or a special sequence of buttons This transfers the current conversation to an unused extension number and immediately puts th...

Page 30: ...y and time period in ms as the following format Frequency Time Period for example 400 200 3 Press Confirm button to save the changes or Cancel to cancel the changes Note 1 Please contact your system a...

Page 31: ...ared data area where voice packets can be collected stored and sent to the voice processor in evenly Type To choose the type of JITTER BUFFER adaptive or Fixed Delay To set the Min Delay Max Delay and...

Page 32: ...y IP Phone Trouble Shooting 28 2 Internal Ringer Text To set group name For example family 3 Internal Ringer File To choose a special ring tone for the group 4 Click the Confirm button to save the cha...

Page 33: ...ther you have muted the conversation or not 3 Consult the outbound server details with your ISP Have DTMF problem 1 Check which kind of DTMF you are using and whether it is compatible with the server...

Page 34: ...to auto provision Consult the auto provision server address with your ISP The manual is only for reference please take the object as the standard We reserve the right to improve or change the product...

Reviews: