6.3
Setting into Operation
■
If necessary, mount the drive unit on to a fixing device for wall mounting (refer to chapter 4.1).
■
Set the volume of the C-Power LV-unit via the jumper position (refer to chapter 4.2 a).
■
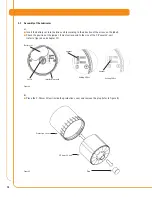
Insert the battery set into the drive unit and the C-Power LV-unit into the protection cover.
Close the complete system (refer to chapters 4.2 b-d).
■
Switch on the lubrication system (refer to chapter 6.5).
■
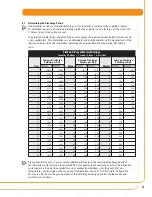
Determine the discharge period (refer to chapter 6.7).
■
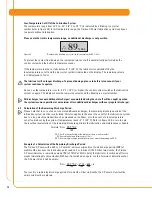
Set the discharge period using the buttons below the display (refer to chapter 6.8).
■
Carry out an additional discharge (refer to chapter 6.8). If the drive motor starts and the green
LED is lit, the lubricator has begun to discharge. The display indicates the remaining volume
(% Vol.) of the C-Power LV-unit.
The operator must always check the customer-specific settings and, if necessary, change them
before the lubricator is set into operation.
6.4 During
Operation
■
Perform regular inspections during operation. Pay special attention to possible leakage and the
condition of the lubricator.
■
Regularly check the condition of the lubricant tube and the connections.
■
Regularly check the filling level of the transparent C-Power LV-unit.
■
After several additional discharges, calculate the reduced discharge period and note it on the
lubrication and maintenance schedule.
■
If a malfunction is indicated on the display, use the troubleshooting guide (table 4, chapter 8.2)
to determine the cause. If the problem cannot be fixed, contact your Timken supplier for
technical support.
Additional discharges and prolonged idle periods must be taken into account when determining
the remaining discharge period of the lubricator.
6.5
Switching the Lubrication System On
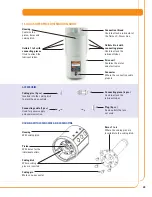
To switch on the lubrication system (refer to figure 13), keep the ON/OFF/SELECT button pressed until
the indication on the display “– –“ is replaced by an indication of the remaining volume (with a new
C-Power LV-unit) and the green LED starts blinking.
Figure 13
6.6
Switching the Lubrication System Off
To switch off the lubrication system (refer to figure 14), keep the ON/OFF/SELECT button pressed until
the display no longer indicates the remaining volume and indicates “– –“ instead. When the lubrication
system is switched off, all of the settings are saved. If you start the lubricator again, it will resume
operation at the point where it had been switched off.
Figure 14
14
– –
99
% Vol.
ON/OFF
SELECT
99
% Vol.
– –
ON/OFF
SELECT


