


1
ENGLISH 02X-095000
EXTENDED WARRANTY
Available in U.S. only.
Extend your warranty for an additional 4 years from date
of purchase for $5… You can pay with AMEX, Discover, Visa or MasterCard by
calling 1 800-448-4639 during normal business hours… Payment must be made
within 30 days of purchase… Name, address, telephone number, purchase date,
and 5-digit model number required… You can also mail a check for $5 to: Timex
Extended Warranty, P…O… Box 1676, Dept… EF, Little Rock, AR 72203…
Please read instructions carefully to understand how to operate your Timex
®
watch…
Your model may not have all of the features described in this
booklet.
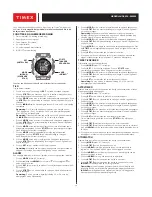
FEATURES AND BASIC OPERATION
1… Date with MM-DD format (month/day)
2… Daily Alarm and Hourly Chime
3… Dual Time (2nd Time Zone)
4… 24-Hour Countdown Timer
5… 24-Hour Stopwatch with Split time
6… INDIGLO
®
night-light
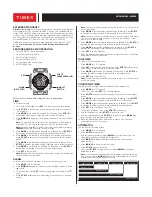
SET
ST/STP
(INCREASE VALUE)
MODE
(NEXT STEP)
INDIGLO
®
BUTTON
Button functions shown with setting functions in parentheses
TIME
To set time and date
1… From Time of Day mode, press
SET
. The Seconds can be seen flashing.
2… Press
ST/STP
to set Seconds to zero adding one minute if seconds are
“30” or greater…
3… Press
MODE
to set Hours, as indicated by its flashing. Press
ST/STP
to
advance the Hours setting… Press and hold to increment quickly…
4… Press
INDIGLO
to toggle the Hours display between 12-Hour and 24-Hour
format…
Note:
12-Hour time has no indicator in the morning and a “PM” indicator
after Noon… 24-Hour time is indicated by a “24H” on the time display…
Note:
Switching between 12- and 24-Hour time can be done by pressing
INDIGLO
at any time during the Time Set process…
5… Press
MODE
to set Minutes, as indicated by its flashing. Press
ST/STP
to
advance the Minutes setting… Press and hold to increment quickly…
6… Press
MODE
to set the Year’s last two digits, as indicated by its flashing.
Press
ST/STP
to advance the Year setting… Press and hold to increment
quickly…
7… Press
MODE
to set the Month number, as indicated by its flashing. Press
ST/STP
to advance the Month setting… Press and hold to increment quickly…
8… Press
MODE
to set the Day, as indicated by its flashing. Press
ST/STP
to
advance the Day setting… Press and hold to increment quickly…
9… Press
SET
to exit Time Set…
Note:
Based on the Year, Month and Day entries, the watch will display the
corresponding Day of the Week…
ALARM
To turn on/off or to set a Daily alarm, or to turn on/off an hourly chime.
1… Press
MODE
until “AL” appears…
2… Press
INDIGLO
repeatedly to turn on/off the Alarm
or the Hourly Chime
or both…
3… To Set the Alarm, press
SET
. The Hour digit flashes and the Alarm ON
lights…
4… Press
ST/STP
to advance the Hours setting… Press and hold to increment
quickly…
Note:
The Hours will be presented in the same format (12- or 24-hour time)
as the time setting…
5… Press
MODE
to set the Minutes as indicated by its flashing. Press
ST/STP
to advance the Minutes setting… Press and hold to increment quickly…
Note:
If desired, you can set the Month and/or Day for an alarm… This allows
you to have the alarm sound every day of a month, the same day of every
month, or on a specific date.
6… Press
MODE
to set the Month as indicated by its flashing. Press
ST/STP
to
advance the Month setting… Press and hold to increment quickly…
7… Press
MODE
to set the Day as indicated by its flashing. Press
ST/STP
to
advance the Day setting… Press and hold to increment quickly…
8… Press
SET
to exit the Alarm Set…
9… When the alarm sounds, press ANY button to silence the alert, or it will stop
automatically in about 10 seconds…
DUAL TIME
To set time for a second time zone
1… Press
MODE
until “DT” appears…
2… Press
SET
. The Hours can be seen flashing. Press
ST/STP
to advance the
Hours setting… Press and hold to increment quickly…
3… Press
MODE
to set Minutes, as indicated by its flashing. Press
ST/STP
to
advance the Minutes setting… Press and hold to increment quickly…
4… Press
SET
to exit Dual Time Set…
Note:
The Hours will be presented in the same format (12- or 24-hour time)
as the time setting…
COUNTOWN TIMER
Use this function for timing events or tasks that have a defined end.
1… Press
MODE
until “TR” appears…
2… To Set the Timer, press
SET
. The Hour digit flashes.
3… Press
ST/STP
to advance the Hours setting… Press and hold to increment
quickly…
4… Press
MODE
to set the Minutes as indicated by its flashing. Press
ST/STP
to advance the Minutes setting… Press and hold to increment quickly…
5… Press
MODE
to set the Seconds as indicated by its flashing. Press
ST/STP
to advance the Minutes setting… Press and hold to increment quickly…
6… Press
SET
to exit Countdown Timer Set…
7… To use the Countdown Timer, press
ST/STP
to start timing…
8… With the timer running, press
ST/STP
to pause the timer…
9… With the timer stopped, press
ST/STP
to re-start it or press
INDIGLO
to
reset the timer to its originally set duration…
10… When the alert sounds, press ANY button to silence it, or it will stop
automatically in about 10 seconds…
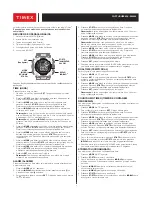
STOPWATCH
Use this function for timing events…
1… Press
MODE
until “ST” appears…
2… Press
ST/STP
to start timing…
3… With the stopwatch running, press
INDIGLO
to record a Split time… The
stopwatch will continue timing in the background…
4… Press
INDIGLO
to release the display and show the current running
stopwatch time…
5… Press
INDIGLO
to record another Split time…
6… Press
ST/STP
to pause the timing…
7… Either press
ST/STP
to resume timing, or press
INDIGLO
to reset the
Stopwatch to zero…
Note:
If the Stopwatch was paused when the display was showing a Split
time, the first press of
INDIGLO
will show the final recorded time, and the
second press will reset the Stopwatch to zero…
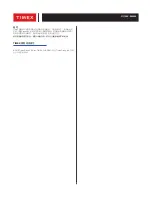
LAP 1 = 7.11
LAP 2 = 7.50
SPLIT 2 = 15.01
LAP 3 = 7.08
SPLIT 3 = 22.09
LAP 4 = 7.30
SPLIT 4 = 29.39
SPLIT 1 = 7.11