background image

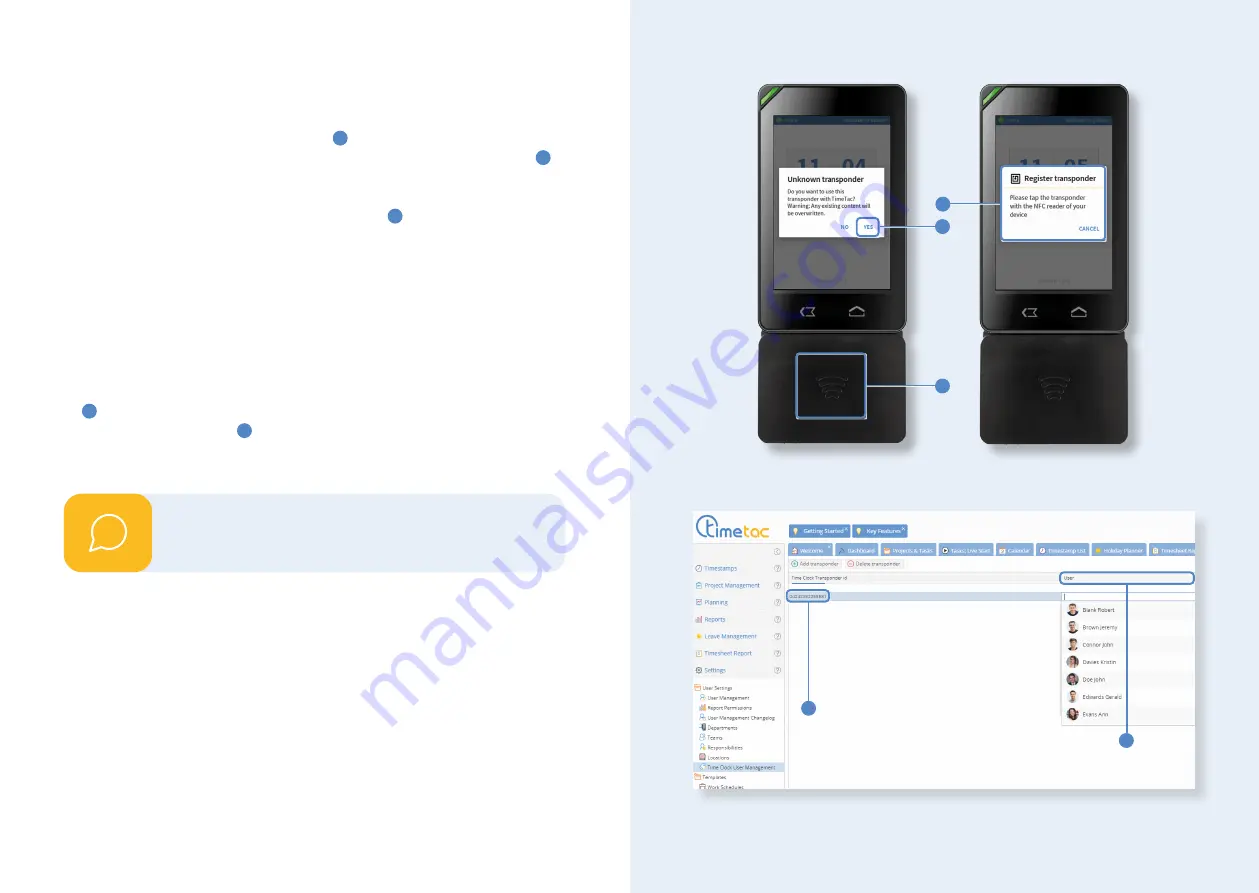
Bring a new transponder to the reader unit 

1

 on the lower end of the time clock. 

The notification "Unknown Transponder" appears on your screen. Tap on "Yes" 

2

 to 

continue the configuration.

The  screen  now  displays  "Register  transponder" 

3

. Bring your transponder 

again  to  the  reader  unit  until  the  notification  changes  to  "Transponder  regis

-

tered". The preparations on the time clock are now completed. To continue in the 

web interace, make sure that the account used belongs to the user group 

Mana-

ger

 and the setting 

Full Employee Access

 is enabled as well as the permissions 

Show User Settings Menu

 and 

Show Assign Transponders Menu

 are in hand. 

Open the settings in the side menu on the left-hand side of the web interface and 
select Settings > User Settings > Time Clock User Management.

Within this menu item you will find a row that indicates a new transponder's 
ID 

4

, however, without assignation to a user. Double click in this row and wit-

hin the column called User 

5

. A 

dropdown menu

 appears which allows you to 

select an employee, the transponder shall be assigned to. After that, the trans

-

ponder can be used immediately.

Assign the transponders one by one!

i


Configuration of transponders

1

2

3

4

5

12

13

Summary of Contents for Mini Time Clock

Page 1: ...Manual for the Mini Time Clock Getting started with TimeTac www timetac com Information Knowledge Base support timetac com The enterprise solution for time tracking...

Page 2: ...Mini Time Clock Index Overview and initial activation 4 Establishing an internet connection 8 Configuration of transponders 12 Settings 14 Time tracking with the different modes 20 Multiuser login 24...

Page 3: ...hat allows the power cable to connect to the device must be on the upper side of the time clock The backside of the mounting is correctly affixed to the device if it has clicked into place The frontsi...

Page 4: ...e setup this display indicates if your Mini Time Clock is con nected to the internet green light online red light offline Once the inter net connection has been established the name of the connected m...

Page 5: ...internet connection Connection via Wi Fi Press the upper volume button 1 for two seconds in order to get to the device menu Tap now on the arrow below the menu Connectivity 2 Enable the op tion WIFI...

Page 6: ...W 3 is where you must insert your sim card Then put the battery back in and the rear cover back on Your time clock can then be connected to a socket via the included cable for power sup ply 4 Press t...

Page 7: ...etting Full Employee Access is enabled as well as the permissions Show User Settings Menu and Show Assign Transponders Menu are in hand Open the settings in the side menu on the left hand side of the...

Page 8: ...ng mode appears on the screen In the upper right corner you can find a setting symbol three points 1 Tap on it to open the settings Changing the tracking mode In the settings menu tap on Tracking mode...

Page 9: ...break 2 Tap on it to define the task that shall be started when you identify at the time clock and indicate your break Define further tasks Within the settings menu you can find the item Assigned Task...

Page 10: ...me Define a Timeout With the aid of the Timeout you can define a time span after which the time clock if not used changes back to the start screen Tap on Idle Timeout 2 in the settings menu in order t...

Page 11: ...tracking tasks Managers with full employee access can determine which task is tracked when you start time tracking or which tasks are available under Others Multiuser task list In this view you have...

Page 12: ...ffers in the following point compared to the multiuser project list Here all projects are listed that have been assigned to the respective employee no matter if they have been activated in the web app...

Page 13: ...count name 1 that appears at the end of your web browser link https go timetac com accountname Then insert your username 2 and password 3 You can view this data within the Multiuser Menu in the web br...

Page 14: ...the volume button for a few seconds You then enter the dashbo ard 1 and open the menu item Device Information Here you can deactivate the auto launch 2 Then tap on the home button 3 and select Settin...

Page 15: ...Have a successful start with TimeTac www timetac com...

Reviews: