background image

3d

Explore endless creativity with the Tiger 3D

 Advanced Setting

(3) Save and Back to Print setting
(4) Within the Speed column, select Adv. setting to implement the motion cycle

- File setting : The motion cycle setting existing in this file
- Adv. setting : The newly saved motion cycle setting

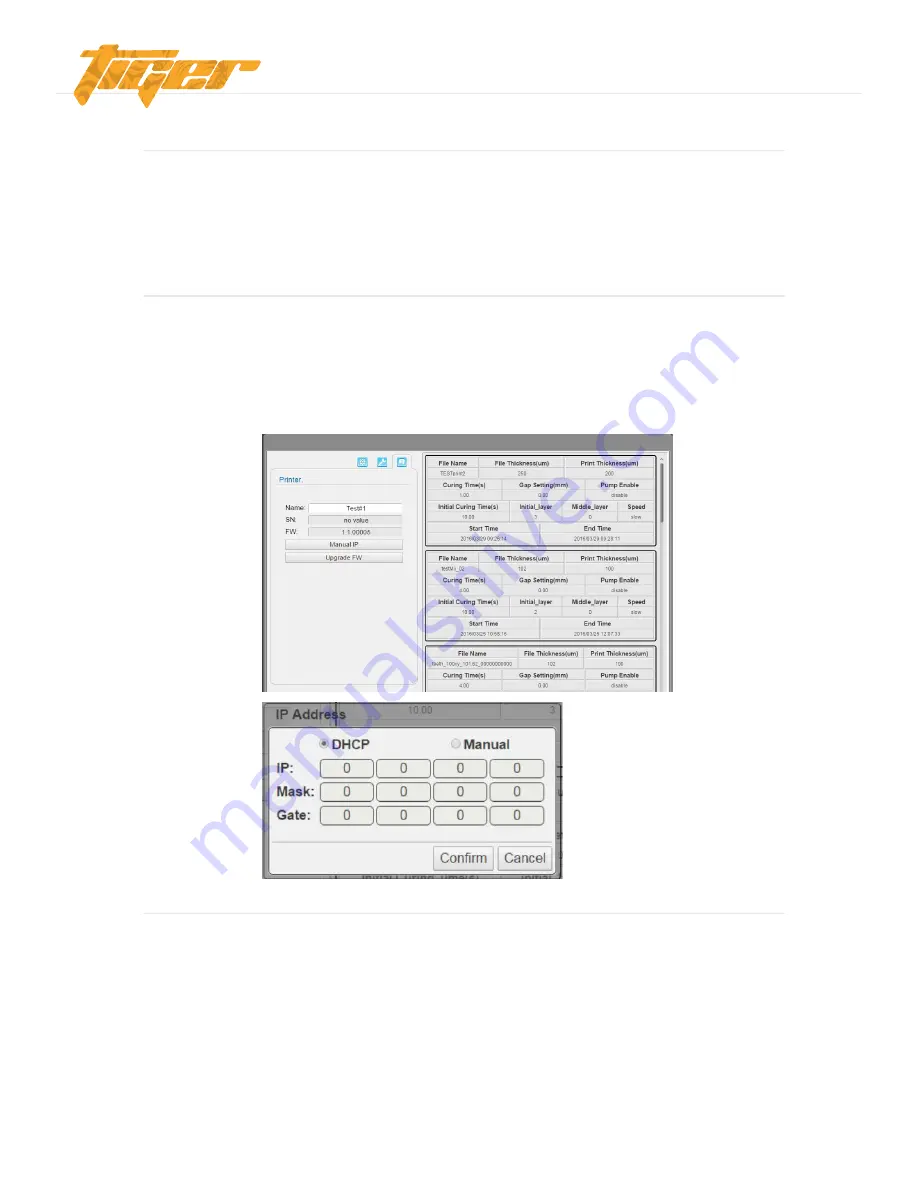
Printing Record and Update

Name: File name
- SN: Serial number
- FW: Firmware version
- Manual IP : Set a static IP address for the Printer.
- Upgrade FW : Download the latest firmware from 

http://www.tiger3dprinters.com/support

  Save as .ZIP file, and select it for upgrade
- Printing record

Information:

- Why and how to use manual IP function?

Manual IP function is for the user whose environment don’t have DHCP network, and would like to 
speed up the printer connection. First, use manual IP function to set a static IP address on printer. 
Second, set the same static IP address on your computer.

- Trouble shooting

If a connection error happen due to manual IP’s typing error, please download DHCP recover file from 

http://www.tiger3dprinters.com/support

- Save the file in USB, and follow the USB upgrade process to unlock.

14

Summary of Contents for HD

Page 1: ...Tiger3D Series XL HD XHD 3DPrinter Operators Manual Version 1 0 1 3d 1 ...

Page 2: ... 2 1 Unpacking 2 2 Connecting to the Power Adapter and Cable 2 3 Power Button Control 2 4 Installing the Picker 2 5 Filling the Resin Tank 3 Operating your 3D Printer Software 3 1 Installing Tiger3D Software 3 2 TigerController 4 After Finished Printing 4 1 After Finished Printing 4 2 Cleaning the Picker 4 3 Cleaning the Resin Tank 4 Appendix Appendix 1 Specifications Appendix 2 Resin Curing Time ...

Page 3: ...erence This equipment generates uses and can radiate radio frequency energy and if not installed and used in accordance with the instruction manual may cause harmful interference to radio communications Operation of this equipment in a residential area is likely to cause harmful interference in which case the user will be required to correct the interference at their expense COMPLIANCE This equipm...

Page 4: ...in will solidify under UV light 7 Chemical substances like resin may cause skin irritation please read the guidelines in Material Safety Data Sheet MSDS of the resin supplied by manufacturer It is recommended to wear gloves when necessary 8 When moving the printer for a long distance be sure to withdraw the remaining resin in reaction tank and clean the tank in advance to prevent from resin overfl...

Page 5: ...indows 8 Windows 10 Network Browser Google Chrome Packaged Size and Weight 32 x 32 x 37 1 2 including packing 127 60 lbs Operating Temperature 10 C to 30 C Ideal Temperature 50 to 86 F 10 28 C Humidity RH 40 to 60 Our printer should keep in dry conditions Store the materials at ambient temperature from 15 C to 28 C Storage of Printing Material And do not exposure to the light otherwise resin may s...

Page 6: ...Overview 3d Explore endless creativity with the Tiger 3D 6 Inside Resin Tank Picker Handle Projector Front View Product Label Fan Storage Area Front Panel Network Port Power Jack USB Port Printer Door Power Button ...

Page 7: ...r box 3 Remove the side cardboard 4 Remove the inner box 2 2 Connecting to the Power adapter and Cable 1 Connect the power cord and adapter to your device and then plug it into an electrical outlet 2 Connect your printer with laptop Basic Connect printer and laptop by RJ 45 cable Graph1 Initiating time 1 minute LAN Connect both printer and laptop to local area network Initiating time a few seconds...

Page 8: ...sides Power on and off you can use Power button to select file in USB to print Or download the latest firmware from our website and execute firmware upgrade by USB Press power button change mode in the same level Pressed and Hold power button hold down the power button for up to 2 seconds to enter the next level 8 Power Indicator Color Behavior Printer Status Purple Blinking System warms up Blue S...

Page 9: ...corners 1 Unlock the Resin Tank from the four corners When installing back the resin tank remember to lock it from the four corners Reminder Before you start to print please remove EPE under resin tank 2 Pick up the resin tank and pour resin 2 Put down the handle to lock the Picker Remove the Picker Lift the handle and remove the Picker Do not fill exceed the top line otherwise the resin will spil...

Page 10: ... file CWS file ZIP file WRK file 3DP file Output Save as 3DP file 3 Operating your 3D Printer Software Surface Smoothing Flip Image Sharpness Resin Shrinkage Compensation Surface smoothing from Z axis the greater number means higher compensation from Z axis Flip image by X axis or Y axis Enabling sharpness from X and Y axis Sharpen an image Soften an image Compensate resin shrinkage 0 to 9 9 Enlar...

Page 11: ...intTool What is a buffer layer 11 Print Setting Select file Insert your 3D image EDP Thickness um Thickness per layer Curing Time s The amount of time for UV curing seconds Speed Peeling speed Gap Adj mm Adjust thickness of the first layer Basic is 0 2mm Base Layers Define number of base layers Base Curing s Curing time for base layers Buffer Layers Set the number of buffer layers Print Setting En...

Page 12: ...rinter Save to USB on printer Printer s memory capacity is 3GB Delete file in Printer Delete file in USB on printer 12 Save Save as Delete Select file from USB on printer Select file from PC Select file from Printer O O O O O O X O X 3 Print and inspect Reminder Do not put your hand into the printer while printing ...

Page 13: ...emove the layer from the tank On The projector turns on Off The projector turns off Current to 6A Reset Reset LED current to default On Door lock warning open Off Door lock warning close LED Change the current of optical engine range from 0 3A Action Verifying Correct Module Behavior Advanced Setting 1 Here you can set the actions of cartridge and picker The setting will be saved as one motion cyc...

Page 14: ...atest firmware from http www tiger3dprinters com support Save as ZIP file and select it for upgrade Printing record Information Why and how to use manual IP function Manual IP function is for the user whose environment don t have DHCP network and would like to speed up the printer connection First use manual IP function to set a static IP address on printer Second set the same static IP address on...

Page 15: ...similar object to scrape away the excess printed model on the picker If any greasy residue persists use a soft cloth dipped in alcohol to rub the surface until the grease is removed 4 3 Cleaning the Resin Tank 1 Unlock the resin tank from four corners 2 Pick up the resin tank and clean out resin 3 Pick up the resin tank and pour resin Do not fill exceed the top line when refilling otherwise the re...

Page 16: ...r Input Model Printing Packaged Size Weight File Input Limitation PrinterTool file input limitation from PC 130 PrinterTool file input limitation from USB 1GB SLC ZIP PNG CWS WRK Ethernet Connection USB Direct Printing Printer 24V DC 3 75A With Adapter 100 240V AC 2A 50 60HZ 32 x 32 x 37 1 2 including packing 127 60 lbs Google Chrome 3 75 kg Windows 7 Windows 8 Windows 10 17 x 17 x 23 1 2 83 lbs I...

Page 17: ...ing industrial design jewelry and education industry The resin is transparent and specifically provide very fine performance Tiger Blue 78 5004 is a Photopolymer resin for engineering and rapid prototyping Tiger3D Burgundy 78 5002 is a Photopolymer resin suitable for direct investment casting in jewelry The resin can be like normal casting wax and specifically formulated for producing investment c...

Page 18: ...ge 78 5003 Tiger3D Clear 78 5010 Resin Resin Thickness Features Curing Time Speed Application 50um 100um Non transparent Easy surface or detail checking Lost Wax Casting 4 5 sec 7 0 sec Normal 50um 100um Non transparent Dental Jewelry Non transparent Easy surface or detail checking R D Master Prototype Conceptional 3 5 sec 6 0 sec Slow 50um 100um 4 5 sec 7 0 sec Normal 50um 100um Transparent Micro...

Reviews: