background image

CM201


Chapter 10: Thorlabs Worldwide Contacts


Page 28


TTN118795-D02


Chapter 10 

Thorlabs Worldwide Contacts 

For technical support or sales inquiries, please visit us at 

www.thorlabs.com/contact

 for our most up-to-date 

contact information. 


USA, Canada, and South America 


Thorlabs, Inc.  
[email protected]  
[email protected]


UK and Ireland 


Thorlabs Ltd.   
[email protected]  
[email protected]


Europe 


Thorlabs GmbH  
[email protected]


Scandinavia 


Thorlabs Sweden AB  
[email protected]


France 


Thorlabs SAS  
[email protected]


Brazil 


Thorlabs Vendas de Fotônicos Ltda.  
[email protected]


Japan 


Thorlabs Japan, Inc.  
[email protected]


China 


Thorlabs China  
[email protected]


Summary of Contents for CM201

Page 1: ...CM201 Green Fluorescent Protein Confocal Microscope User Guide ...

Page 2: ... The software may be used or copied only in accordance with the terms of those agreements No part of this publication may be reproduced stored in a retrieval system or transmitted in any form or any means electronic or mechanical including photocopying and recording for any purpose other than the purchaser s personal use without the written permission of Thorlabs Inc Thorlabs Inc 108 Powers Court ...

Page 3: ...nd Inspection 4 4 2 Setting up the CM201 5 4 3 Cable Connection Diagram 8 4 3 1 Electronic Control Unit ECU Connections 9 4 3 2 Galvo Galvo Scanning Pair 10 Chapter 5 Alignment 12 Chapter 6 Maintaining the CM201 23 6 1 Cleaning 23 6 2 Connector Cleaning 23 6 3 Troubleshooting 23 Chapter 7 Specifications 24 Chapter 8 Mechanical Drawing 26 Chapter 9 Regulatory 27 Chapter 10 Thorlabs Worldwide Contac...

Page 4: ......

Page 5: ...ption Direct Current Alternating Current Both Direct and Alternating Current Earth Ground Terminal Protective Conductor Terminal Frame or Chassis Terminal Equipotentiality On Supply Off Supply In Position of a Bi Stable Push Control Out Position of a Bi Stable Push Control Caution Risk of Electric Shock Caution Hot Surface Caution Risk of Danger Warning Laser Radiation Caution Spinning Blades May ...

Page 6: ... open the scanner block electronics enclosure detector module or computer There are no serviceable parts in these products DO NOT perform instrumentation maintenance or service except as specifically stated Any modification or servicing of this system by unqualified personnel renders Thorlabs free of any liability Only personnel authorized by Thorlabs and trained in the maintenance of this equipme...

Page 7: ...ging modalities without replacing the optic The confocal microscope is designed so that imaging capabilities can be added to accommodate new experimental needs as your research requirements grow 3 1 Features at a Glance Upright Microscope Based on the Cerna DIY Microscopy Platform o 95 mm Dovetail on Rail Accepts Cerna Accessories o D1N Dovetail on Top of Scan Path for Cerna Widefield Imaging Modu...

Page 8: ... LSKGG4 M 1 PMT PMT1001 M 1 Computer with Monitor Keyboard and Mouse 1 Clamping Fork CF175 1 Post Holder PH082E 1 Optical Post TR20 M 1 Dichroic Filtera MD498 1 Emission Filtera MF525 39 1 NI SHC68 68 EPM Cable 1 NI SH6868 Cable 1 Single Mode Fiber Patch Cable P1 405B FC 2 1 Armored Fiber Patch Cable 1 K Cube USB Cable 1 SMA to BNC Cable 1 Alignment Tool 1 Fluorescence Slide 1 Fluorescent Bead Sli...

Page 9: ...ter on Page 26 for mounting holes 2 Use the 2 mm hex wrench to remove the shipping plate on the objective arm 3 Use the 3 32 hex key to remove the locking screw and move the slider to the front of the microscope 4 Use two screws and washers to mount the K Cube Stepper Motor Controller onto the optical table 5 Connect the cable from the Motorized Objective Arm to the Motor port of the K Cube Steppe...

Page 10: ...t of the Controller and the other end to the Scanner Controller port of theCM201 2 Connect the power cord to a standard power outlet D Laser Read the Laser User Guide included along with the unit before setting up the laser WARNING DO NOT switch on the laser while installing the Confocal system This may cause injury due to laser radiation Make sure the laser source is off 1 Remove the red cap from...

Page 11: ... the post holder and clamping fork to mount the PMT onto the optical table 2 Connect the USB port to the computer 3 Connect the SMA to BNC cable from the OUT port of the PMT to the AI1 port on the NI Breakout Box 4 Connect one end of the Armored Fiber Patch cable to the PMT and the other end to the Pinhole port of the CM201 ...

Page 12: ...CM201 Chapter 4 Getting Started Page 8 TTN118795 D02 4 3 Cable Connection Diagram ...

Page 13: ...red without interrupting the system so long as the impedance is 1 kΩ X OUT This is the monitor signal that indicates the location of the X galvanometer It may be monitored without interrupting the system so long as the impedance is 1 kΩ Y OUT This is the monitor signal that indicates the location of the Y galvanometer It may be monitored without interrupting the system so long as the impedance is ...

Page 14: ...n velocity It takes 200 µs to turnaround at the edges of the image There is a turnaround at each side of the image The slow Galvo Y axis controls line movement and there is a flyback between images The Line trigger is synchronized to the fast X galvo triggering on the acquisition and going to zero during the turnarounds This line trigger synchronization is true for both bidirectional two way and u...

Page 15: ...ed Rev G January 28 2022 Page 11 The slow galvo Y axis moves once per image frame During each sweep of the Y galvo scanner the ECU is signaling a frame trigger FRAME TRIGGER OUT or vertical line sync for acquisition synchronization ...

Page 16: ...d Slide Alignment A Fluorescence Slide Alignment Perform the Fluorescence Slide Alignment procedure prior to Bead Slide Alignment 1 Use the 2 5 mm hex wrench to remove the red front and back cover of the microscope There are six M4 screws on the back cover and one M4 screw on the front cover of the microscope 2 Use a 2 mm hex key to remove the dovetail cover on top of the microscope ...

Page 17: ... the PWR ADJUST knob on the laser to set it to maximum power 6 Open the ThorImageLS Application and select the hardware components you have set up in the Hardware Setup window The Hardware Setup window appears when you open the ThorImageLS application Alternately you can access it from the main screen of the application Click on the icon on the Menu panel to open the Hardware Setup window Make sur...

Page 18: ...CM201 Chapter 5 Alignment Page 14 TTN118795 D02 7 In the Galvo Galvo Area Control panel select Advanced and click ...

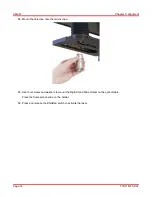
Page 19: ...the laser The LASER ON indicator lights up and after a delay of approximately 5 seconds the source begins to emit light 9 Use a 2 mm hex wrench to adjust the tip and tilt of the Mirror Mount to center the beam on the IR Disk of the Alignment tool Use the iris on the Alignment tool to resize the beam on the center of the IR Disk If the beam on the IR Disk appears clipped not circular please contact...

Page 20: ...95 D02 12 Mount the objective onto the microscope 13 Use four screws and washers to mount the Rigid Stand Slide Holder on the optical table Place the fluorescence slide on the holder 14 Press and release the ENABLE switch to activate the laser ...

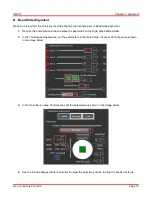
Page 21: ...ageLS application set the parameters in the Galvo Galvo Scanner Control panel as shown in the image below 16 In the Galvo Galvo Area Control panel set the parameters as shown in the image below 17 Use the K Cube Stepper Motor Controller to focus the objective onto the slide ...

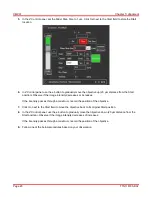
Page 22: ...ote Adjust the histogram in the ThorImageLS software to visualize the intensity of the beam Click the histogram icon in the Image Control panel to display the histogram of the image To adjust the histogram click the Auto button 19 Use the 2 mm hex key to adjust the pinhole position in the X and Y directions to get maximum beam intensity a XY Mount is attached to the pinhole inside the microscope T...

Page 23: ...fluorescence slide and place the bead slide on the Rigid Stand Slide Holder 2 In the ThorImageLS application set the parameters in the Galvo Galvo Scanner Control panel as shown in the image below 3 In the Galvo Galvo Area Control panel set the parameters as shown in the image below 4 Use the K Cube Stepper Motor Controller to adjust the objective position to bring the beads into focus ...

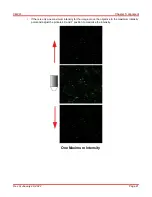
Page 24: ...y decreases or increases If the intensity passes through a maximum record the position of the objective 7 Click Go next to the Start field to move the objective back to its original Start position 8 In the Z Control panel use the button to gradually move the objective down 20 µm distance from the Start position Observe if the image intensity decreases of increases If the intensity passes through a...

Page 25: ...nt Rev G January 28 2022 Page 21 If there is only one maximum intensity for the image move the objective to the maximum intensity point and adjust the pinhole s X and Y position to maximize the intensity One Maximum Intensity ...

Page 26: ...bjective to the mid point of the two maximum intensities Then adjust the pinhole s X and Y position to maximize the intensity After the adjustment you can see only one maximum intensity for the image The bead slide alignment procedure is now complete and the system is ready for imaging Two Maximum Intensities ...

Page 27: ... bulkhead Use a fiber cleaning pad such as Thorlabs FCC 7020 Universal Fiber Connector Cleaner to clean the connector 6 3 Troubleshooting Problem Solution A red dot appears next to the connected hardware device in the Hardware Setup window Check the hardware s cable connections and click in the Hardware Setup window Clipped beam on the IR disk The laser beam is not aligned with the optical axis of...

Page 28: ...table Scan Zoom 1X to 32X Continuous Diffraction Limited Field of View FN25 884 µm x 884 µm 20X 442 µm x 442 µm 40Xa FN23 814 µm x 814 µm 20X 407 µm x 407 µm FOV 40Xa Field Number is Software Selectable up to FN25 Detection Pinhole Ø75 µm Optimized for Included 20X Objective Photomultiplier Tube Multialkali PMT Filters Dichroic Reflection Band 452 490 nm Transmission Band 505 800 nm Emission Filte...

Page 29: ...cluded Sample Holder Included Sample Holder Rigid Stand Slide Holder Sample Holder Stage Manual XY Stage 1 2 Travel Micrometers with 10 µm Graduations Microscope Control and Software Computer PC with DAQ Software ThorImage LS with Lifetime Support Data Acquisition Type National Instruments PXIe 6363 X Series DAQ Card Analog Inputa 1 Channel Resolution 16 Bits Voltage Range 10 V Accuracy 1 66 mV An...

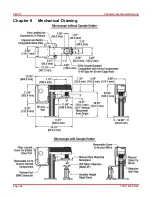
Page 30: ...CM201 Chapter 8 Mechanical Drawing Page 26 TTN118795 D02 Chapter 8 Mechanical Drawing ...

Page 31: ...bs products such as Pure OEM products that means assemblies to be built into a unit by the user e g OEM laser driver cards Components Mechanics and optics Left over parts of units disassembled by the user PCBs housings etc If you wish to return a Thorlabs unit for waste recovery please contact Thorlabs or your nearest dealer for further information Waste Treatment is Your Own Responsibility If you...

Page 32: ...ada and South America Thorlabs Inc sales thorlabs com techsupport thorlabs com UK and Ireland Thorlabs Ltd sales uk thorlabs com techsupport uk thorlabs com Europe Thorlabs GmbH europe thorlabs com Scandinavia Thorlabs Sweden AB scandinavia thorlabs com France Thorlabs SAS sales fr thorlabs com Brazil Thorlabs Vendas de Fotônicos Ltda brasil thorlabs com Japan Thorlabs Japan Inc sales thorlabs jp ...

Page 33: ...www thorlabs com ...
Reviews: