background image

14

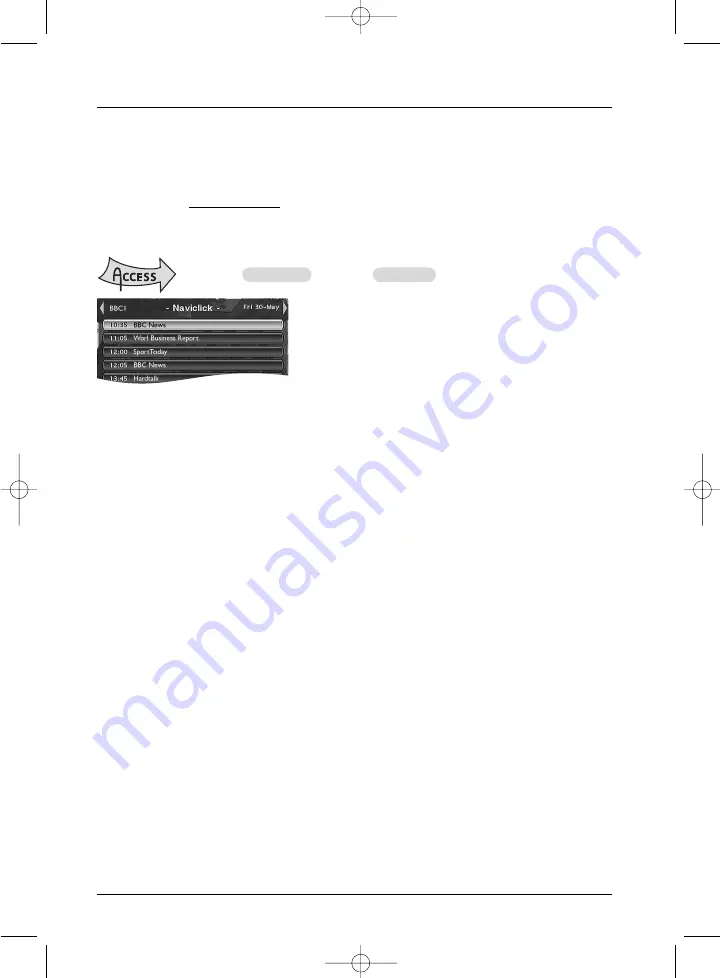
Automatic programming (Naviclick)

Your DVD recorder offers you a TV programming guide for certain channels.The information it
provides are broadcast by these channels and can be downloaded.The updating of Naviclick
information is carried out once every 24 hours. Naviclick allows you to display on your screen
the programmes of those channels and to select the broadcasts you wish to record simply by
clicking on them.

Consulting the TV guide with Naviclick

The programme guide will be available for 24 hours after it is
commissioned as long as the download parameters are correct
(settings on page 34).

Use the keys 

C

,

B

to move from one channel to another or to move around in the channel

programme list (

,

▼ ➔

moving from one programme to another) (

FWD

,

REV

moving from

6 to 6 programmes).
To consult the programs of the channels at a given time, choose a program from the list (e.g.: 9
o’clock news) and use the (

C

,

B

) keys to move on to the programs of the other channels.

Recording through the Naviclick TV guide

1.

Select a channel on your DVD recorder.

2.

Press the 

NAVICLICK

key and wait for the Naviclick page to appear.

3.

Go to the programme you want to record. Move from one channel to another with 

PR+/PR-

or 

C

,

B

.

4.

Confirm by pressing 

OK

.

5.

To select another programme to record, press 

C

to display the Naviclick page.

6.

Leave the menu using 

EXIT

. Switch off your DVD recorder or leave it switched on (don’t

forget to load a DVD R or DVD RW disc if you modify the default internal DVR destination
to DVD R/RW in the programming setup menu). In this case the DVD recorder will
automatically seek the channel to automatically record at the correct recording time.

Note: for the correct downloading of the programme guide, the clock of your DVD recorder must be set.

Recording from a connected device

1.

Satellite receiver 

- When you are watching a channel, select the DVD recorder’s AV2 input

with the 

AV

key on the remote control.

AV2-SAT-CABL

is displayed in the banner and on

the display (

LIVE AV2

) on the DVD recorder for the SCART IN socket.

2.

Video camera or other device

- When you are watching a channel, use 

AV

to select the

AV3 (AUDIO/VIDEO or S-VIDEO IN) socket if your video camera is connected to the front
of your DVD recorder.
Record with 

REC 

(

RECORD

).

Stop the recording by pressing twice on the 

STOP

key.

3.

USB or DV IN Device

- If you connect a compatible appliance to the DV IN or USB

sockets on the front, an additional line will appear in the main menu. Select this line to access
the functions which are proposed.

Recording functions

MENU

Watch TV

OK

Naviclick

OK

02_DTH8657_en.qxp  10/05/06  14:13  Page 14

Summary of Contents for DTH8657E

Page 1: ...DVD DTH8657E User manual 00_DTH8657_cov qxp 10 05 06 14 11 Page 1 ...

Page 2: ...CAUTION LASER RADIATIONWHEN OPEN DO NOT STARE INTO BEAM DE VORSICHT LASERSTRAHLUNG WENNABDECKUNG GEÖFFNET NICHT IN DEN STRAHL BLICKEN ES PRECAUCIÓN RADIACIÓN LÁSER CUANDO ESTAABIERTO NO MIRAR FIJAMENTEAL RAYO DE LUZ IT ATTENZIONE QUANDO E APERTO EMETTE RADIAZIONI LASER NON GUARDARE DENTRO IL FASCIO 00_DTH8657_cov qxp 10 05 06 14 12 Page 2 ...

Page 3: ...er 12 Manually programming a recoding Programming a transfer Automatic programming Naviclick Recording from a connected device Libraries 15 Video library disc Library Music library Picture library Copy to disc Export to USB Copying titles and files Playing a disc 19 Readable discs 19 Loading and playing a disc 20 Play functions Playing discs Displaying the information banner Interactive banners 24...

Page 4: ...ent on top of your DVD recorder Do not place the device on top of an amplifier or any other equipment that gives off heat The appliance should not be in contact with liquids or exposed to the risk of dripping or splashing Therefore be careful not to place any object containing a liquid vase glass bottle on or near your appliance The DVD recorder must not be near or exposed to a flame For instance ...

Page 5: ... navigation keys OK The channel installation starts Wqit until the end of the channel search and continue the installation by following the indications on the screen and using the B C and OK keys Note Installation with a satellite or cable receiver is explained in the separate Quick Start Guide document The navigation keys are used to select and confirm the menu functions The direction of the arro...

Page 6: ...d in RGB which ensures good image quality Caution If aYUV or PS video signal mode is selected there will be no output signal on the SCART OUT TV socket and therefore no image To get an image RGB video signal on this socket press the ZOOM VIDEO OUT key one or more times on the remote control to display RGB 576P 720P 1080I 1H YUV RGB AUTO 576P The main menu must appear on the television screen make ...

Page 7: ...ilable on the coaxial socket of your player Use this socket by connecting it to a decoder or Dolby Digital amplifier or DTS 6 Digital Audio Video outputs The HDMI socket permanently delivers very high quality digital sound and pictures This connection is strongly recommended with a digital television which is fitted with the same socket and is compatible HDMI connection image adjustment If no imag...

Page 8: ...images select DV CAM in the main menu USB socket La prise USB socket is used to play and or copy JPEG images MP3 files or AVI files Note recognised players USB 1 1 MASS STORAGE CLASS Note to access the peripheral files in the main menu select USB Device The AUDIO VIDEO sockets inputs allow the viewing or copying of your video sequences from a camcorder or any other AV device that provides a compos...

Page 9: ...ent selection of the output signal RGB YUV etc SUBTITLE Video DVD subtitle language FWD REV change Naviclick page forward or back Display the NAVICLICK programme guide ADVANCE Skip Forward AGAIN Skip Back REV Slow Fast Rewind PLAY Play FWD Slow Fast Forward REC Record STOP Stop PAUSE Temporary stop RETURN Returns to the previous menu TRANSPORT KEYS The remote control keys One of the recorder s men...

Page 10: ...ns that the function is not available Banners during playback While a disc is playing back you can display or remove banners using the INFO key on the remote control unit The banners appear in the form of a succession of icons at the top of the screen A question mark in the counter zone indicates an input error Information banners When you are watching a channel you can obtain information about th...

Page 11: ...ided by the channel using the B key on the remote control To display information again press the INFO key of the remote control To display the information banner again press the INFO key once To display the banner permanently hold the INFO key down for 2 or 3 seconds The banner is then accompanied by an aerial signal reception quality indicator cursor To remove the banner press the INFO key Curren...

Page 12: ...nt of time available on the disc However for a recording to the hard disc that you can copy later to a DVD R RW disc increase the quality 5 Destination The default recording destination is set for the DVR hard disc To record to a DVD R RW disc change the setting with the key B 6 Start the recording by choosing Start with the key then by pressing OK Recording starts The indication RECORD is display...

Page 13: ... not close a DVD R disc it will still be possible to make other recordings on it later on providing there is enough disc space You can therefore safely store it You may also erase recordings but the corresponding duration will be lost You may not record other titles in their place With DVD RW discs this function does not exist It is replaced by a function that renders the disc compatible in such c...

Page 14: ... selecting the AV2 connector allows you to program the recording of a satellite receiver programme either left switched on or also programmed connected to this connector The selecting of the AV2 connector is activated by default by the AV Timer function triggering of programming via the AV connector Day s Using the digit keys on the remote control type in the date if the recording is not made the ...

Page 15: ... Store your programming by selecting Keep Timer and confirming Return to the main menu using the MENU key in order to continue to use your DVD recorder or turn it off using the STANDBY ON key after having loaded a DVD R RW disc with remaining time compatible with your programming if DVD R RW is selected for recording Programming a transfer The Timers screen appears If you didn t programme anything...

Page 16: ...R or C B 4 Confirm by pressing OK 5 To select another programme to record press C to display the Naviclick page 6 Leave the menu using EXIT Switch off your DVD recorder or leave it switched on don t forget to load a DVD R or DVD RW disc if you modify the default internal DVR destination to DVD R RW in the programming setup menu In this case the DVD recorder will automatically seek the channel to a...

Page 17: ...g Play title gives you access with the navigation keys to other functions Play title to play the title except for the hidden chapters Play all chapters to play the title even the hidden chapters Note Vital if you want to split a title with the Edit menu page 25 Rename the title to give it the name of your choice letter by letter using the character grid Delete the title to free up space on the har...

Page 18: ...ration of the recordings the number of titles and or the number of discs we may estimate that the library may contain the names of 400 titles created on the different discs in your DVD collected DVD R RW discs only on the internal DVR hard disc In order to assist you to find a title the library offers a range of functions sort by title sort by type etc Music library on the DVR hard disc The musica...

Page 19: ... quality In this case the copy is made at the same time as the title is played copying speed 1x If you do not change the recording quality a digital copy will be made In this case a progress bar will be displayed during the copy which may take a certain amount of time depending on the length of the title to be copied Caution SmartRecord must be deactivated in the Recording options menu Export to U...

Page 20: ...files from one media form to another The illustrations on this page summarise the different possibilities and the functions to be chosen in the different menus for copying Copy to disc Export to USB Copy to DVR Copy to disc Copy to DVR Export to USB 02_DTH8657_en qxp 10 05 06 14 13 Page 18 ...

Page 21: ...ou to record to a CD up to 74 minutes of VHS quality video associated with fixed pictures audio tracks and interactive menus SuperVideo CD SVCD Most S VCD discs conform to the IEC 62107 standard They can be used to record up to 70 minutes of digital sound and video with MPEG 2 standard video and MPEG 1 standard audio S VCD disc compatibility is dependent on which MPEG coding software disc design s...

Page 22: ... FWD REV Press one or more times Normal playback with PLAY Skipping a chapter or track Keys PLAY then PR Fl PR lG Note Forward or backward skips can also be made by using the lG SKIP and SKIP Fl keys on the DVD recorder Scene Again DVD Keys PLAY then AGAIN go back approximately 10 seconds Advance DVD Keys PLAY then ADVANCE go forward approximately 30 seconds Zoom Keys PLAY then ZOOM Move the enlar...

Page 23: ...on and use the numbered keys on the remote control unit to access the place from which you want to play back Use two digits for each field For instance if you enter 01 35 12 you will access the sequence beginning 1 hour 35 minutes and 12 seconds after the start of the title Note for VCDs the timer refers to the track currently being played Title or Track Most DVD discs only contain one title Howev...

Page 24: ...d on the type of disc being played standard play respects the order of the titles and chapters on the disc repeat between 2 points or repeat a disc a title The icon of the play mode is accessible via the information banner during playback Repetition between 2 points A and B A B Repeat mode allows you to select exactly the sequence you wish to repeat 1 Select A B repeat mode and confirm to store th...

Page 25: ...deactivate the functions on offer Play mode for Audio CDs Your player has several play modes for Audio CDs standard play that respects the order of the tracks random play that reads music tracks in a random order repeat play Repeat A B Repeat track Repeat disc Repeat de activated IntroScan The IntroScan function enables you to listen to the first few seconds of each track of an audio CD Note when ...

Page 26: ...BC function where available on the disc While playing a disc Access INFO key 1 Select an icon using the C B keys or enter a number using the number buttons to access a chapter a title or a track depending on the disc being played when the corresponding T C P icon is selected 2 Remove the banner using the yellow INFO key or the CLEAR key or wait a few seconds until it disappears With a DVD PLAY MOD...

Page 27: ...okmarks in order not to play an undesirable passage advertising violent scenes If you do not wish to play the masked chapters you must select Play Title in the title menu If you wish to play all the chapters including those you have masked select Play All Chapters in the title menu With this function you can for example hide chapters on a title present on the DVR before copying the title to a DVD ...

Page 28: ...files Where there are sub folders in the folder these are also played Playback then moves to the next folder located at the same level in the tree diagram as the folder containing the first file you selected Stop playback using the STOP key Images Select an image or start the slideshow from the selected image Choose a play mode and confirm with OK Play Play all Random Random all Changing images Du...

Page 29: ...VD player in the purchase form on the site Your player s record number is available in the menu Disc Options of the Setup menu Write down this VOD 8 character recording number in order to complete the form on the web site where you purchase your DivX VOD files Note If you cannot play a DivX VOD file recorded on a CD R disc after downloading it is possible that the rental period allocated during pu...

Page 30: ...acks on Audio CDs Note to remove a chapter from the list select it and press OK To delete the list press the STOP button and confirm your request in the following screen using the C and OK keys Disc actions Rename Disc allows you to change the name chosen by the DVD recorder Thomson xx for a name of your choice selected using a table of alphabetic characters Erase Disc deletes all the titles on th...

Page 31: ...firm with OK Delete a letter by selecting DEL and OK Add a space by selecting SPACE and OK 3 When the name is complete select Done and OK 4 Exit the menu using the RETURN key Play title to play the title except for the hidden chapters Play Full Title allows you to play all the chapters of the selected title even those you have masked using the Edit disc Hide chapter function page 25 Delete Title a...

Page 32: ...he internal DVR hard disc This capacity depends on the space available and the quality set in the Default quality menu SmartRecord By activating the SmartRecord function of your DVD recorder it will adapt the quality of your programmed recordings to one of the 6 settings so that you can record the entire desired programme on a disc that has already been partially recorded Note deactivate this func...

Page 33: ...s then Audio and press OK to confirm Select Audio and confirm with OK Select your favourite language and confirm with OK For the subtitle language select Setup Languages then Subtitles and press OK to confirm Select one of the settings which are selected and press OK to confirm Dialogues if the language chosen is also available on the DVD it will be selected as the dialogue language If it is not a...

Page 34: ...e to set a rating limit and position the Lock function on On Locking 1 The Lock line is already selected Press OK to validate If no secret code has been chosen your DVD recorder asks you to choose one 2 Type four digits and confirm with OK Note choose a four digit number that you will be able to remember easily or note it down 3 The first time a confirmation of the code is asked for Enter the code...

Page 35: ...3 Press OK 4 To return to the DVD recorder menu press C until the menu is displayed on the screen Non categorized titles Certain commercially available DVD video discs have restrictions Unfortunately few discs in Europe have one You can however restrict viewing of such discs by means of the Unrated Titles function by ticking the Password Required option and then locking the DVD recorder When this ...

Page 36: ...r DTS decoder or both depending on devices MPEG must be ticked to play a DVD disc on which the sound was recorded using MPEG standard Standby mode Your DVD recorder has an Eco Standby to reduce its power consumption when on stand by Select Eco Standby to enable this function Note the E Ec co o function does not allow the display of programming warning messages on the display panel Only the record ...

Page 37: ... case of a single sided disc Always place the disc properly into the tray using the proper guide area Always use a soft cloth to clean discs if necessary wipe from the centre to the border Always put discs back into their cases after playing and store in a vertical position Never use record cleaning sprays benzine static electricity liquids or any other solvent if the disc surface is dirty Wipe ge...

Page 38: ...0fps and 720 x 576 at 25fps are supported Macroblocks per second 40500 Maximum average bitrate 4000 kbps Maximum peak bitrate during any 3 seconds of video 10000 kbps MinimumVBV buffer size kbytes 384k bytes for DivX 3 11 content at Home Theater Profile the required average bitrate is 1000 kbps and the required maximum peak bitrate is 4000 kbps Mpeg4 and Xvid content may or may not play back depen...

Page 39: ... in the path of the infrared beam between the remote control and your DVD recorder They may block the beam and thereby cause a malfunction of your DVD recorder The recorder is in copy mode COPYING appears on the display Some DVD players made by the Thomson group react to the same remote control codes To avoid this inconvenience you can modify your DVD recorder s setting by setting it to the A or B...

Page 40: ...at Problems playing DivX version 5 1 and the version 2 5 player With certain recent version coding problems may arise with DivX files which are related directly to the capacities of your computer The coding may require the entire capacity of the microprocessor and alter the quality of the image or desynchronise the image and the sound The display or reading of digital images in JPEG format is slow...

Page 41: ...ss the STANDBY ON key by holding it down for 3 seconds until INIT is displayed on the screen of your DVD recorder The recorder switches off after a few seconds switch it back on The menu displayed on screen is the menu which enables you to choose your DVD recorder s display language It confirms that all settings made since initial installation have been deleted The DVD recorder has been reconfigur...

Page 42: ...o channel configuration from a stereo sound 2 channels up to the digital surround sound 5 1 Manufactured under license from Dolby Laboratories Dolby and the double D symbol are trademarks of Dolby Laboratories DTS is a digital sound compression technique developed by Digital Theater Sound Systems for digital audio multichannel signals DTS and DTS Digital Out are registered trademarks of Digital Th...

Page 43: ...ire to the terminal coded L Live or coloured red Do NOT make any connection to the terminal in the plug which is marked by the letter E or by the safety symbol l l or coloured green and yellow A fused plug must be fitted with a 3A fuse approved by ASTA or BSI to BS 1362 and fuse covers must always be securely replaced If the fuse blows check the mains cable for damage or call a qualified technicia...

Page 44: ...tructions are used to change the signal settings for the sockets used In menu mode select the socket by pressing the ZOOM VIDEO OUT key on the remote control one or more times until a menu appears Your recorder s menu displays the following one after the other AUTO 576P 720P 1080I 1H YUV RGB Auto 576P EN AV 2 SAT CABLE DECODER AV 1 TV HDMI OUT COAXIAL DIGITAL AUDIO OUT ANTENNA CABLE IN OUT OUTPUT ...

Page 45: ...46 quai A Le Gallo 92648 Boulogne Cedex FRANCE 322 019 464 RCS NANTERRE http www thomson europe com 5619471A Copyright THOMSON 2006 00_DTH8657_cov qxp 10 05 06 14 12 Page 4 Model and serial number Dealer s address DTH8657E ...

Page 46: ...DVD DTH 8657 Quick Start Guide QSG 10 05 06 14 17 Page 1 ...

Page 47: ... CABLE DECODER AV 1 TV HDMI OUT COAXIAL DIGITAL AUDIO OUT ANTENNA CABLE IN OUT OUTPUT COMPONENT VIDEO OUT VIDEO AUDIO L R Y Pb Cb Pr Cr 1 2 3 230 V 50 Hz United Kingdom Ireland Europe QSG 10 05 06 14 17 Page 2 ...

Page 48: ... button wait a few seconds to let the television set or the monitor detect the video signal Note 2 The settings above may be applied the first time you use the recorder because the first screen displayed by the recorder is a screen to select the menu language If you connect a television set via the HDMI or Y Pr Pb sockets you will not then see this screen Nevertheless carry out the setting in step...

Page 49: ... Europe 46 quai A Le Gallo 92648 Boulogne Cedex FRANCE 322 019 464 RCS NANTERRE http www thomson europe com 5633736A Copyright THOMSON 2006 DTH8657E QSG 10 05 06 14 17 Page 4 Model and serial number Dealer s address ...

Reviews: