background image

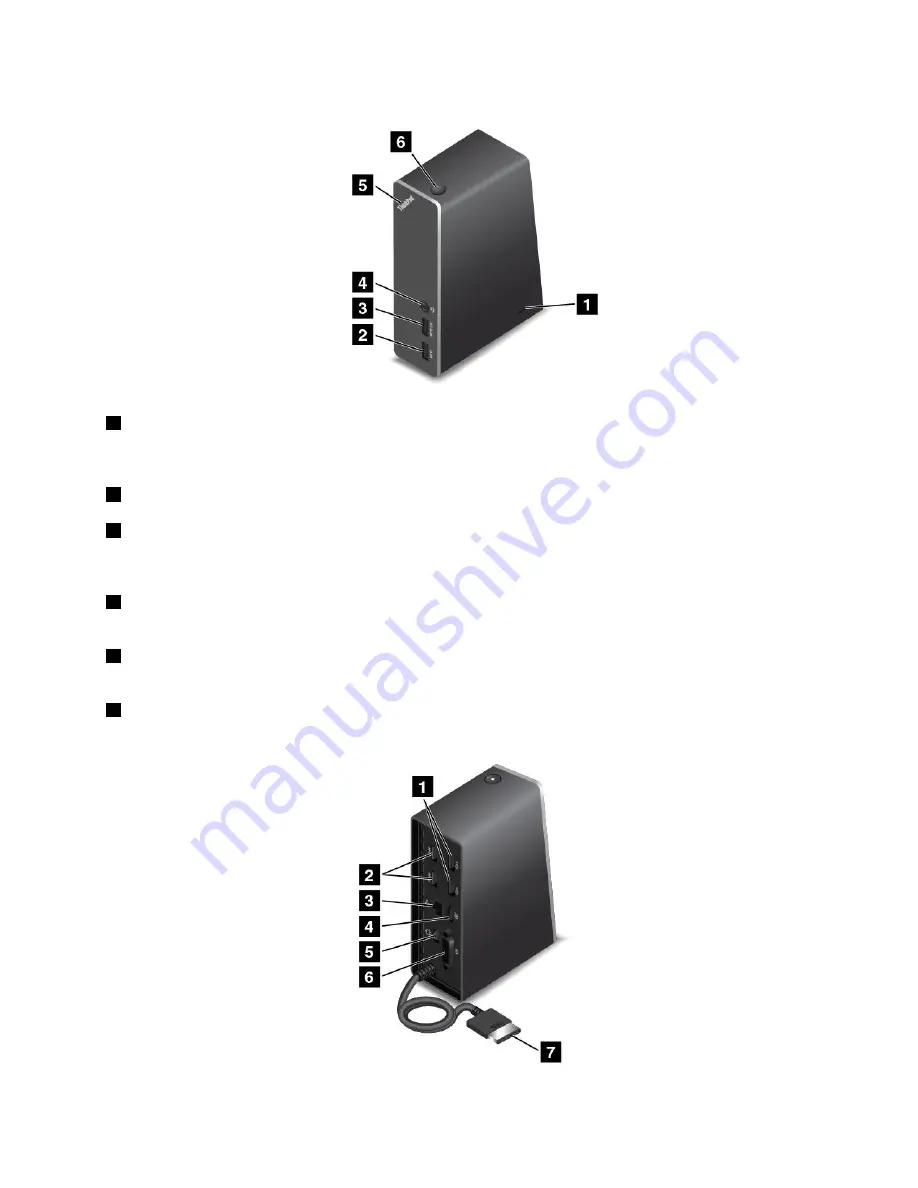
Front view

1

Security-lock slot

: To protect your dock from theft, you can purchase a security cable lock, such as

a Kensington-style cable lock, that fits this security-lock slot to lock your dock to a desk, table, or other
non-permanent fixture.

2

USB 3.0 connector

: Used to connect devices that are compatible with USB 3.0 and USB 2.0.

3

Always On USB connector

: By default, the Always On USB connector enables you to charge some

mobile digital devices and smartphones no matter when your computer is in sleep mode, hibernation mode,
or is off. For more information, refer to the documentation that comes with the dock.

4

Combo audio connector

: Used to connect headphones or a headset that has a 3.5-mm (0.14-inch),

4-pole plug.

5

System-status indicator

: The indicator on the illuminated ThinkPad logo functions the same as the ones

on the computer. For details, see “Status indicators” on page 8.

6

Power button

: The power button on the dock functions the same as the one on the computer.

Rear view

Chapter 3

.

Enhancing your computer

45

Summary of Contents for E550

Page 1: ...User Guide ThinkPad E550 E555 and E550c ...

Page 2: ...53 The latest Safety Warranty and Setup Guide and the Regulatory Notice are available on the Lenovo Support Web site at http www lenovo com UserGuides Second Edition January 2015 Copyright Lenovo 2014 2015 LIMITED AND RESTRICTED RIGHTS NOTICE If data or software is delivered pursuant a General Services Administration GSA contract use reproduction or disclosure is subject to restrictions set forth ...

Page 3: ...ating system 15 Accessing Lenovo programs on the Windows 8 1 operating system 15 An introduction to Lenovo programs 16 Chapter 2 Using your computer 19 Registering your computer 19 Frequently asked questions 19 Special keys 21 ThinkPad pointing device 23 Using the thinkPad pointing device 23 Using the trackpad touch gestures 29 Customizing the ThinkPad pointing device 30 Replacing the cap of point...

Page 4: ... overview 105 Recovery overview for the Windows 7 operating system 105 Creating and using a recovery media 105 Performing backup and recovery operations 106 Using the Rescue and Recovery workspace 107 Creating and using a rescue medium 108 Reinstalling preinstalled programs and device drivers 109 Solving recovery problems 110 Recovery overview for the Windows 8 1 operating system 110 Refreshing yo...

Page 5: ... 140 Appendix B WEEE and recycling statements 141 Important WEEE information 141 Recycling information for China 141 Recycling information for Japan 141 Recycling information for Brazil 142 Battery recycling information for Taiwan 143 Battery recycling information for the European Union 143 Battery recycling information for the United States and Canada 143 Appendix C Restriction of Hazardous Subst...

Page 6: ...iv User Guide ...

Page 7: ...ard by lifting your hands from the palm rest Protect yourself from the heat generated by the ac power adapter When the ac power adapter is connected to an electrical outlet and your computer it generates heat Extended contact with your body even through clothing may cause a skin burn Do not place the ac power adapter in contact with any part of your body while it is in use Never use it to warm you...

Page 8: ...novo Limited Warranty For more information see Warranty Information in the Safety Warranty and Setup Guide that comes with your computer Customer safety is important Our products are developed to be safe and effective However personal computers are electronic devices Power cords power adapters and other features can create potential safety risks that can result in physical injury or property damag...

Page 9: ...en or damaged Signs of overheating smoke sparks or fire Damage to a battery such as cracks dents or creases discharge from a battery or a buildup of foreign substances on the battery A cracking hissing or popping sound or strong odor that comes from the product Signs that liquid has been spilled or an object has fallen onto the computer product the power cord or power adapter The computer product ...

Page 10: ...crimp This can present a safety hazard Always route power cords so that they will not be walked on tripped over or pinched by objects Protect power cords and power adapters from liquids For instance do not leave your power cord or power adapter near sinks tubs toilets or on floors that are cleaned with liquid cleansers Liquids can cause a short circuit particularly if the power cord or power adapt...

Page 11: ...s is a safety feature Do not defeat this safety feature by trying to insert it into a non grounded outlet If you cannot insert the plug into the outlet contact an electrician for an approved outlet adapter or to replace the outlet with one that enables this safety feature Never overload an electrical outlet The overall system load should not exceed 80 percent of the branch circuit rating Consult a...

Page 12: ...y Do not crush or puncture the battery Do not short circuit the battery or expose it to water or other liquids Keep the battery away from children Keep the battery away from fire Stop using the battery if it is damaged or if you notice any discharge or the buildup of foreign materials on the battery leads Store the rechargeable batteries or products containing the rechargeable batteries at room te...

Page 13: ... depends on the amount of system activity and the battery charge level Extended contact with your body even through clothing could cause discomfort or even a skin burn Periodically take breaks from using the keyboard by lifting your hands from the palm rest and be careful not to use the keyboard for any extended length of time Do not operate your computer or charge the battery near flammable mater...

Page 14: ...ted otherwise in the installation and configuration procedures Do not use your computer until all internal parts enclosures are fastened into place Never use the computer when internal parts and circuits are exposed DANGER Connect and disconnect cables as described in the following procedures when installing moving or opening covers on this product or attached devices To connect 1 Turn everything ...

Page 15: ... or on your hands immediately wash the affected areas with water for at least 15 minutes if any symptoms are present after washing get medical care Note For products with mercury containing fluorescent lamps for example non LED the fluorescent lamp in the liquid crystal display LCD contains mercury dispose of according to local state or federal laws Using headphones or earphones CAUTION Excessive ...

Page 16: ...tic bags can be dangerous Keep plastic bags away from babies and children to avoid danger of suffocation Notice for users in the U S A Many personal computer products and accessories contain cords cables or wires such as power cords or cords to connect the accessory to a personal computer If this product has such a cord cable or wire then the following warning applies WARNING Handling the cord on ...

Page 17: ... on page 12 Specifications on page 13 Operating environment on page 14 Lenovo programs on page 14 Locating computer controls connectors and indicators This section introduces the computer hardware features to give you the basic information you need to start using the computer Front view for models with a 2D camera Figure 1 Front view for models with a 2D camera 1 Microphones 2 2D camera 3 TrackPoi...

Page 18: ...he computer cannot be turned off see Computer stops responding on page 85 for more information You also can define what the power button does For example by pressing the power button you can turn off the computer or put the computer into sleep or hibernation mode To change what the power button does do the following 1 From the desktop click the battery status icon in the Windows notification area ...

Page 19: ...ck 7 Power button 8 Numeric keypad 9 System status indicator 10 Fingerprint reader available on some models 11 TrackPoint buttons available on some models 12 Trackpad 13 Media card slot 14 Speakers 1 3D camera 2 Infrared camera 3 Color camera 4 Infrared laser projector Some models comes with a 3D camera 1 Consisted of an infrared camera 2 a color camera 3 and an infrared laser projector 4 the 3D c...

Page 20: ...ut the computer into sleep or hibernation mode To change what the power button does do the following 1 From the desktop click the battery status icon in the Windows notification area on the taskbar 2 Click More power options Choose what the power buttons do 3 Follow the instructions on the screen Note Use Lenovo programs for advanced power settings For Windows 7 Use the Power Manager program For W...

Page 21: ...s it the headset microphone will be disabled and the integrated microphones on the computer will be enabled instead The combo audio connector does not support a conventional microphone For more information see Using audio features on page 40 2 Optical drive available on some models Use the optical drive to read or burn optical discs 3 USB 2 0 connector The Universal Serial Bus USB 2 0 connector is...

Page 22: ...attach it to the Lenovo OneLink connector when you are not using the Lenovo OneLink connector Left side view Figure 4 Left side view 1 Security lock slot 2 Fan louvers 3 Ethernet connector 4 Video graphics array VGA connector 5 High definition multimedia interface HDMI connector 6 USB 3 0 connector 7 Always On USB 3 0 connector 1 Security lock slot To protect your computer from theft purchase a se...

Page 23: ...nector to connect the computer to an HDMI compatible audio device or video monitor such as a high definition television HDTV Note If you connect the computer to a supported ThinkPad OneLink Dock use the HDMI connector on the dock not the one on the computer 6 USB 3 0 connector The USB 3 0 connector is used for connecting USB compatible devices such as a USB printer or a digital camera Note When yo...

Page 24: ...apacity customer upgradable hard disk drive that can meet various storage demands Some models have a solid state drive for data storage The solid state drive makes your computer light small and fast Some models are equipped with a hybrid drive which is a storage device that combines NAND flash solid state memory with hard disk drive technology Note The hidden service partition is the reason why th...

Page 25: ...uted 4 Camera status indicator When the camera status indicator is on the camera is in use 5 6 System status indicators The illuminated dots one in the ThinkPad logo on the outer lid of your computer and the other on the palm rest show the system status of your computer Blinks for three times The computer is initially connected to power On The computer is on in normal mode Off The computer is off ...

Page 26: ... ID and IC Certification information on page 11 Certificate of Authenticity label on page 11 Genuine Microsoft label on page 12 Machine type and model label The machine type and model label identifies your computer When you contact Lenovo for help the machine type and model information helps support technicians to identify your computer and provide faster service The following figure shows the loc...

Page 27: ...enticity label The Certificate of Authenticity label is provided on models that are licensed to use a Windows 7 operating system The licensed Windows version and product key associated with the computer are printed on this label Record this information and keep it in a safe place You might need these numbers to start your computer or reinstall the Windows 7 operating system Depending on the model ...

Page 28: ...ystem if you prefer For more information about the Genuine Microsoft label go to http www microsoft com en us howtotell Hardware aspx The following figure shows the location of the Certificate of Authenticity label under the battery Features This topic lists the features of your computer To view the system properties of your computer do the following For Windows 7 Click Start and right click Compu...

Page 29: ...nal monitor connectors VGA connector and HDMI connector Lenovo OneLink connector One Always On USB 3 0 connector One USB 2 0 connector One USB 3 0 connector RJ45 Ethernet connector Integrated microphones 2D camera or 3D camera depending on the model Note The 3D camera is an infrared laser device Optical drive available on some models Multi Burner drive Wireless features Integrated wireless LAN Int...

Page 30: ...y Operating 8 to 80 Storage 5 to 95 If possible place your computer in a well ventilated and dry area without direct exposure to sunshine Attention Keep electrical appliances such as an electric fan radio air conditioner and microwave oven away from the computer The strong magnetic fields generated by these appliances can damage the monitor and data on the hard disk drive or hybrid drive Do not pl...

Page 31: ... of Control Panel from Category to Large icons or Small icons 2 Locate the program by the icon name and then click the program to launch it Depending on the model your computer might support the following Lenovo programs Note The available programs are subject to change without notice Table 1 Lenovo programs available on the Windows 7 operating system Program name Icon name Access Connections Leno...

Page 32: ... Each location profile stores all the network and Internet configuration settings needed for connecting to a network infrastructure from a specific location such as a home or an office By switching between location profiles as you move your computer from place to place you can quickly and easily connect to a network with no need to manually reconfigure your settings and restart the computer each t...

Page 33: ...ve Protection System Windows 7 and Windows 8 1 The Active Protection System program protects your hard disk drive when the shock sensor inside your computer detects a condition that could damage the drive such as system tilt excessive vibration or shock The hard disk drive is less vulnerable to damage when it is not operating This is because when the hard disk drive is not operating the system sto...

Page 34: ... Manager Windows 7 and Windows 8 1 The Password Manager program automatically captures and fills in authentication information for Windows programs and Web sites System Update Windows 7 and Windows 8 1 The System Update program enables you to keep the software on the computer up to date by downloading and installing software packages including ThinkVantage programs device drivers Unified Extensibl...

Page 35: ...icker service when you call Lenovo for help Automatic notification of free software and special promotional offers To register your computer with Lenovo go to http www lenovo com register and follow the instructions on the screen to register your computer If you are using a Windows 7 operating system you also can register your computer through the preinstalled Lenovo Product Registration program T...

Page 36: ...puter from theft and unauthorized use Use the Password Manager program to protect the data stored on your computer For details see the help information system of the program Before you dispose of the data on the storage drive be sure to read Notice on deleting data from your storage drive on page 60 Is getting connected in different locations a challenge To troubleshoot a wireless networking issue...

Page 37: ...he following To set the desktop as your default startup screen select When I sign in or close all apps on a screen go to the desktop instead of Start so a check is visible To set the Start screen as your default startup screen remove the check from the When I sign in or close all apps on a screen go to the desktop instead of Start checkbox 4 Click OK to save the new setting This feature is not ava...

Page 38: ...ponding function key Note Alternatively you also can disable or enable the Fn lock function in the Keyboard Properties window See Personalized keyboard on page 51 Mutes or unmutes the speakers When the speakers are muted the speaker mute indicator turns on If you mute the sound and turn off your computer the sound will remain muted when you turn on your computer again To turn on the sound press F1...

Page 39: ...e same function as the SysRq key Fn K Has the same function as the ScrLK key ThinkPad pointing device The ThinkPad pointing device enables you to perform all the functions of a traditional mouse such as moving the pointer left clicking right clicking and scrolling With the ThinkPad pointing device you also can perform a variety of touch gestures such as rotating and zooming in or out Using the thi...

Page 40: ...kPoint pointing device 2 Trackpad By default both the TrackPoint pointing device and the trackpad are active with the touch gestures enabled To change the settings see Customizing the ThinkPad pointing device on page 30 TrackPoint pointing device The TrackPoint pointing device enables you to perform all the functions of a traditional mouse such as pointing clicking and scrolling 24 User Guide ...

Page 41: ...tick apply pressure to the pointing stick nonslip cap in any direction parallel to the keyboard The pointer moves accordingly but the pointing stick itself does not move The speed at which the pointer moves depends on the amount of pressure you apply to the pointing stick Left click Press the left click button 2 to select or open an item Right click Press the right click button 3 to display a shor...

Page 42: ...m the left click action Right click Press the right click zone 2 to display a shortcut menu You also can tap anywhere on the surface of the trackpad with two fingers to perform the right click action Scroll Put two fingers on the trackpad and move them in the vertical or horizontal direction This action enables you to scroll through the document Web site or apps Ensure that you position your two f...

Page 43: ...g device see Customizing the ThinkPad pointing device on page 30 Note By default the TrackPoint mode and the Trackpad mode are both enabled You can use either one of them TrackPoint mode In the TrackPoint mode use the pointing stick to move the pointer and use the trackpad to perform other actions such as left click right click and scroll You also can use the trackpad to perform a variety of touch...

Page 44: ...d to perform a variety of touch gestures For information about using touch gestures see Using the trackpad touch gestures on page 29 Point Slide one finger across the surface of the trackpad to move the pointer accordingly Scroll Put two fingers on the trackpad and move them in the vertical or horizontal direction Then you can scroll through the document Web site or apps Ensure that you position y...

Page 45: ...so can use the trackpad to perform a variety of touch gestures This topic introduces the frequently used touch gestures such as tapping dragging scrolling and rotating For more gestures see the help information system of the ThinkPad pointing device Notes When using two or more fingers ensure that you position your fingers slightly apart Some gestures are not available if the last action was done ...

Page 46: ...rackpad with one finger to close the current app Performing this gesture on the desktop closes the desktop and displays the Start screen Swipe from the right edge Swipe in from the right edge of the trackpad with one finger to display the charms Swipe from the left edge Swipe in from the left edge of the trackpad with one finger to show the previously used app Swipe in and out from the right edge ...

Page 47: ...y has revolutionized business by enabling you to take your work wherever you go With ThinkPad batteries you will be able to work longer without being tied to an electrical outlet Using the ac power The power to run your computer can come either from the battery or from ac power While you use ac power the batteries charge automatically Your computer comes with an ac power adapter and a power cord a...

Page 48: ... main factors How much energy is stored in the battery when you begin to work The way you use your computer How often you access the storage drive How bright you make the computer display How often you use the wireless features To check for detailed battery status information do the following For Windows 7 Open the Power Manager program and click the Battery tab For Windows 8 1 Open the Lenovo Set...

Page 49: ...leep mode In sleep mode your work is saved to memory and then the storage drive and the computer display are turned off When your computer wakes up your work is restored within seconds To put your computer into sleep mode doing the following For Windows 7 click Start Sleep For Windows 8 1 go to the Start screen by pressing the Windows key click the power icon then click Sleep Depending on the mode...

Page 50: ...eless features such as Bluetooth or wireless LAN turn them off This helps conserve power To turn off the wireless features press the wireless radios control key Handling the battery This system supports only batteries specially designed for this specific system and manufactured by Lenovo or an authorized builder The system does not support unauthorized batteries or batteries designed for other sys...

Page 51: ...y discharge from your battery or the buildup of foreign materials on the battery leads stop using the battery and obtain a replacement from the battery manufacturer DANGER Only recharge the battery strictly according to instructions included in the product documentation DANGER Do not put the battery in trash that is disposed of in landfills When disposing of the battery comply with local ordinance...

Page 52: ...ards can connect to this type of network Your computer comes with a built in wireless network card and a configuration utility to help you establish wireless connections and monitor the connection status This enables you to stay connected to your network while you are at the office in a meeting room or at home with no need for a wired connection To establish a wireless LAN connection do the follow...

Page 53: ...can check the Access Connections gauge the Access Connections status icon or the Access Connections wireless status icon in the Windows notification area Access Connections gauge Power to the wireless radio is off or no signal Power to the wireless radio is on The signal strength of the wireless connection is poor To improve signal strength move your computer closer to the wireless access point Po...

Page 54: ...n the screen For more information refer to the Windows help information system and the Bluetooth help information system Using an external display You can use an external display such as a projector or a monitor to give presentations or to expand your workspace This topic introduces how to connect an external display choose display modes and change display settings Your computer supports the follo...

Page 55: ...plays the video output only on your computer screen Note Depending on the situation you might see Disconnect PC screen only Computer only or Disconnect projector Duplicate Displays the same video output on both your computer screen and an external display Extend Extends the video output from your computer display to an external display You can drag and move items between the two displays Projector...

Page 56: ...Pro Dock Headphone and microphone functions supported Headphone function supported Not supported Configuring for sound recording To configure the microphone for optimal sound recording use the SmartAudio program To start the program go to Control Panel and click Hardware and Sound SmartAudio Using the camera Depending on the model your computer comes with a 2D camera or a 3D camera The 3D camera w...

Page 57: ... it can record on DVD R discs DVD RW discs type II DVD RAM discs CD RW standard and high speed discs and CD R discs Using a flash media card Your computer has one media card reader slot The media card reader slot supports the following four types of cards MultiMediaCard MMC Secure Digital eXtended Capacity SDXC card Secure Digital SD card Secure Digital High Capacity SDHC card Note Your computer d...

Page 58: ...ard while the computer is in sleep mode or hibernation mode Otherwise the system might not respond when you try to resume operation To remove a flash media card do the following 1 Click the triangular icon in the Windows notification area to show hidden icons 2 Right click the Safely Remove Hardware and Eject Media icon 3 Select the corresponding item to eject the card from the Windows operating s...

Page 59: ...is an Internet connection and a credit card To shop at Lenovo go to http www lenovo com accessories services index html ThinkPad OneLink Dock Depending on the model your computer might support the ThinkPad OneLink Dock hereafter referred to as the dock Attach your computer to the dock to expand the working capability This topic provides basic information about the dock For detailed information abo...

Page 60: ...USB 2 0 connector Used to connect devices that are compatible with USB 2 0 2 Ethernet connector Used to connect the dock to an Ethernet LAN The indicators on this connector have the same function as the ones on the computer 3 HDMI connector Used to connect a digital audio device or video monitor that is compatible with HDMI 4 Power connector Used to connect the ac power adapter 5 Lenovo OneLink co...

Page 61: ...u to charge some mobile digital devices and smartphones no matter when your computer is in sleep mode hibernation mode or is off For more information refer to the documentation that comes with the dock 4 Combo audio connector Used to connect headphones or a headset that has a 3 5 mm 0 14 inch 4 pole plug 5 System status indicator The indicator on the illuminated ThinkPad logo functions the same as...

Page 62: ...ices that use a DisplayPort connector 5 Power connector Used to connect the ac power adapter 6 DVI connector Used to connect a monitor that supports Digital Visual Interface DVI connection Note The DVI connector provides a digital interface only This connector can only be used with a computer that supports DVI connection To connect a DVI monitor do the following Turn off the computer Connect the D...

Page 63: ...ea See Accessibility information on page 48 Ergonomic information Working in the virtual office might mean adapting to frequent changes in your environment For example adapting to the surrounding light sources proper seating and the placement of your computer hardware can help you improve your performance and achieve greater comfort This example shows someone in a conventional setting Even when no...

Page 64: ...ter comfort and improve performance Active sitting and rest breaks The longer you sit and work with your computer the more important it is to observe your working posture Follow Ergonomic information on page 47 and practice active sitting to avoid discomfort associated with your working postures Making minor voluntary postural changes and taking short frequent work breaks are the key ingredients f...

Page 65: ... Use the computer without a display and then select Turn on Audio Description Narrator Narrator is a screen reader that reads what is displayed on the screen aloud and describes events like error messages To open Narrator do the following For Windows 7 Click the Start button Then type Narrator into the search field In the list of results click Narrator For Windows 8 1 Click the Search icon on the ...

Page 66: ...ed people use the computer more comfortably Magnifier is a useful utility that enlarges part or all of your screen so that you can see the words and images better Magnifier is part of the Ease of Access Center To open Magnifier do the following For Windows 7 Click the Start button click All Programs Accessories Ease of Access and then click Magnifier For Windows 8 1 Click the Search icon on the to...

Page 67: ...t from which you can easily locate all keys on the keyboard without visual assistance To adjust your keyboard settings open Control Panel click Ease of Access Ease of Access Center and then click Make the keyboard easier to use To disable or enable the Fn Lock function in the Keyboard Properties window rather than pressing the Fn Esc key combination do the following 1 Go to Control Panel Change th...

Page 68: ...apter for use in an airplane or automobile If you carry an ac power adapter detach the ac cord from it to avoid damaging the cord Travel tips on airplanes If you carry your computer into an airplane take note of the following tips If you intend to use your computer or wireless services such as Internet and Bluetooth check with the airline for restrictions and availability of services before boardi...

Page 69: ...u will be prompted to enter it Typing passwords When this icon is displayed type a power on password or a supervisor password When this icon is displayed type a user hard disk password To type a master hard disk password press F1 When the icon changes to type the master hard disk password Note To return to the icon press F1 again Power on password You can set a power on password to help protect yo...

Page 70: ...rvisor password protects the system information stored in the ThinkPad Setup program If you have set a supervisor password no one can change the configuration of the computer without the password It provides the following security features If only a supervisor password is set a password prompt is displayed when you try to start the ThinkPad Setup program Unauthorized users cannot access the ThinkP...

Page 71: ...Enter To remove a password do the following a In the Enter Current Password field type the current supervisor password and press Enter b Leave the Enter New Password and Confirm New Password fields blank Press Enter twice 4 A Setup Notice window is displayed Press Enter to continue 5 Press F10 A Setup Confirmation window is displayed Select Yes to save the configuration changes and exit Note You m...

Page 72: ...w user hard disk password in the Enter New Password field and press Enter Retype the password in the Confirm New Password field and press Enter b Then set a master hard disk password When a message window prompts you to set the master hard disk password Press Enter to continue Type your new master hard disk password in the Enter New Password field and press Enter Retype the password in the Confirm...

Page 73: ...sk password of over seven characters If you then install the hard disk drive in a computer that cannot recognize a hard disk password that contains more than seven characters you cannot access the drive Record your password and store it in a safe place If you forget the user hard disk password or both user and master hard disk passwords Lenovo cannot reset your passwords or recover data from the h...

Page 74: ...ryption hard disk drive and Encryption solid state drive Some models contain the Disk Encryption hard disk drive or Encryption solid state drive This feature helps to protect your computer against security attacks on media NAND flash or device controllers by use of a hardware encryption chip For the efficient use of the encryption feature set a hard disk password for the internal storage device Us...

Page 75: ...fingerprint reader The following actions could damage the fingerprint reader or cause it not to work properly Scratching the surface of the reader with a hard pointed object Scraping the surface of the reader with your fingernail or anything hard Using or touching the reader with a dirty finger If you notice any of the following conditions gently clean the surface of the reader with a dry soft lin...

Page 76: ...he Recycle Bin Delete the data Format your storage drive using the software for initializing it Use the recovery program provided by Lenovo to bring the storage drive back to the factory default settings These operations however only change the file location of the data they do not delete the data itself In other words the data retrieval processing is disabled under an operating system such as Win...

Page 77: ...rotects against computer Internet security threats unauthorized access intrusions and Internet attacks It also protects your privacy For more information about how to use the firewall program refer to the help information system that comes with the program Protecting data against viruses Your computer is preinstalled with an antivirus program so you can detect and eliminate viruses The antivirus p...

Page 78: ...62 User Guide ...

Page 79: ...y Boot Then do one of the following To install the Windows 7 32 bit operating system select Legacy Only or Both To install the Windows 7 64 bit operating system in Legacy mode select Legacy Only To install the Windows 7 64 bit operating system in UEFI mode select UEFI Only 4 Press the F10 key to exit the ThinkPad Setup program 5 Insert the Windows 7 operating system installation DVD into the optic...

Page 80: ...ws 8 1 operating system installation program to the computer and restart the computer 6 Install the Windows 8 1 fix modules Go to the Microsoft Knowledge Base home page at http support microsoft com Type the number of the fix module in the search field then click Search 7 Install the registry patches for example the Enabling Wake on LAN from Standby for ENERGY STAR patch To download and install th...

Page 81: ...ur computer do the following 1 Turn on the computer When the ThinkPad logo is displayed press F1 The ThinkPad Setup program starts Note If you are required to enter the supervisor password enter the correct password You also can press Enter to skip the password prompt and start the ThinkPad Setup program If you do not enter the password you cannot change the configurations that are protected by th...

Page 82: ...y optimized for you Improper change of the configurations might cause unexpected results Table 3 Config menu items Menu item Submenu item Selection Comments Wake On LAN Disabled AC Only AC and Battery Enable the computer to power on when the Ethernet controller receives a magic packet a special network message If you select AC Only Wake on LAN is enabled only when the ac power adapter is attached ...

Page 83: ... Disabled Enabled Enables or disables boot support for USB storage devices Always On USB Disabled Enabled If you select Disabled the external USB devices cannot be charged through USB connectors Always On USB Charge in Battery Mode Disabled Enabled If you select Enabled the Always On USB connector enables you to charge some mobile digital devices and smartphones when the computer is powered off or...

Page 84: ...otal memory which Intel internal graphics device shares If you select 512MB the maximum usable memory might be reduced on the 32 bit operating system Note This sub menu is only supported in models with an Intel CPU Intel SpeedStep technology Disabled Enabled Select the mode of Intel SpeedStep technology at runtime Maximum Performance Always highest speed Battery Optimized Always lowest speed Disab...

Page 85: ...to be serviced Note The battery will be automatically enabled when the AC adapter is reconnected Password Beep Disabled Enabled Enable this option to have a beep sound when the system is waiting for a power on hard disk or supervisor password Different beeps will sound when the entered password matches or does not match the configured password Beep and Alarm Keyboard Beep Disabled Enabled Enable t...

Page 86: ...2 Type a date or time Security menu To change the security settings of your computer select the Security tab from the ThinkPad Setup menu The following table lists the Security menu items Default values are in boldface Attention The default configurations are already optimized for you Improper change of the configurations might cause unexpected results Table 4 Security menu items Menu item Submenu...

Page 87: ... prevent unauthorized access set the user authentication on the operating system Password at Restart Disabled Enabled If you select and enable Password at restart a password prompt is displayed when you restart the computer If you select Disabled no password prompt is displayed the computer goes ahead and loads the operating system To prevent unauthorized access set the user authentication on the ...

Page 88: ...nd Users Disabled Enabled If you select Enabled all users can update the UEFI BIOS If you select Disabled only the person who knows the supervisor password can update the UEFI BIOS UEFI BIOS Update Option Secure RollBack Prevention Disabled Enabled If you select Disabled you can flash the older version UEFI BIOS Memory Protection Execution Prevention Disabled Enabled Some computer viruses and worm...

Page 89: ...elect Enabled a VMM can utilize the additional hardware capabilities provided by AMD Virtualization technology Note This sub menu is only supported in models with an AMD CPU Ethernet LAN Disabled Enabled If you select Enabled you can use the Ethernet LAN device Wireless LAN Disabled Enabled If you select Enabled you can use wireless LAN devices Bluetooth Disabled Enabled If you select Enabled you ...

Page 90: ...ble Secure Boot you need to set the startup setting as UEFI Only and set CSM Support as No Platform Mode Setup Mode User Mode Specify the system operating mode Secure Boot Mode Standard Mode Custom Mode Specify the system operating mode Reset to Setup Mode Yes No This option is used to clear the current platform key and put the system into Setup Mode You can install your own platform key and custo...

Page 91: ...ou want the computer to start from Note The Boot menu will be displayed if the computer cannot start from any devices or the operating system cannot be found The following table lists the Startup menu items Default values are in boldface Note Some items are displayed on the menu only if the computer supports the corresponding features Table 5 Startup menu items Menu item Selection Comments Boot Se...

Page 92: ...bled If you select Disabled your computer will boot using the default priority If you select Enabled your computer will boot using the priority you have customized Restart menu To exit the ThinkPad Setup program and restart the computer select Restart from the ThinkPad Setup menu The following submenu items are displayed Exit Saving Changes Save the changes and restart the computer Exit Discarding...

Page 93: ...lity features that are already integrated into the client computer and the network Desktop Management Interface The UEFI BIOS of your computer supports an interface called System Management BIOS SMBIOS Reference Specification version 2 7 1 SMBIOS provides information about the hardware components of your computer It is the responsibility of the UEFI BIOS to provide information about itself and the...

Page 94: ...78 User Guide ...

Page 95: ... a good idea to perform a daily backup operation Lenovo has many backup options available for your computer Rewritable optical drives are available for most machines and are easily installed Schedule system restore operations to take a system snapshot periodically For more information about system restore see Chapter 9 Recovery overview on page 105 Update device drivers and the UEFI BIOS when need...

Page 96: ...ver as the potential cause of a problem Getting the latest drivers from the Web site You can download and install updated device drivers from the Lenovo Web site by doing the following 1 Go to http www lenovo com ThinkPadDrivers 2 Select the entry for your computer and then follow the instructions on the screen to download and install necessary software Getting the latest drivers using System Upda...

Page 97: ...ance that can produce negative ions give special attention to the following Avoid directly exposing your computer to the air from an appliance that can produce negative ions Keep your computer and peripherals as far as possible from such an appliance Wherever possible ground your computer to facilitate safe electrostatic discharge Note Not all such appliances cause a significant electrostatic char...

Page 98: ...e surface of the fingerprint reader with a dry soft lint free cloth The surface of the fingerprint reader is dirty or stained The surface of the fingerprint reader is wet The fingerprint reader often fails to enroll or authenticate your fingerprint Registering your computer Register your ThinkPad computer with Lenovo at http www lenovo com register For more information see Registering your compute...

Page 99: ...r Cleaning your computer display To clean the computer display do the following 1 Gently wipe the display with a dry soft lint free cloth If you see a scratchlike mark on your display it might be a stain transferred from the keyboard or the TrackPoint pointing stick when the cover was pressed from the outside 2 Wipe or dust the stain gently with a soft dry cloth 3 If the stain remains moisten a so...

Page 100: ...84 User Guide ...

Page 101: ...vo Solution Center program prompts you to create recovery media You can use the recovery media to restore the hard disk drive or hybrid drive to the factory default state For more information see Creating and using a recovery media on page 105 To run the Lenovo Solution Center program see Accessing Lenovo programs on the Windows 7 operating system on page 15 For additional information refer to the...

Page 102: ...at you are properly grounded and remove all sources of power attached to the computer If you are uncomfortable or unsure about removing components call the Customer Support Center for assistance 4 While the computer is off remove all sources of power and external hardware Remove any non original memory module added to your computer After removing the extra memory module and reinstalling the origin...

Page 103: ...y Invalid remote change requested Solution The system configuration change has failed Confirm the operation and try again To clear the error enter the ThinkPad Setup program Message 0199 System Security Security password retry count exceeded Solution This message is displayed if you enter a wrong supervisor password more than three times Confirm the supervisor password and try again To clear the e...

Page 104: ... Message Fan error Solution Cooling fan has failed Shut down the computer immediately and have the computer serviced Message Thermal sensing error Solution The thermal sensor is not functioning correctly Shut down the computer immediately and have the computer serviced Message This system does not support batteries that are not genuine Lenovo made or authorized The system will continue to boot but...

Page 105: ...nd then type the correct password and press Enter If these items are correctly set and the screen remains blank have the computer serviced Problem When I turn on the computer only a white cursor is displayed on a blank screen Solution If you have modified a partition on your hard disk drive by using partition software information about that partition or the master boot record might have been destr...

Page 106: ...agnostic programs See Diagnosing problems on page 85 Networking problems The following are the most common networking problems Ethernet problems Problem Your computer cannot connect to the network Solution Make sure that The cable is installed correctly The network cable must be securely connected both to the Ethernet connector of your computer and to the RJ45 connector of the hub The maximum allo...

Page 107: ...opper A wireless LAN problem Problem I cannot connect to the network using the built in wireless network card Solution Make sure that Your wireless LAN driver is the latest version Your computer is within range of a wireless access point The wireless radio is enabled Note If you are using the Windows 7 operating system click Show hidden icons on the Windows notification area The Access Connections...

Page 108: ...mputer resumes normal operation When the TrackPoint pointing device is kept pressed for a long time When the temperature changes Problem The TrackPoint pointing device or ThinkPad trackpad does not work Solution Ensure that the TrackPoint pointing device or ThinkPad trackpad is enabled in the ThinkPad pointing device setting window Keyboard problems Problem All or some keys on the keyboard do not ...

Page 109: ...If your computer cannot detect the external monitor click the Detect button 4 Select the external monitor and set Resolution 5 Click Advanced Settings 6 Click the Monitor tab Check the monitor information to make sure that the monitor type is correct If the monitor type is correct click OK to close the window otherwise proceed with the following steps 1 If more than two monitor types are displayed...

Page 110: ...view output on the external monitor or on both the external monitor and the computer display If the external monitor supports a lower resolution than the computer display view output on the external monitor only If you view output on both the computer display and the external monitor the external monitor screen will be blank or distorted Problem You cannot set a higher resolution than the present ...

Page 111: ...rect and the appropriate monitor type is selected Refer to the solution to the above problem Make sure that an appropriate refresh rate is selected by doing the following 1 Connect the external monitor to the monitor connector and then connect the monitor to an electrical outlet 2 Turn on the external monitor and the computer 3 Right click on the desktop and click Screen resolution Note If your co...

Page 112: ...e screen position on the external monitor is incorrect when that monitor is set for a high resolution Solution Sometimes when you use a high resolution such as 1600x1200 the image is shifted to left or right on the screen To correct this first make sure that your external monitor supports the display mode the resolution and the refresh rate that you have set If it does not set a display mode that ...

Page 113: ...t in synthesizer software does not support the control Problem The sound cannot be turned off even if you set the Master volume control at minimum Solution You still can hear some sound even though you have set the Master volume control at minimum To turn off the sound completely go to the Master volume control and select Mute speakers Problem When you connect a headphones to your computer while p...

Page 114: ...the battery Problem The operating time for a fully charged battery is short Solution Discharge and recharge the battery If your battery operating time is still short use a new battery Problem The computer does not operate with a fully charged battery Solution The surge protector in the battery might be active Turn off the computer for one minute to reset the protector then turn on the computer aga...

Page 115: ...r to Replacing a memory module on page 126 e Remove the hard disk drive or hybrid drive Refer to Replacing the storage drive on page 120 f Wait for 30 seconds and then reinstall the memory module and the known good battery or the ac power adapter to test the computer with minimal devices attached first g Reinstall each device one at a time that you have removed in the earlier steps If your compute...

Page 116: ... from the sleep mode When resuming the computer from the sleep mode without attaching the external monitor or turning it on and the computer display remains blank press F7 to bring up the computer display Problem The computer does not return from sleep mode or the system status indicator blinks slowly and the computer does not work Solution If the system does not return from sleep mode it might ha...

Page 117: ...an enhanced password algorithm Computers older than yours might not support such a security function A solid state drive problem Problem When you compress files or folders by use of the data compression function in Windows and then decompress them the process of writing to or reading from the files or folders is slow Solution Apply the disk defragmentation tool in Windows for faster access to the ...

Page 118: ... a disc that does not meet these standards we cannot guarantee that it will play or that if it does play the sound quality will be good Problem The HD DVD tab in the WinDVD8 program is dimmed and I cannot use it Solution Your computer does not support an HD DVD drive A software problem Problem A application does not run correctly Solution Make sure that the problem is not being caused by the appli...

Page 119: ...click Hardware and Sound Device Manager If you are prompted for an administrator password or confirmation type the password or provide confirmation A dock problem Problem The computer does not start when you try to turn it on and does not respond when you try to resume operation Solution Make sure that The ThinkPad OneLink Dock or ThinkPad OneLink Pro Dock is connected to power The computer is cor...

Page 120: ...104 User Guide ...

Page 121: ...To start the Symantec Norton Ghost program do the following 1 Click Start Run The Run window opens 2 Type cmd in the field Then click OK 3 Type ghost align 1mb and press Enter Acronis True Image 2010 or later Paragon Backup Recovery 10 Suit or later Paragon Backup Recovery 10 Home or later Creating and using a recovery media You can use recovery media to restore the hard disk drive or hybrid drive...

Page 122: ...ome with Microsoft Office or Microsoft Works preinstalled If you need to recover or reinstall your Microsoft Office or Microsoft Works programs you must use the Microsoft Office CD or Microsoft Works CD These discs are provided only with computers preinstalled with Microsoft Office or Microsoft Works Performing backup and recovery operations The Rescue and Recovery program enables you to back up a...

Page 123: ...rom a Rescue and Recovery backup located on your local hard disk drive or hybrid drive a USB device or a network drive Restore your hard disk drive or hybrid drive from a Rescue and Recovery backup If you have backed up your hard disk drive or hybrid drive using the Rescue and Recovery program you can restore the hard disk drive or hybrid drive from a Rescue and Recovery backup even if you cannot ...

Page 124: ...ed with Microsoft Office or Microsoft Works Creating and using a rescue medium With a rescue medium such as a disc or a USB hard disk drive you can recover the computer from failures that prevent you from gaining access to the Rescue and Recovery workspace on your hard disk drive or hybrid drive Notes 1 The recovery operations you can perform using a rescue medium vary depending on the operating s...

Page 125: ...the APPS folder The folder contains several subfolders named for the various preinstalled applications 4 Open the subfolder for the application you want to reinstall 5 Double click Setup and then follow the on screen steps to reinstall the application Reinstalling preinstalled device drivers Attention When you reinstall device drivers you are changing the current configuration of your computer Rei...

Page 126: ...s important to create a rescue medium and a set of recovery media as early as possible and store them in a safe place for future use Recovery overview for the Windows 8 1 operating system This section provides information about the recovery solutions for the Windows 8 1 operating system A Windows recovery image is preinstalled in the recovery partition on your computer The Windows recovery image e...

Page 127: ...ettings of the Windows operating system start the computer from an external device or restore the Windows operating system from a system image To use the advanced startup options do the following 1 Depending on the operating system do one of the following Move your pointer to the top right or bottom right corner of the screen to display the charms Click Settings Change PC settings Update and recov...

Page 128: ... of the recovery media starts 7 When the creation of the recovery media finishes do one of the following To keep the recovery partition on your computer click Finish To delete the recovery partition on your computer click Delete the recovery partition Attention If you delete the recovery partition on your computer do keep the recovery media in a safe place The Windows recovery image will not be st...

Page 129: ...ic protective package that contains the part to a metal expansion slot cover or other unpainted metal surface on the computer for at least two seconds This reduces static electricity in the package and your body When possible remove the static sensitive part from the static protective package and install the part without setting it down When this is not possible place the static protective package...

Page 130: ...ot drop crush puncture the battery or make it subject to strong forces Battery abuse or mishandling can cause the battery to overheat which can cause gasses or flame to vent from the battery or coin cell battery To replace the battery do the following 1 Turn off the computer or put the computer into hibernation mode Then disconnect the ac power adapter and all cables from the computer 2 Close the ...

Page 131: ...uring electrical storms do not perform any replacement and do not connect or disconnect the telephone cable from the telephone outlet on the wall Removing the keyboard To remove the keyboard do the following 1 Turn off the computer and then disconnect the ac power adapter and all cables from the computer Wait several minutes to let the computer cool 2 Close the computer display and turn the comput...

Page 132: ...4 Loosen the screws 1 and then remove the cover 2 5 Remove the screws that secure the keyboard 6 Turn the computer over and open the display 116 User Guide ...

Page 133: ...7 Push hard in the direction shown by the arrows to unlatch the front side of the keyboard 8 Detach the keyboard from the keyboard frame Chapter 10 Replacing devices 117 ...

Page 134: ...9 Detach the connectors to remove the keyboard Installing the keyboard To install the keyboard do the following 1 Attach the connectors 118 User Guide ...

Page 135: ...2 Insert the keyboard Ensure that the rear edge of the keyboard is under the frame 3 Slide the keyboard into place in the direction shown by the arrows Chapter 10 Replacing devices 119 ...

Page 136: ...mportant safety information on page vi Attention The storage drive is very sensitive Incorrect handling can cause damage and permanent loss of data Observe the following guidelines Replace the storage drive only if you upgrade it or have it repaired The connectors and slot of the storage drive are not designed for frequent changes or drive swapping Do not drop the drive or subject it to physical s...

Page 137: ...n hibernation mode To replace the storage drive do the following 1 Turn off the computer then disconnect the ac power adapter and all cables from the computer Wait several minutes to let the computer cool 2 Close the computer display and turn the computer over 3 Remove the battery See Replacing the battery on page 113 4 Loosen the screws 1 and then remove the cover 2 5 Remove the screws 1 and then...

Page 138: ...6 Lift the tab to remove the storage drive out of the computer 7 Place the new storage drive into the drive bay 122 User Guide ...

Page 139: ...placing the optical drive Before you start print these instructions and read Important safety information on page vi You computer is shipped with an optical drive installed If it needs to be repaired remove it by doing the following To replace the optical drive do the following 1 Turn off the computer then disconnect the ac power adapter and all cables from the computer Wait several minutes to let...

Page 140: ...3 Close the computer display and turn the computer over 4 Loosen the screws 1 and then remove the cover 2 5 Remove the screw that secures the optical drive 6 Pull out the optical drive 124 User Guide ...

Page 141: ...e connector 8 Reinstall the screw to secure the optical drive 9 Reinstall the computer cover 1 Then tighten the screws 2 10 Reinstall the battery See Replacing the battery on page 113 11 Turn the computer over again Connect the ac power adapter and all cables Chapter 10 Replacing devices 125 ...

Page 142: ...computer might not be able to operate at the maximum speed Attention Before you start installing a memory module touch a metal table or a grounded metal object This action reduces any static electricity from your body Static electricity could damage the memory module To replace a memory module do the following 1 Turn off the computer then disconnect the ac power adapter and all cables from the com...

Page 143: ...de of the memory slot Insert the memory module 1 into the slot at an angle of about 20 degrees Pivot the memory module downward until it snaps into place 2 Ensure that the memory module is firmly installed in the slot and cannot be moved easily Attention Do not touch the contact edge of the memory module Otherwise the memory module might get damaged Chapter 10 Replacing devices 127 ...

Page 144: ...njury Replace only with a battery of the type recommended by Lenovo Keep the battery away from fire Do not expose it to excessive heat Do not expose it to water or rain Do not short circuit it Do not drop crush puncture the battery or make it subject to strong forces Battery abuse or mishandling can cause the battery to overheat which can cause gasses or flame to vent from the battery or coin cell...

Page 145: ...osen the screws 1 and then remove the cover 2 5 Detach the connector 1 Then remove the coin cell battery 2 6 Install the new coin cell battery 1 Then attach the connector 2 Chapter 10 Replacing devices 129 ...

Page 146: ...install the computer cover 1 Then tighten the screws 2 8 Reinstall the battery See Replacing the battery on page 113 9 Turn the computer over again Connect the ac power adapter and all cables 130 User Guide ...

Page 147: ...computer Recording problem symptoms and details Collect the answers to the questions below before you call for help Then you will be able to get help as quickly as possible What is the problem Is it continuous or intermittent Is there an error message What is the error code if any What operating system are you using Which version Which software programs were running at the time of the problem Can ...

Page 148: ...ooting information or the diagnostic programs might tell you that you need additional or updated device drivers or other software You can get the latest technical information and download device drivers and updates from the Lenovo Web site at http www lenovo com support Lenovo Support Web site Technical support information is available on the Lenovo Support Web site at http www lenovo com support ...

Page 149: ...ur computer monitor and other components or your proof of purchase Description of the problem Exact wording of any error messages Hardware and software configuration information for your system Telephone numbers For a list of the Lenovo Support phone numbers for your country or region go to http www lenovo com support phone or refer to the Safety Warranty and Setup Guide that comes with your compu...

Page 150: ...134 User Guide ...

Page 151: ... Division Multiplexing OFDM radio technology and is compliant to The 802 11b g Standard 802 11a b g 802 11n or 802 11ac on Wireless LANs as defined and approved by the Institute of Electrical and Electronics Engineers The Wireless Fidelity WiFi certification as defined by the Wi Fi Alliance A Bluetooth device is designed to be interoperable with any Bluetooth products that are compliant to Bluetoo...

Page 152: ...tromagnetic energy emitted by wireless devices like for example mobile phones Due to the fact that integrated wireless cards operate within the guidelines found in radio frequency safety standards and recommendations Lenovo believes they are safe for use by consumers These standards and recommendations reflect the consensus of the scientific community and result from deliberations of panels and co...

Page 153: ... to Part 15 of the FCC Rules These limits are designed to provide reasonable protection against harmful interference in a residential installation This equipment generates uses and can radiate radio frequency energy and if not installed and used in accordance with the instructions may cause harmful interference to radio communications However there is no guarantee that interference will not occur ...

Page 154: ...Bratislava Slovakia German Class B compliance statement Deutschsprachiger EU Hinweis Hinweis für Geräte der Klasse B EU Richtlinie zur Elektromagnetischen Verträglichkeit Dieses Produkt entspricht den Schutzanforderungen der EU Richtlinie 2004 108 EG früher 89 336 EWG zur Angleichung der Rechtsvorschriften über die elektromagnetische Verträglichkeit in den EU Mitgliedsstaaten und hält die Grenzwer...

Page 155: ...ät erfüllt die Schutzanforderungen nach EN 55024 und EN 55022 Klasse B Class 1 laser product compliance statement This product complies with International Standard EN IEC 60825 1 2007 edition 2 for a Class 1 laser product This product also complies with US FDA performance standards for laser products except for deviations pursuant to Laser notice No 50 dated June 24 2007 Manufactured by Intel Corp...

Page 156: ... regulatory notice Advertencia En Mexico la operación de este equipo estásujeta a las siguientes dos condiciones 1 es posible que este equipo o dispositivo no cause interferencia perjudicial y 2 este equipo o dispositivo debe aceptar cualquier interferencia incluyendo la que pueda causar su operación no deseada 140 User Guide ...

Page 157: ...he product is not to be thrown away but rather put in the established collection systems for reclaiming these end of life products Users of electrical and electronic equipment EEE with the WEEE marking must not dispose of end of life EEE as unsorted municipal waste but use the collection framework available to them for the return recycle and recovery of WEEE and to minimize any potential effects o...

Page 158: ...dustrial waste disposal operator and follow their instructions Disposal of a lithium battery must comply with local ordinances and regulations Disposing of a disused battery from Lenovo notebook computers Your Lenovo notebook computer has a lithium ion battery or a nickel metal hydride battery If you are a company employee who uses a Lenovo notebook computer and need to dispose of a battery contac...

Page 159: ...6 66 EC batteries and accumulators are labeled to indicate that they are to be collected separately and recycled at end of life The label on the battery may also include a chemical symbol for the metal concerned in the battery Pb for lead Hg for mercury and Cd for cadmium Users of batteries and accumulators must not dispose of batteries and accumulators as unsorted municipal waste but use the coll...

Page 160: ...144 User Guide ...

Page 161: ...January 2013 meet the requirements of Directive 2011 65 EU on the restriction of the use of certain hazardous substances in electrical and electronic equipment RoHS recast or RoHS 2 For more information about Lenovo progress on RoHS go to http www lenovo com social_responsibility us en RoHS_Communication pdf Copyright Lenovo 2014 2015 145 ...

Page 162: ...China RoHS India RoHS RoHS compliant as per E Waste Management Handling Rules 2011 146 User Guide ...

Page 163: ...s the requirements of the Republic of Turkey Directive on the Restriction of the Use of Certain Hazardous Substances in Electrical and Electronic Equipment EEE Ukraine RoHS Appendix C Restriction of Hazardous Substances Directive RoHS 147 ...

Page 164: ...148 User Guide ...

Page 165: ...ou to make efficient use of energy an integral part of your day to day operations To help in this endeavor Lenovo has preset the following power management features to take effect when your computer has been inactive for a specified length of time By using ENERGY STAR qualified products and taking advantage of the power management features of the computer you can help reduce the consumption of ele...

Page 166: ...ave Wake on LAN enabled while the computer is in sleep mode you can reduce the power consumption and prolong the time in sleep mode by disabling the setting of Wake on LAN for sleep mode To disable the setting of Wake on LAN for sleep mode do the following 1 Go to Control panel and click Hardware and Sound Device Manager 2 In the Device Manager window expand Network adapters 3 Right click your net...

Page 167: ...tries Microsoft Windows Direct3D and BitLocker are trademarks of the Microsoft group of companies AMD and AMD V are trademarks or registered trademarks of Advanced Micro Devices Inc DisplayPort is a Trademark of the Video Electronics Standards Association The terms HDMI and HDMI High Definition Multimedia Interface are trademarks or registered trademarks of HDMI Licensing LLC in the United States ...

Page 168: ...152 User Guide ...

Page 169: ...cation Lenovo may make improvements and or changes in the product s and or the application s described in this publication at any time without notice The products described in this document are not intended for use in implantation or other life support applications where malfunction may result in injury or death to persons The information contained in this document does not affect or change Lenovo...

Page 170: ...154 User Guide ...

Page 171: ......

Page 172: ......

Reviews: