pg. 14
5.2 LIGHTING
5.2 LIGHTING
5.2 LIGHTING
5.2 LIGHTING
5.2 LIGHTING AND ST
AND ST
AND ST
AND ST
AND STAR
AR
AR
AR
ARTING
TING
TING
TING
TING THE CENTRAL HEA
THE CENTRAL HEA
THE CENTRAL HEA
THE CENTRAL HEA
THE CENTRAL HEATING COOKERS
TING COOKERS
TING COOKERS
TING COOKERS
TING COOKERS
Before using the central heating cooker make sure that all the movable parts are in position; also remove any labels and
stickers from the glass to avoid having permanent traces remain on the surfaces. Verify that the hydraulic and electric
connections have been made perfectly.
REMOVE THE PROTECTIVE ADHESIVE FILM FROM THE COOKTOP.
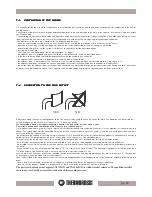
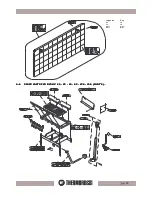
To start the central heating cooker firstly activate the starter by lifting the pin until it hooks onto the plate by means of the groove on it (see fig.
above and on page
F - 9
; use the tool provided). Leave the adjustment ring
I - 14
open
.
Now make a small fire using paper or cardboard
together with wood chips or small pieces of wood, and keep adding bigger pieces of wood as the fire gets going.
When the combustion is well underway, turn the starter
F - 9
to the home position and close the adjustment ring
I - 14.
CAUTION: DO NOT FORGET TO CLOSE THE ADJUSTMENT RING! IF IT IS LEFT OPEN THERE IS A SERIOUS RISK OF THE
BOILER OVERHEATING AND SUBSEQUENTLY DAMAGING THE BOILER ITSELF. THIS DAMAGE IS NOT COVERED BY
WARRANTY AS IT WOULD BE THE RESULT OF NEGLIGENCE BY THE USER. IF THE STARTER IS LEFT OPEN THE RESULT
IS LESS HEAT TRANSFER TO THE WATER IN THE CENTRAL HEATING COOKER AS THE ADDITIONAL HEAT EXCHANGER
IS NOT UTILISED.
5.3 OPERA
5.3 OPERA
5.3 OPERA
5.3 OPERA
5.3 OPERATION OF
TION OF
TION OF
TION OF
TION OF THE CENTRAL HEA
THE CENTRAL HEA
THE CENTRAL HEA
THE CENTRAL HEA
THE CENTRAL HEATING COOKERS
TING COOKERS
TING COOKERS
TING COOKERS
TING COOKERS
Once the heater has been lit and started, the combustion can be increased or reduced by acting on the automatic combustion air thermostat
adjustment knob to adapt the central heating cooker to your heating or cooking needs. In models 60 - 65 - 90 - 95 - 650 - 920 a secondary air
slide is located on the loading door for the ingress of secondary air. The heating pump starts up as soon as the anticondensation thermostat
calibrated at 60°C gives the start signal to the plant circulating pump. The pump switch (only for models 60 - 65 - 650 - 90 - 95 - 920 ) must be
positioned on “1” (ON).
The maximum thermal value is achieved by using fuel having a diameter of 5-7 cm , obviously bigger pieces can be used but
at the expense of less power. To rekindle the fire move the grate to the lowest position. Move the handle (O - 7) forward and
backward several times: this will free the grate slots of the combustion ash.
CAUTION : The wood load must always be suitable for the actual thermal absorption requirements of the plant. Large
firewood loads in limited absorption conditions result in the unburnt wood remaining in the forebox for long periods of time.
This situation encourages the distillation of the wood resulting in the formation of large quantities of gases and vapours that
are only partially burned. The gases condense in the central heating cooker and in the tubes and create tarry deposits.
5 . 1 . 2
5 . 1 . 2
5 . 1 . 2
5 . 1 . 2
5 . 1 . 2
DESCRIPTION OF MAIN CONTR
DESCRIPTION OF MAIN CONTR
DESCRIPTION OF MAIN CONTR
DESCRIPTION OF MAIN CONTR
DESCRIPTION OF MAIN CONTROLS
OLS
OLS
OLS
OLS AND COMPONENTS OF CENTRAL HEA
AND COMPONENTS OF CENTRAL HEA
AND COMPONENTS OF CENTRAL HEA
AND COMPONENTS OF CENTRAL HEA
AND COMPONENTS OF CENTRAL HEATING
TING
TING
TING
TING
COOKERS 60 - 65 - 650 - 90 - 95 - 920 .
COOKERS 60 - 65 - 650 - 90 - 95 - 920 .
COOKERS 60 - 65 - 650 - 90 - 95 - 920 .
COOKERS 60 - 65 - 650 - 90 - 95 - 920 .
COOKERS 60 - 65 - 650 - 90 - 95 - 920 .
The main controls and components of the central heating cooker are listed below.
1) Automatic primary air regulator
2) Secondary air inlet
3) Front feed door
4) Three-position grate
5) Combustion chamber
6) Top feed hole
7) Grate adjustment lever
8) Oven temperature adjustment lever
9) Starter
10) Oven grill positioner
11) Second oven
12) Oven
13) Boiler thermometer
14) Supplementary air
15) Grate control release lever
16) Anticondensation thermostat
17) Pump switch


