pg. 12
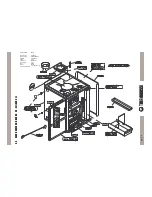
Next mount the wood drawer front (only for F25 - F30 ) (see
figure on next page on the right).
- Slide in the wood drawer front (F) complete with handle.
- Fasten the front with 9 self-tapping screws TC+ 3.9X13
black z..
Next mount the oven door (only for F25 - F30 ).
- Fix the hooks (C) to the hinges (D) on the oven
door. (see figure on right)
- Slide the oven door into the lodgings as indicated
in the figures on the side.
- Release the lock (E) as indicated in the figure
below.
4.10 INST
4.10 INST
4.10 INST
4.10 INST
4.10 INSTALLA
ALLA
ALLA
ALLA
ALLATION OF CASING FOR BOSKY 25 - 30 - F25 - F30
TION OF CASING FOR BOSKY 25 - 30 - F25 - F30
TION OF CASING FOR BOSKY 25 - 30 - F25 - F30
TION OF CASING FOR BOSKY 25 - 30 - F25 - F30
TION OF CASING FOR BOSKY 25 - 30 - F25 - F30
After positioning the central heating cooker, connecting the electrical system and the hydraulic system (only if using the rear delivery and
return outlets) (see para. 4.2 - 4.3 - 4.4 - 4.5 - 4.6 - 4.7 - 4.8 - 4.9 ) proceed with the installation of the casing as illustrated in the images
below:
Firstly
mount the front profile (figure below right): -Lift and move away the cooktop (A) -Insert the front profile (B) in the cast iron housing.
Fix the profile with the hardware specified below. -Next replace the cooktop (A).
Then
mount the vertical door (figure below left) : -Mount the door on the hinges as indicated by the arrows in the drawing on the left. Align
the vertical door by adjusting the hinges.
Key
screw
nut
Legenda
vite
dado


