background image

Operation - UT150 Controller
UP150 Controller Overview

6-4 

Thermo Scientific

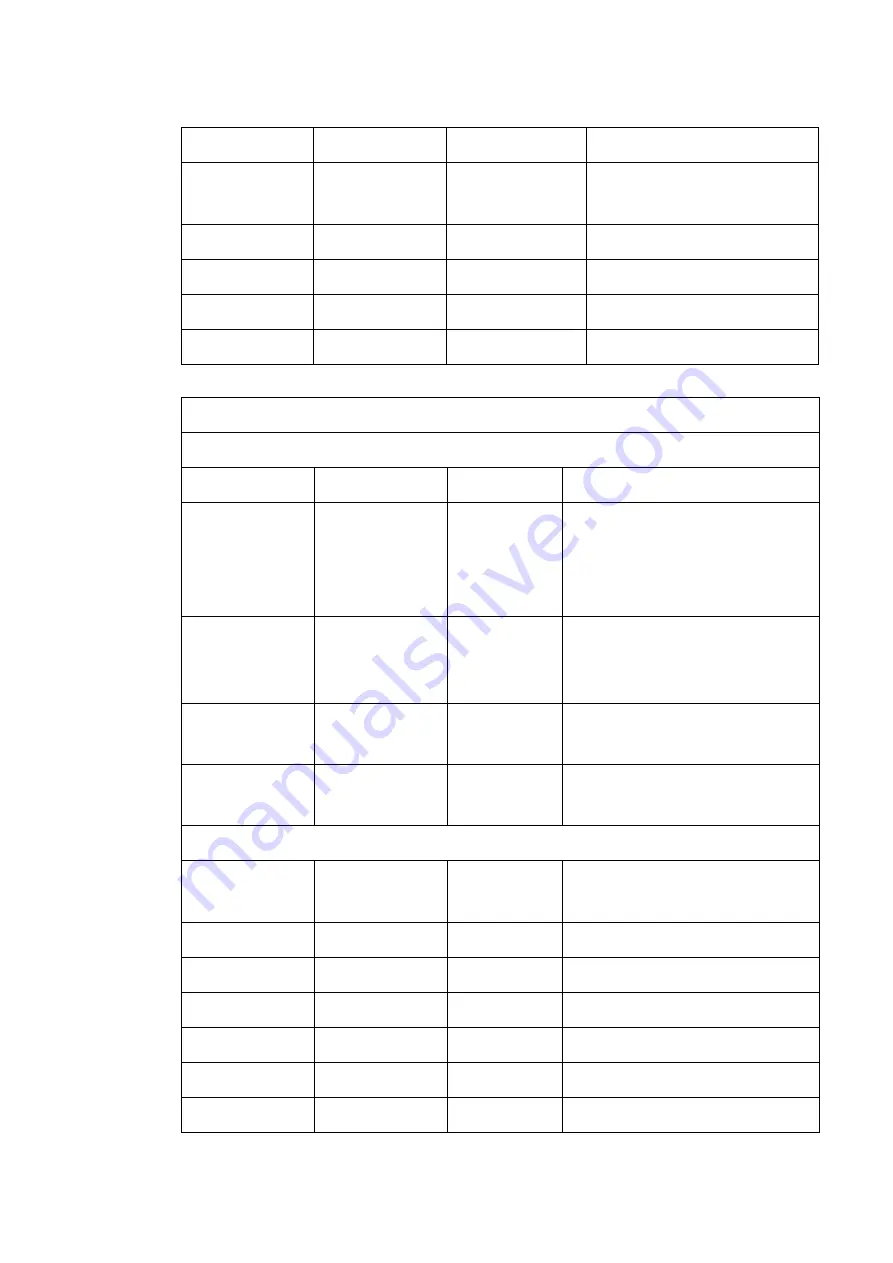
Table 2. Access to Operating Parameters

PSL

0

0

Protocol Selection

Adr

1

1

Controller Address, selec-

tion upto 99

bPS

9600

9600

Baud Rate

Pr 1

EVN

EVN

Parity (even)

StP

1

1

Stop Bit

dLn

8

8

Data Length.

Press and Hold SET/ENT for three second

Press SET/ENT to view each parameter, Arrows to select values.

Parameter

°C Value

°F Value

Description

node

rES

rES

Operation Mode: reset (no 

output) 

rUn, running the program; 

LCL, local (single setpoint)

PrG

0

0

Program access, select 

“1”and SET/ENT to enter 

menu

£ HoLd

oFF

oFF

Program hold mode: on to 

suspend program time

£ AdV

oFF

oFF

Program advance mode: to 

skip the current segment

£ Parameter and value only displayed while program is running

LSP

0 to 1200

32 to 2192 

Local Setpoint: selectable 

through equipment range

CtL

Pid

Pid

Control Mode

At

oFF

oFF

Auto Tuning

P

26

47

Proportional Band

I

73

73

Integral Time

d

18

18

Derivatives Time

Ct

1

1

Heat Cycle Time

Summary of Contents for CC58114PBC

Page 1: ......

Page 2: ...MA 02454 USA Thermo Fisher Scientific Inc provides this document to its customers with a product purchase to use in the product operation This document is copyright protected and any reproduction of the whole or any part of this document is strictly prohibited except with the written authorization of Thermo Fisher Scientific Inc The contents of this document are subject to change without notice Al...

Page 3: ...ower Wiring Procedure 4 4 Thermocouple Wiring Installation 4 5 Chapter 5 Initial Start Up 5 1 Chapter 6 Operation UT150 Controller UP150 Controller Overview 6 2 Single Setpoint Operation 6 7 Programming Operation Entering a Program 6 8 Usinh the Hold Function 6 13 Using the Advance Function 6 14 Auto Tuning UP150 Controller 6 15 Temperature Offset Procedure 6 15 Changing Temperature Scale Between ...

Page 4: ...ss Temperature Setpoint 8 2 Hysteresis 8 2 Excess Temperature Controller Operation 8 2 Chapter 9 Maintenance TemperatureController Replacement 9 1 Replacing the controller 9 1 Solid State Relay SSR Replacement 9 2 Chapter 10 Troubleshooting 10 1 Chapter 11 Replacement Parts 11 1 Chapter 12 Error Codes 12 1 Chapter 13 WEEE Compliance 13 1 Chapter 14 Spare Parts and Accessories 14 1 Chapter 15 Devic...

Page 5: ...nace and Control Console Connections Diagram 4 1 Figure 2 Furnace Thermocouple Connection Single and Double Controller 4 4 Figure 3 UT150 Control Panel 6 1 Figure 4 Ramp and Dwell Graph 6 11 Figure 5 Wiring Diagram 11 3 List of Figures ...

Page 6: ...List of Figures ii Thermo Scientific ...

Page 7: ...lines and the corresponding technical rules issued by the operator shall be used to create written procedures targeted at personnel working with the subject matter device detailing The decontamination measures to be employed for the Control Consoles and the accessories used with it The safety precautions to be taken when processing specific agents The measures to be taken in case of accidents Repa...

Page 8: ...verheated and start on fire causing personal injury or death product and property damage Do not modify or disconnect any safety features provided Disconnection of the unit safety features could allow the unit to become overheated and start on fire causing personal injury or death product and property damage Do not use components or materials not specifically designed for this equipment Failure to ...

Page 9: ...is valid from the date of delivery of the Control Consoles to the customer Explanation of Safety Information and Symbols Safety Notes and Symbols Used Throughout These Operating Instructions Additional symbols for safety information Indicates a hazardous situation which if not avoided will result in death or serious injuries Indicates a hazardous situation which if not avoided could result in deat...

Page 10: ...ectives The Control Consoles complies with the following standards and guidelines Current Approved Agency standards Underwriters Laboratory CSA CE Harmful liquids Electrical shock Hot surfaces Fire hazard Explosion hazard Suffocation hazard Biological hazard Contamination hazard ...

Page 11: ...ogrammer and featuring an Over Temperature Protection OTP system Each console is equipped with a solid state power module power contactor for OTP panel mounted circuit breaker and polarized thermocouple jack s B models also include Over Temperature Control OTC by an independent digital controller The consoles are designed to operate Thermo Fisher 1200 C laboratory box tube and crucible furnaces ...

Page 12: ...Introduction 2 2 Thermo Scientific ...

Page 13: ...amage keep the packing materials and immediately report the damage to the carrier We will assist you with your claim if requested Do not return goods to Thermo Fisher Scientific without written authorization When submitting a claim for shipping damage request that the carrier inspect the shipping container and equipment ...

Page 14: ...Unpacking 3 2 Thermo Scientific ...

Page 15: ...he customer is to provide a main power disconnect switch or circuit breaker and correctly sized power and ground wires according to local electrical codes The wiring should correspond with those carrying similar loads built into the console Improper operation of the control console could result in dangerous conditions To preclude hazard and minimize risk follow all instructions and operate within ...

Page 16: ...nge for a trained electrician to make the electrical connections to the control console from the building s electrical supply and connections between the control console and the furnace The connecting electrical wire materials are provided by the owner or electrician Some furnaces recommend a high temperature insulation on the connecting wires These can be purchased locally or from the factory par...

Page 17: ...trical supply power from the building and switch this power to the furnace heaters as needed to maintain a selected temperature setpoint A feature in some control consoles is a second controller which operates as a high temperature limit device intending to turn of the electrical power to the heaters if the measured temperature exceeds a selected threshold This High Temperature Limit circuitry req...

Page 18: ...ired the bushings may be removed and the holes used to mount a standard 1 2 electrical conduit connector Insert the power and ground wires through one of the bushings Connect the black wire to terminal L1 the white wire to terminal L2 and the green wire to the ground bar The second bushing is used for the wiring to the furnace These control consoles can be used in conjunction with a large number o...

Page 19: ...Installation Thermocouple Wiring Installation Thermo Scientific 4 5 Thermocouple Wiring Installation Insert the thermocouple plug into the thermocouple jack on the console rear panel ...

Page 20: ...Installation Thermocouple Wiring Installation 4 6 Thermo Scientific ...

Page 21: ...rature controller s before attempting to operate the furnace for the first time Examine the appropriate installation operation instructions for the controller s that are included with the control console Refer to the separate furnace instruction manual for initial heat up time and temperature recommendations ...

Page 22: ...Initial Start up 5 2 Heratherm Thermo Scientific ...

Page 23: ...ications Occasionally it may be advisable to configure the temperature controller differently to suit a particular working environment or process Before reconfiguring the controller read this chapter and the UT150 operation manual Reconfiguring the controller can change the unit characteristics and design parameters which can hamper performance and make the equipment dangerous to use ...

Page 24: ...ize the heating equipment until the entire sequence is complete The Temperature Controller senses the chamber air temperature of the furnace the PV or process value and supplies the heat necessary to achieve the desired setpoint The controller includes an LED display and a push button keypad Refer to Table 1 and Table 2 for lists of displayed parameters and keypad functions Table 1 UP150 Parameter...

Page 25: ...SET ENT button for three seconds Press and release SET ENT button to display LOC Verify LOC has a value of 0 If not 0 select 0 with DOWN button press SET ENT At LOC press DOWN button to select 1 then SET ENT Press SET ENT to view each parameter ARROWS to select values Parameter C Value F Value Description In 14 44 Input Type PL2 T C SPH 1200 2192 High Setpoint Limit SPL 0 0 32 Low Setpoint Limit t...

Page 26: ...ter C Value F Value Description node rES rES Operation Mode reset no output rUn running the program LCL local single setpoint PrG 0 0 Program access select 1 and SET ENT to enter menu HoLd oFF oFF Program hold mode on to suspend program time AdV oFF oFF Program advance mode to skip the current segment Parameter and value only displayed while program is running LSP 0 to 1200 32 to 2192 Local Setpoi...

Page 27: ...s and release SETIENT to display PrG At PrG press UP button to select 1 then SET ENT Press SET ENT to view each parameter ARROWS to select values Parameter C Value F Value Description SSP 25 0 77 Start setpoint for programming StC 0 0 Start code program starts with SSP value 1 Program starts with current measured temperature 2 Program targets first setpoint SP1 ø ø Target setpoint 1 Variable value...

Page 28: ... last operated target setpoint 2 Repeats the program continuously 3 At end of program reverts to local setpoint utZ oFF oFF Wait zone oFF disabled 1 to 39 1 to 247 Range of temperature delta allowed at end of segment Exit Press and hold SET ENT button for three seconds Button Function Pressing and holding the SET ENT for three second advances the display to the Operation Parameters Menu While in t...

Page 29: ...m Setpoint value is displayed as A1 6 Select an alarm setpoint 10 C above greater than the target setpoint to be selected 7 Press and release the SET ENT button to select this new value in the controller memory 8 Press and HOLD for three seconds the SET ENT button to exit this menu Accessing Local Mode 1 Press and hold for three seconds the SET ENT button to display modE rES 2 Press and release th...

Page 30: ...will register setpoint value changes until these values are changed again Exiting Local Mode To exit Single Setpoint or Local Mode and turn off the energy to the heater 1 Press and bold for three seconds the SET ENT button to display modE LCL 2 Press and release the DOWN button twice to select the display modE rES 3 Press and release the SET ENT button once to select the display modE rES Reset Mod...

Page 31: ...the programming menu Entering program Parameters The first display is the Start Set Point parameter shown as SSP in the upper display The value assigned to SSP is usually the current room temperature 25 C On the next page is an illustration of the program profile and a table of the parameters entered Basic Ramp and Dwell Parameters 1 Use the arrow buttons to select 25 in the below SSP display then...

Page 32: ...point value desires in the chamber Select this target temperature setpoint with the arrow buttons and press and release the SET ENT button twice to enter this value and release the SET ENT button twice to enter this value and advance to the tM3 display If this value is correct and not changed press and release the SET ENT button once to advance to the tM3 display 8 tM3 represents the third time pe...

Page 33: ...lue and advance to the JC display or if the value is correct press the SET ENT button five times to advance to the JC display 15 For the parameter displayed as JC select 1 with the arrow buttons then press and release the SET ENT button twice to display WTZ Selecting the value of 1 will cause the program to hold the setpoint at this last segment A value of 0 would cause the program to reset and st...

Page 34: ...et temperature This hold indicator is caused by the JC selection of 1 while the JC selections of 2 or 3 will not illuminate the HLD hold indicator Parameter Values Meaning PrG 0 Enters program menu SSP 25 Start Setpoint StC 1 Start Code SP1 Segment 1 Setpoint Tm1 Line length for Segment 1 SP2 Segment 2 Setpoint Tm2 Line length for Segment 2 SP3 Segment 3 Setpoint TM3 Line length for Segment 3 SP4 ...

Page 35: ...ppears in the lower display 3 Press the SET ENT key to accept 4 Press and hold the SET ENT key again to return to the normal display To stop the hold mode Press and hold the SET ENT key for 3 seconds noDE will appear in the upper display Press SET ENT key to Hold Press the arrowdown key so that OFF with flashing decimal appears in the lower display Press the SET ENT key to accept Press and hold th...

Page 36: ...inated press and hold the SET ENT button until the display shows mode Select Res in the lower display with the arrow buttons Press and release the SET ENT button once 2 Press the SET ENT button for 3 seconds to display mode in the upper display and rES in the lower display Press and release SET ENT repeatedly to display LoC Make sure the value below LoC is 0 zero If it is not 0 use DOWN arrow to s...

Page 37: ... SET ENT button once to enter the auto tune mode and exit the Operating Parameters menu 7 The controller will cycle three times through a heating and cooling pattern measuring the characteristics of the load and chamber temperature controls During the auto tuning At will alternately flash with the measured temperature PV display to indicate that the auto tuning progress The length of time for the ...

Page 38: ...et value 6 Allocate the offset value and select with the arrow buttons that is needed to make this controller display correctly For example if the independent measurement is 553 C the controller Temperature measurement display shows 550 C and the current controller offset bS is 2 then make controller display offset 1 3 needed offset 2 current offset 1 new offset 7 Press and release the SET ENT but...

Page 39: ...teps 7 Select the appropriate value for the In parameter Press the UP or DOWN arrow buttons to make the lower display to the new value then press and release the SET ENT button TWICE to register the new value and advance to the next parameter 8 SPH is the next parameter displayed Select and enter the new value then press and release the SET ENT button TWICE 9 SPL is the next parameter displayed Se...

Page 40: ...le Between C and F 6 18 Thermo Scientific The P I D parameters may be altered through auto tuning refer to Section Auto Tuning the UP150 Controller Chapter UT150 Controller Operation Parameter C F In 8 38 SPH 1500 2732 SPL 0 32 P 50 80 I 240 240 D 60 60 ...

Page 41: ... the unit and PC 2 Connect the cable end with a black housing to the 9 pin port on the rear of the Thermo Fisher Scientific 3 Connect the other cable end with the RS 232 485 Converter to the COM 1 Port or other COM port of your choice on the rear of the PC 4 If you have purchased the Spec View Plus Communication Software with the copy protection key install this key on your parallel port It may be...

Page 42: ...n it for another 20 minute segment 4 When the Configuration Founds windows opens click on the Test Comms for New Config Button 5 The Input Required window then opens Enter a new Config Name up to 8 characters with no spaces or accept the DEFAULT name Click OK 6 The Port and Protocol window opens next On the COM1 line if the COM1 port is the serial port used to connect to the port controller select...

Page 43: ...onnection or power to the control may have been interrupted 12 On some controllers the decimal point position has been changed from the YOKOGAWA factory default This will make the SecView display differ from the controller If this is the case follow the instructions in Section Decimal Point Adjustment Communications Test When you have established a working communications link between the controlle...

Page 44: ...t the Variables List icon represented by a page with lines on it 2 Select the controller model number and select Properties button The Add Rename Instrument box appears 3 In the Address window highlight the middle digit usually a 1 and change to 0 zero 4 Click the Rename Only button Close the Variables box click on X in corner of smaller box 5 Select the Enter Runtime icon to see the results of th...

Page 45: ...elease the SET ENT button to access the six parameters specific to the communications option Compare the displayed values to those in Table UT150 Communications Parameters Make adjustments to the Adr parameter as needed 6 Press and hold SET ENT for 3 seconds to exit the Setup Parameters Menu ...

Page 46: ...Communication Option Addresses for Multiple Controllers 7 6 Thermo Scientific ...

Page 47: ...incident Pressing and releasing the SET ENT button once again shows the current temperature measured by the controller in the top display this may differ slightly from the main temperature controller The value shown in the bottom display is the current excess temperature setpoint Pressing and releasing the SET ENT button again cycles back to the first display of the SET OUT in the lower display Ex...

Page 48: ...Exit the Operating Parameters by holding the SET ENT button for three seconds Excess Temperature Controller Operation After the Excess Temperature Stipend and Hysteresis values are selected the controller is ready for operation The stipend and hysteresis should be reviewed and adjusted if necessary when the main controller stipend is changed During an excess temperature incident the EXCEEDED and O...

Page 49: ...xceeded Temperature will be lost In some instance the OUT indicator is illuminated without a high temperature event In this Tripped Out Mode the power to the heating element is interrupted A sensor failure indicated with b o in the upper display will cause OUT illuminated A power failure in some instances causes OUT to be illuminated As soon as the EXCEEDED in the indicator is extinguished the UT1...

Page 50: ...Excess Temperature Option Excess Temperature Controller Operation 8 4 Thermo Scientific ...

Page 51: ...the control console side panels 3 Disconnect the wires from the back of sleeve label the wires for reinstallation 4 Using your fingers or a screwdriver unhook the two retaining clips from the slots in the sides of the sleeve 5 Slide the sleeve out of the front of the panel To reinstall the controller reverse the above procedure Maintenance should only be performed by trained personnel Disconnect c...

Page 52: ... the control console side panels The SSR s are mounted on the inside surface of the back panel 2 Disconnect the wires from the SSR label the wires for reinstallation 3 Undo the two screws holding the SSR to the rear panel and remove the SSR To install the new SSR reverse the above procedure Smear a thin layer of heat sink paste under the new SSR before fitting ...

Page 53: ...eads ooo PV exceed effective range Check the input type and range set tings and correct them Controller reads UUU PV is below effective range Check the input type and range set tings and correct them Controller reads Err Probable hardware failure Call Service for controller repair The controller displays do not illuminate The furnace Is not con nected to the power Check furnace connection to power...

Page 54: ...lear the area around the base Poor ventilation base Clear the area around the base Inlet and or exhaust vents are open Close vents Inadequate tuning values Auto tune the controller Insufficient stabilization time Allow load ample time to reach equilib rium Intermittent failure of switch controller limit switch or wiring Verify wiring connection Temperature Offset Controller degradation and or sens...

Page 55: ...em CC58114PA 1 CC58114PBA 1 T C Leadwire 33940 006 3 feet 6 feet T C Jack 33931 002 1 2 Wire Harness 38850G25 1 1 Control Fuse 104828 2 2 Main breaker 302795H07 1 1 Heater Fuse 32657 004 1 1 Heater Solid State Relay 102460 1 1 Contactor E02F 2 2 1 1 Controller 303115H03 1 1 Over Temp Con trol 303115H05 0 1 Operation Manul 304245H01 1 1 Wiring Diagram 304244l01 1 1 ...

Page 56: ...C Leadwire 33940 006 3 feet 6 feet T C Jack 33931 002 1 2 Wire Harness 38850G25 1 1 Control Fuse 104828 2 2 Main breaker 302795H07 1 1 Heater Fuse 32657 004 1 1 Heater Solid State Relay 102460 1 1 Contactor 300088H01 1 1 Controller 303115H03 1 1 Over TempControl 303115H05 0 1 Operation Manul 304245H01 1 1 Wiring Diagram 304244l01 1 1 ...

Page 57: ...Replacement Parts Thermo Scientific Heratherm 11 3 Figure 5 Wiring Diagram ...

Page 58: ...Replacement Parts 11 4 Heratherm Thermo Scientific ...

Page 59: ...Thermo Scientific 12 1 12 Error Codes This chapter is not applicable ...

Page 60: ...Error Codes 12 2 Thermo Scientific ...

Page 61: ...fizieren die unter diese RoHS Anweisung fillen finden Sie unter www thermo com WEEERoHS Italia Questo prodotto deve risponderealla direttiva dell unione Europea 2002 96EC in merito ai Rifiuti degli Apparecchi Elettrici ed Elearonici WEEE k marcato col seguente simbolo Thermo Scientific ha stipulate contratti con una o diverse societi di ricicliggio smdtimento in ognuno degli Stati Membri Europei Q...

Page 62: ...WEEE Compliance 13 2 Thermo Scientific ...

Page 63: ...Thermo Scientific 14 1 14 14 Spare Parts and Accessories This chapter is not applicable ...

Page 64: ...Spare Parts and Accessories 14 2 Thermo Scientific ...

Page 65: ...Thermo Scientific 15 1 15 Device Log Control Consoles Part number Serial number Service number Location Operator s note Work carried out Notes Date Signed ...

Page 66: ...Device Log 15 2 Thermo Scientific ...

Page 67: ... 112114 Email info labequipment de thermofisher com Enquiries from Europe Middle East and Africa Phone 49 0 6184 90 6940 Fax 49 0 6184 90 6772 E Mail info labequipment de thermofisher com Postal address USA Thermo Scientific 275 Aiken Road Asheville NC 28804 USA Enquiries from North America Phone 1 800 879 7767 Fax 1 828 658 0363 E Mail info l abequipment thermofisher com Enquiries from Latin Amer...

Page 68: ...Contact 16 2 Thermo Scientific Enquiries from Asia Pacific Phone 852 2711 3910 Fax 852 2711 3858 E Mail info labequipment thermofisher com ...

Reviews: