Models 3940 and 3949 ________________________________________________________________Installation and Set-Up
2 - 3
2.7 Setting the Undertemp Safety Thermostat
Allow the chamber temperature and humidity to stabilize,
then set the undertemp safety thermostat as follows:
1. Turn the undertemp control knob slowly clockwise until
the audible alarm sounds and the undertemp indicator
lights.
2. Turn the undertemp control knob counterclockwise
approximately two units on the scale. The alarm should
be silenced and the undertemp indicator light should go
out.
The undertemp safety thermostat is now set a few degrees
below the control temperature setpoint. When the chamber tem-
perature drops to the undertemp control point, the alarm system
will activate, power to the compressor will shut off, and the
chamber temperature will be maintained at the undertemp con-
trol point.
When an undertemp condition occurs, the cause must be
determined and corrected before normal operation under the
main temperature controller can be resumed.
Note:
When the chamber temperature control setpoint is
changed, the undertemp safety thermostat must be reset to
accommodate the change.
2.8 Preparing the (Optional) CoBex Recorder
a. Installing the Battery
The seven-day circular chart recorder is located on the
front of the incubator cabinet and is protected by a glass door.
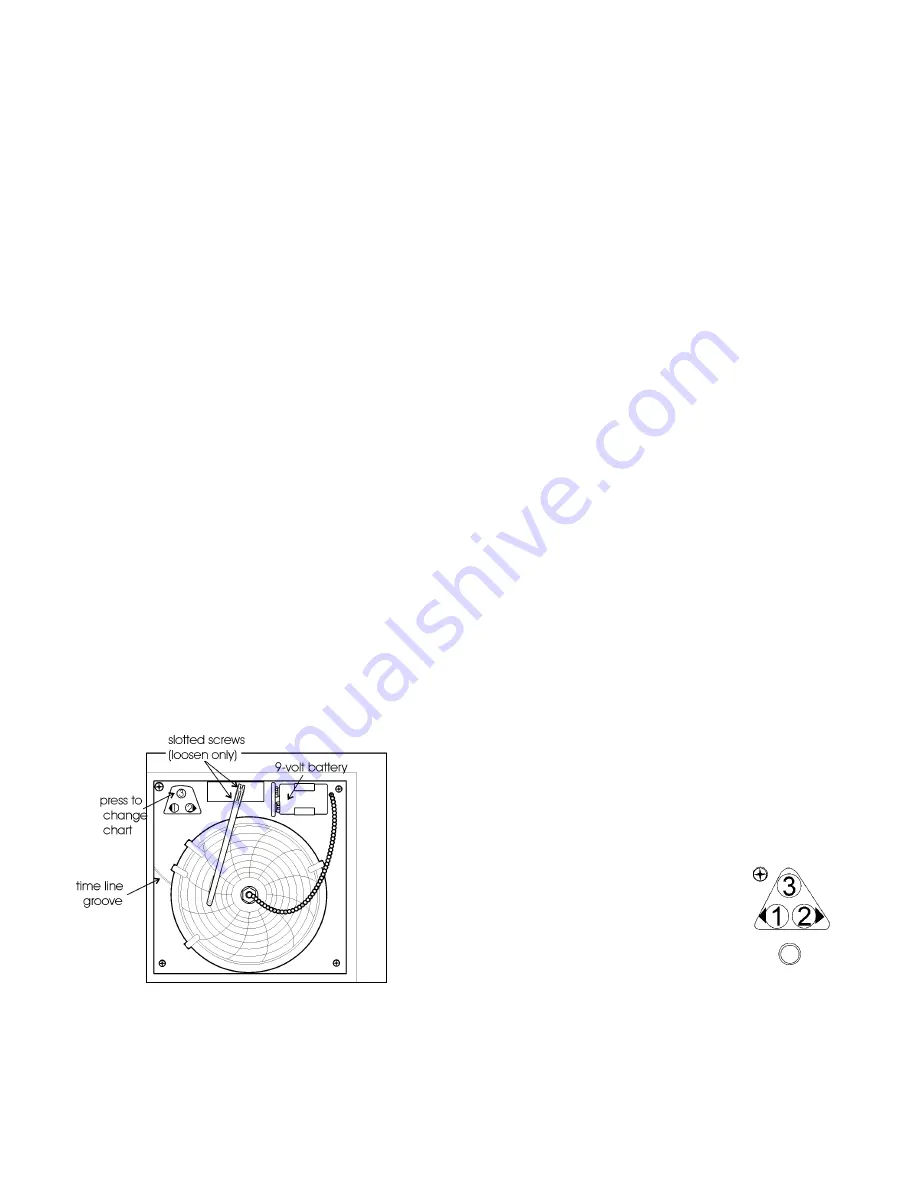
Figure 2-3
To prepare the recorder for operation, open the glass door
and snap the connector onto the 9-volt battery as shown in
Figure 2-3. If the unit is operating, the green LED lights steady.
If the unit is not turned on, the LED blinks.
If the battery is weak or not connected, the green LED will
flash. If power is lost to the cabinet, the LED will also flash.
When replacing the 9-volt battery, use only an alkaline style
battery. Dispose of the old battery following established envi-
ronmental practices.
b. Changing the Chart Paper
1. Press the Change Chart button (#3) and hold it for 1 sec-
ond until the pen begins to move to the left of the chart.
See Figure 2-3.
2. Remove the existing chart by unscrewing the center
knob securing it.
3. Install the new chart, positioning it so that the correct
time line coincides with the time line groove on the
chart plate.
4. Replace the center knob and screw it tightly against the
chart.
c. Changing the Pen
1. Using a small flat blade screwdriver, loosen the 2 screws
holding the pen arm and remove the pen and arm as an
assembly.
2. Unsnap the plastic hinge securing the pen. Remove and
discard the old pen.
3. Install the new pen by snapping the hinge securely
around the pen arm.
4. Re-install the pen assembly by sliding the pen arm under
the screws, positioning the pen tip in the time line
groove. Tighten the screws.
5. Push the Chart Change button and hold it for 1 second
until the pen begins to move back onto the chart.
Note
: Make sure that the pen is marking on the chart. It may
be necessary to gently lift the pen onto the chart paper.
d. Calibrating the Chart Recorder
Place an accurate thermometer(s)
in the chamber next to the recorder’s
probe(s). After about three minutes,
compare the thermometer with the chart
recorder. For 2 pen operations, also
compare the second thermometer.
Note:
For 2 pen operations, first select
the pen you wish to calibrate. Hold
down the #1 arrow for the red (#1) pen
or the #2 arrow for the blue (#2) pen, until the light goes out.
Refer to Figure 2-4. Then adjust as necessary.
If an adjustment is necessary, press either the #1 or #2 but-
ton to move the pen left or right. The button must be held
about five seconds before the pen begins to move. Release the
button when the pen matches the thermometer.
Figure 2-4


