background image

RCS100 series

3.Q&A

General


Questions:

Technical Questions:

Q1. Does Xpressar™ RCS100 need maintenance?

Ans. Under regular operation, Xpressar™ RCS100 has three year warranty for the case and 

         two years on the cooling module. And the cooling module is maintenance-free 

         (No re-filled needed).

Q2. Can Xpressar™ RCS100 operate 24hours non-stop?

Ans. Yes, Xpressar™ RCS100’s compressor has been tested in labs, it can run 24hours 

         non-stop without problem.

Q3. Does Xpressar™ RCS100 makes loud noise?

Ans. Xpressar™ RCS100 does not make much noise when it’s operating; its acoustic is 

         even lower then air-cooling fans.

Q4. Does system build with Xpressar™ RCS100 guaranteed overclock above 4Ghz?

Ans. The overclock range is determined by CPU and other hardware, Xpressar™ RCS100 

         provides optimal thermal solution, helps CPU operate in very low temperature.

Q5. Does Xpressar™ RCS100 system can operate constantly after overclocking?

Ans. Xpressar™ RCS100 provides optimal thermal solution for best overclocking platform.

         If the CPU’s temperature is keeping below 40 degrees, the system can 

         operate normally.

Q6. Will Xpressar™ RCS100 damage your motherboard or VGA because of the condensation?

Ans. The Xpressar™ RCS100's copper tube has covered with isolation materials to isolate 


the damp in contact with the copper tube. And the DC Inverter compressor has 


build-in intelligent IC controller, it can adjust rotating speed according to CPU loading.

Q1. How much power the compressor consumes?

Ans. The compressor consumes 50 watts maximum.

Q2. Can the compressor operate normally in horizontal orientation?

Ans. No, while the compressor operates, put it down to horizontal orientation will damage 

         its internal structure; the compressor should be always kept in vertical orientation 

         while operates (i.e. Keep Xpressar™ RCS100 vertically while operates).

Q3. What kind of refrigerant does Xpressar™ RCS100 use?

Ans. The Xpressar™ RCS100 uses R134a refrigerant, it is industry standard and widely 

         used in vehicles & household conditioning.

33

32

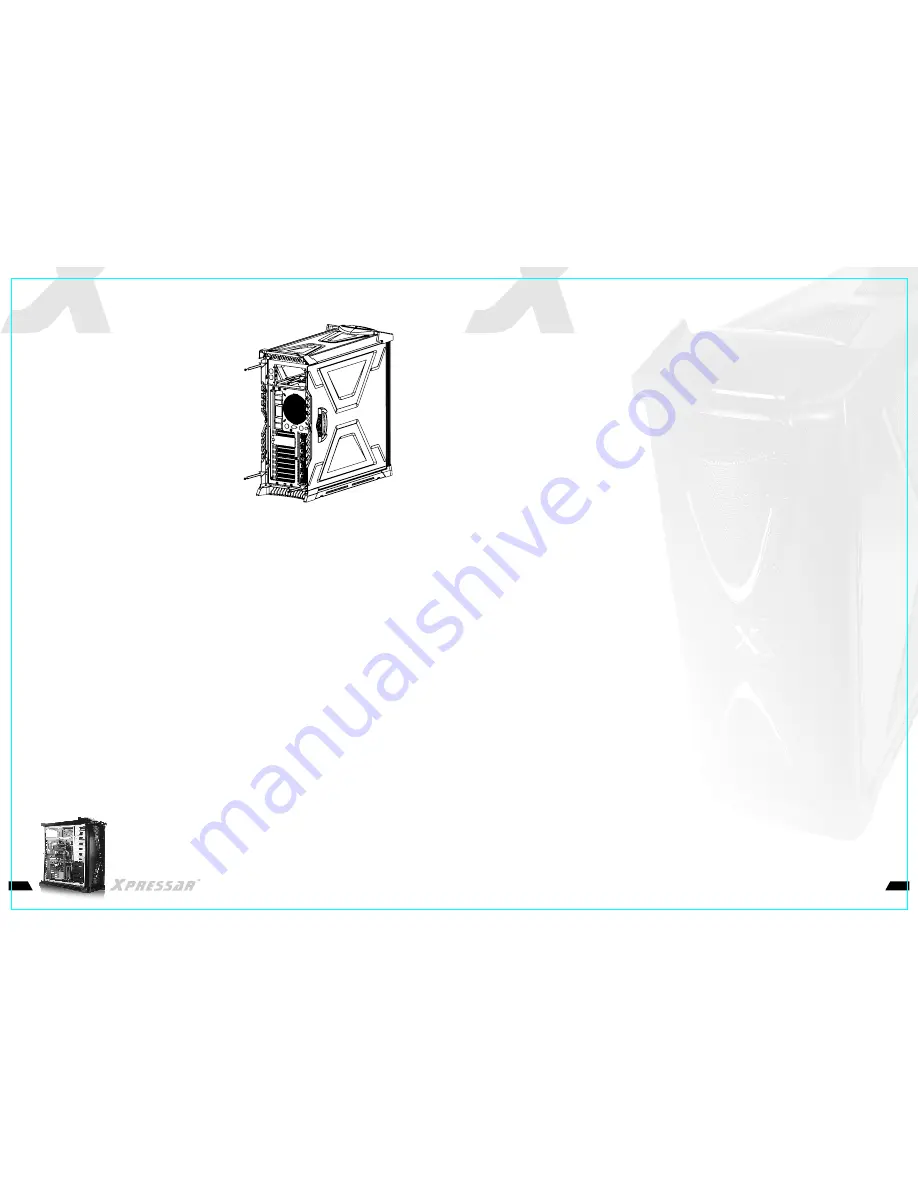
English /

Screw the four (4) fastening screws 
into the bilateral side plates.

Deutsche /

Ziehen Sie die (4) Befestigungsschrauben 
in den Seitenabdeckungen auf 
beiden Seiten fest.

Français /

Vissez les 4 vis de fixation dans les 
plaques de côté bilatérales.

Español /

Atornille los cuatro (4) tornillos de 
sujeción en las placas laterales.

Italiano /

Avvitare le quattro (4) viti di fissaggio 
nelle piastre bilaterali.

/

繁體中文 

鎖合兩側側板的鎖固螺絲(4顆)。

/

日本語 /

日本語 /
両側の側板を4つの締め付け
ねじで締めます。

Русский /

Русский /
Присоедините двухсторонние 
платы, используя четыре (4) 
крепёжных винта.

简体中文 /

简体中文 /

锁合两侧侧板的锁固螺丝(4颗)。

Türkçe


/

Dört (4) s

ı

k

ı

ştırma vidasını çift 

taraflı yan plakalara takın.

Step25

VG40031N2Z_XPRESSAR RCS100_A08091001

Summary of Contents for xpressar rcs100 series

Page 1: ...e companies www thermaltake com User s Manual Benutzerhandbuch Mode d emploi Manual del usuario Manuale dell utente 安裝說明書 用戶手冊 ユーザーズマニュアル Руководство пользователя kullanıcı elkitabı Tested To Comply With FCC Standards FOR HOME OR OFFICE USE World s First DC Inverter Type Micro Refrigeration Cooling System BK00067 VG40031N2Z_XPRESSAR RCS100_A08091001 ...

Page 2: ...lity and efficiency of the products specified in the manual made to the product without prior written consent from Thermaltake is not within the scope of this warranty Abnormal noises caused by the wear of structural components in fans after 12 months of use are not within the scope of warranty Use of modulized wires provided by other manufactures is not warranted Using the Y cable to increase con...

Page 3: ... 7 1 Convertable from one 5 25 drive bay 5 e SATA connector x 2 USB2 0 x 4 IEEE 1394 Firewire x 1 HD Audio 10 Refrigeration Cooling System Performance condenser A Dimension of condenser h 134 x W 120 x T 47 mm B 120mm blue LED silent fan 1600 RPM Micro compressor A Type DC Inverter Type Rotary Compressor B Operating voltage DC 12V C Speed Controlled Type PWM D Connector 4 pins E Power Consumption ...

Page 4: ...uideline Motherboard Guideline 50 2 9 3 61 7 3 9 113 95 95 110 2 20 8 Recommended LGA775 CPU Keepout Zone Recommended LGA1366 CPU Keepout Zone LGA775 CPU Keepout Zone LGA1366 CPU Keepout Zone TM for Xpressar RCS100 TM for Xpressar RCS100 Allowable LGA775 CPU Keepout Zone Allowable LGA1366 CPU Keepout Zone Standard ATX M B Standard ATX M B I O I O 02 104 4 8 61 7 49 7 16 8 115 2 104 104 12 6 1 2 Co...

Page 5: ...tare le quattro 4 viti di fissaggio da entrambe le piastre bilaterali 繁體中文 拆除兩側側板的鎖固螺絲 4顆 日本語 日本語 両側の側板から4つの締め付けねじを抜きます Русский Русский Открутите четыре 4 крепёжных винта с двухсторонних плат 简体中文 简体中文 拆除两侧侧板的锁固螺丝 4颗 Türkçe Çift taraflı yan plakalara takılı dört 4 sıkıştırma vidasını sökün 04 05 50mm screws x4 Intel LGA775 P4 478 LGA1366 AMD AM2 K8 Thumb nuts x4 A Cushion x1 B Metal H type clip x2...

Page 6: ...protective pad is needed on the top Deutsche Entfernen Sie die Seitenabdeckungen auf beiden Seiten Legen Sie das Gehäuse hin ein passender Schutz wird für die Oberseite benötigt Français Retirez les plaques de côté bilatérales Mettez à plat le boîtier un coussinet de protection est nécessaire sur le haut Español Extraiga las placas laterales Tumbe la caja use una alfombrilla protectora en la super...

Page 7: ...crew the four 4 fastening screws connecting the bottom of the frame and the heating module Deutsche Entfernen Sie die vier 4 Befestigungsschrauben welche die Unterseite des Rahmens und das Heizungsmodul verbinden Français Dévissez les 4 vis de fixation connectant le bas du cadre et le module de chauffage Español Desatornille los cuatro 4 tornillos de sujeción que conectan el fondo del armazón y el...

Page 8: ...e Entfernen Sie die vier 4 Befestigungsschrauben welche die Unterseite des Heizungsmoduls und die Wanne der Hauptplatine verbinden Français Dévissez les 4 vis de fixation connectant le module de chauffage et le plateau de la carte mère Español Desatornille los cuatro 4 tornillos de sujeción que conectan el disipador y la bandeja de la placa madre Italiano Svitare le quattro 4 viti di fissaggio col...

Page 9: ...si ayarlayın Step9 1 LGA775 13 12 G B C A F I English Set the bolts into the appropriate holes on the motherboard tray Deutsche Setzen Sie die Schrauben in den entsprechenden Löchern der Wanne für die Hauptplatine an Français Placez les boulons dans les trous appropriés sur le plateau de la carte mère Español Ponga los pasadores en sus correspondientes agujeros en la bandeja de la placa madre Ital...

Page 10: ...除主机板托盘上多于的挡板 Türkçe Ana kart tepsisindeki kullanılmayan bölmeleri çıkarın Step10 15 14 English Set the clip at the back of the LGA1366 motherboard Deutsche Befestigen Sie den Clip auf der Rückseite der LGA1366 Hauptplatine Français Mettez le clip au dos du la carte mère LGA1366 Español Ajuste el clip en la parte trasera de la placa madre LGA1366 Italiano Fissare la clip nella parte posteriore dell...

Page 11: ...инающее устройство и др 简体中文 简体中文 安装相关配件 CPU 显示卡 Memory等 Türkçe Ana kartı ve aksesuarları CPU ekran kartı bellek vb yerleştirin Step12 17 16 English Position the motherboard and lock it into the motherboard tray Deutsche Positionieren Sie die Hauptplatine und befestigen Sie sie an der Wanne der Hauptplatine Français Positionnez la carte mère et verrouillez la dans le plateau de carte mère Español ...

Page 12: ...aliano Rimuovere il materiale di confezionamento dal modulo di riscaldamento Step14 19 18 English Apply thermal grease evenly onto the CPU Deutsche Bringen Sie gleichmäßig Thermalpaste auf die CPU auf Français Appliquez de la pâte thermique en la répartissant sur le microprocesseur Español Aplique pasta térmica uniformemente sobre la CPU Italiano Applicare il grasso termico soltanto sulla CPU 繁體中文...

Page 13: ...上扣具並調整冷卻頭位置 日本語 日本語 クリップを配置し 冷却ブロック の位置を調整します Русский Русский Вставьте зажим и отрегулируйте положение охлаждающего блока 简体中文 简体中文 放上扣具并调整冷却头位置 Türkçe Klipsi yerleştirin ve soğutma blokunun konumunu ayarlayın Step16 1 LGA775 21 20 H D English Install the heating module Deutsche Installieren Sie das Heizungsmodul Français Installez le module de chauffage Español Instale el disipador Italiano Insta...

Page 14: ...tion of the cooling block Deutsche Platzieren Sie den Clip und passen Sie die Position des Kühlungsblocks an Français Mettez le clip et réglez la position sur le bloc de refroidissement Español Coloque el clip y ajuste la posición del bloque de refrigeración Italiano Posizionare la clip e regolare la posizione del blocco di raffreddamento 繁體中文 放上扣具並調整冷卻頭位置 日本語 日本語 クリップを配置し 冷却ブロック の位置を調整します Русский...

Page 15: ...o e il vano della scheda madre 繁體中文 鎖合散熱模組與主機板托盤的 鎖固螺絲 4顆 日本語 日本語 熱モジュールをマザーボードトレイを 接続している4つの締め付けねじ を締め付けます Русский Русский Закрутите четыре 4 крепёжных винта чтобы присоединить нагревательный модуль к лотку материнской платы 简体中文 简体中文 锁合散热模块与主机板托盘的 锁固螺丝 4颗 Türkçe Isıtma modülünü ana kart tepsisine bağlayan dört 4 sıkıştırma vidasını takın Step18 25 24 English Lock the cooling block Deutsche Befes...

Page 16: ...жных винта в лоток материнской платы 简体中文 简体中文 锁合主机板托盘的锁固螺丝 4颗 Türkçe Dört 4 sıkıştırma vidasını ana kart tepsisine takın Step20 27 26 English Place the motherboard tray back into the case Deutsche Platzieren Sie die Wanne der Hauptplatine wieder im Gehäuse Français Remettez le plateau de la carte mère dans le boîtier Español Coloque la bandeja de la placa madre de nuevo en la caja Italiano Posizi...

Page 17: ...ne sulle superfici della linea comporterà un rischio di corto circuito dei componenti elettronici 繁體中文 連接本系統之變頻控制端子於主機板上 請確保有開啟風扇 轉速控制之功能 否則將造成變頻功能失效 造成壓縮機 持續地維持在最高轉速 在CPU靜置狀態時在管路表面可 能會有凝結水滴產生而造成電子零件短路的風險 日本語 日本語 システムの周波数変換コントロールターミナルをマザー ボードにリンクします ファン速度コントロールが有効に なっていることを確認してください 有効になっていな いと 周波数変換に障害が発生し コンプレッサがその 最高速度で強制的に作動します CPUが作動していない 場合 ライン面に結露が生じ そのため電子部品がショ ートする可能性があります Русский Русский ...

Page 18: ...limentation partagé avec d autres composants électroniques Español Conecte la fuente de alimentación por favor asegúrese de que el sistema está alimentado utilizando un cable de alimentación de 4 pines independiente es decir sin utilizar un cable de alimentación compartido con cualquier otro componente electrónico Italiano Collegare l alimentatore Assicurarsi che il sistema sia accesso mediante un...

Page 19: ...ials to isolate the damp in contact with the copper tube And the DC Inverter compressor has build in intelligent IC controller it can adjust rotating speed according to CPU loading Q1 How much power the compressor consumes Ans The compressor consumes 50 watts maximum Q2 Can the compressor operate normally in horizontal orientation Ans No while the compressor operates put it down to horizontal orie...

Page 20: ...art immediately cause compressor has not turn off during soft reset Q1 Does Xpressar RCS100 support AMD platform Ans At this stage Xpressar RCS100 only support Intel platform Thermaltake is developing AMD platform and is coming soon next year Q2 Does Xpressar RCS100 support Intel coming new LGA1366 platform Ans Yes Xpressar RCS100 series has LGA775 LGA1366 clip inside the package Q3 Is there any l...

Page 21: ...RCS100 series VG40031N2Z_XPRESSAR RCS100_A08091001 ...

Reviews: